
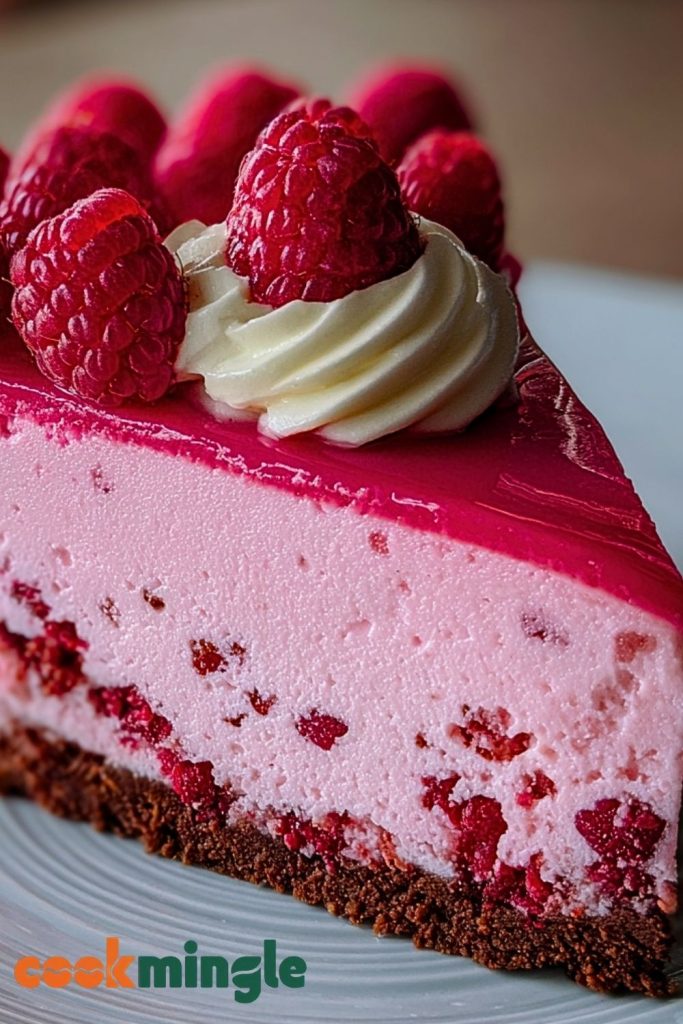
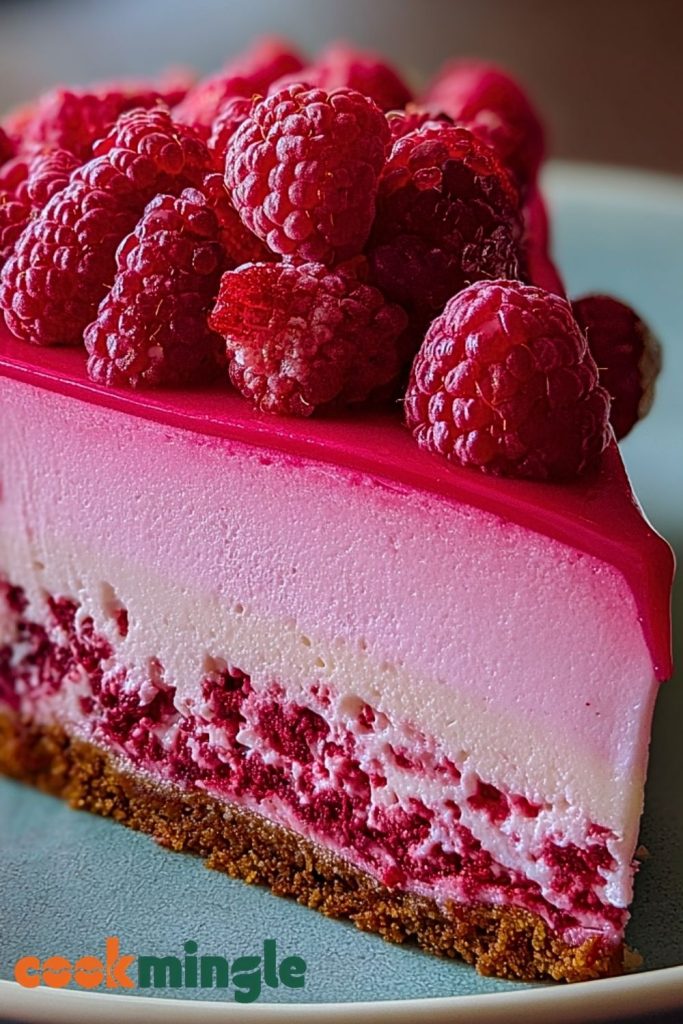
Rich, vibrant, and irresistibly creamy, the Pink Velvet Raspberry Cheesecake is an absolute showstopper that blends elegance with indulgence. With its stunning pink layers, velvety texture, and bursts of tangy raspberry nestled in a crunchy graham cracker crust, this dessert is more than just a pretty slice—it’s a luxurious flavor experience. Topped with whipped cream swirls and fresh raspberries, every bite offers a balance of sweet, tart, and creamy, making it perfect for special occasions or anytime you want to impress.
The visual appeal is just as delightful as the taste. Whether you’re serving this at a bridal shower, birthday, or romantic dinner, this cheesecake demands attention and satisfies every creamy-crunchy-fruity craving. Its no-bake nature makes it approachable even for novice bakers, yet the end result tastes like it came straight from a patisserie.
Why You’ll Love This Pink Velvet Raspberry Cheesecake
- Stunning presentation – Its striking pink layers and elegant finish make it perfect for entertaining.
- Creamy and light – Despite its rich look, the texture is smooth and airy.
- Flavor-balanced – Sweet white chocolate meets tart raspberries for a balanced, unforgettable taste.
- No oven needed – A no-bake filling means minimal fuss and more consistency.
- Perfect make-ahead dessert – It sets beautifully overnight, giving you more time to focus on the event.
Preparation Phase & Tools to Use
Essential Tools and Equipment (and Why You Need Them)
To make a flawless Pink Velvet Raspberry Cheesecake, having the right tools on hand will make all the difference—both in ease and final presentation.
- Springform Pan (9-inch): This is crucial for any cheesecake. It allows for easy removal without damaging the beautiful layers.
- Electric Hand Mixer or Stand Mixer: Needed for whipping the cream cheese and folding in the whipped cream without lumps.
- Food Processor or Blender: To crush the graham crackers evenly for a fine-textured crust.
- Mixing Bowls (various sizes): Multiple bowls will streamline your prep, keeping wet and dry ingredients separate and organized.
- Silicone Spatula: Helps with smooth folding and ensures no air pockets ruin the creamy texture.
- Offset Spatula or Knife: For evenly spreading each cheesecake layer and smoothing the top for a professional finish.
- Measuring Cups and Spoons: Precision is key with cheesecake, especially for setting agents like gelatin.
- Piping Bag (optional): For garnishing the top with whipped cream swirls like a pro.
These tools aren’t just about convenience—they directly impact the texture, layering, and finish of your cheesecake.
Preparation Tips
- Room Temperature Ingredients: Let cream cheese and heavy cream sit out for 20–30 minutes before mixing. This prevents lumps and ensures a silkier filling.
- Chill Your Mixing Bowl: For whipped cream that holds its shape longer, chill the bowl and beaters in the freezer for 10 minutes before whipping.
- Use Real Raspberries: Fresh or frozen raspberries add bright flavor and natural acidity to balance the sweetness.
- Even Layering: After each layer, give the pan a gentle tap on the counter to eliminate air bubbles and settle the filling evenly.
- Plan Ahead: Cheesecake sets best when chilled overnight, so make it a day in advance for ideal texture and flavor meld.
Preparation is half the battle—give this cheesecake the calm, measured process it deserves and it’ll reward you tenfold.
Ingredients for this Pink Velvet Raspberry Cheesecake
Here’s everything you’ll need to create this luscious, eye-catching dessert. Each ingredient plays a key role in taste, texture, or visual appeal.
For the Crust:
- 1 ½ cups graham cracker crumbs
- ¼ cup granulated sugar
- 6 tablespoons unsalted butter, melted
For the Raspberry Layer:
- 1 ½ cups fresh or frozen raspberries (thawed if frozen)
- 2 tablespoons granulated sugar
- 1 tablespoon lemon juice
- 1 tablespoon water
- 1 teaspoon cornstarch
For the Cheesecake Filling:
- 16 oz (2 blocks) cream cheese, softened
- ¾ cup powdered sugar
- 1 teaspoon vanilla extract
- 1 cup heavy whipping cream (chilled)
- 1 packet (about 2 ½ teaspoons) unflavored gelatin
- ¼ cup warm water (for blooming gelatin)
- Pink gel or food coloring (optional, for vibrant color)
For the Topping:
- ¾ cup heavy whipping cream
- 2 tablespoons powdered sugar
- Fresh raspberries, for garnish
- White chocolate curls or pink sprinkles (optional)
These ingredients combine into distinct, creamy layers and bold raspberry flavors with a satisfying crust to balance each bite.
Step 1: Make the Graham Cracker Crust
In a mixing bowl, combine the graham cracker crumbs, granulated sugar, and melted butter. Stir until the mixture resembles wet sand. Press it firmly into the bottom of a 9-inch springform pan using the base of a glass or spoon. Chill in the refrigerator while you prepare the next steps.
Step 2: Prepare the Raspberry Compote
In a small saucepan, combine raspberries, sugar, lemon juice, and water. Cook over medium heat for 5–7 minutes until the berries break down. Stir in cornstarch and simmer for another minute until thickened. Remove from heat and cool completely. You can strain it for a smoother texture or leave it rustic with berry pieces.
Step 3: Bloom the Gelatin
In a small bowl, sprinkle the gelatin over ¼ cup warm water and let it sit for 5 minutes to bloom. Once set, microwave for about 10 seconds to liquefy before adding to the cheesecake filling.
Step 4: Whip the Cream
In a chilled bowl, beat the heavy whipping cream until soft peaks form. Set aside in the fridge. This whipped cream will be folded into the cream cheese mixture to give the cheesecake its light, airy texture.
Step 5: Make the Cheesecake Base
In another large mixing bowl, beat the softened cream cheese until smooth and creamy. Add powdered sugar and vanilla extract, mixing until fully incorporated. Blend in the food coloring until you reach your desired shade of pink. Slowly add the melted gelatin and mix quickly to avoid clumping.
Step 6: Fold in the Whipped Cream
Gently fold the prepared whipped cream into the cream cheese mixture using a spatula. Use slow, smooth motions to keep the filling fluffy.
Step 7: Assemble the Layers
Spread half of the cheesecake filling over the prepared crust. Dollop and swirl half of the raspberry compote on top. Add the remaining cheesecake filling and smooth the top with an offset spatula. Chill for 4–6 hours or preferably overnight.
Step 8: Decorate and Serve
Once fully set, remove the cheesecake from the springform pan. Whip the topping cream with powdered sugar until stiff peaks form. Pipe decorative swirls on top and garnish with fresh raspberries and optional sprinkles or white chocolate curls. Slice with a warm knife for clean cuts.
Notes
- Chill Time Matters: For best texture, let the cheesecake chill overnight. This gives the gelatin time to set and helps the flavors meld.
- Adjust the Sweetness: If your raspberries are very tart, feel free to add an extra tablespoon of sugar to the compote.
- Color Control: Use gel food coloring sparingly. A little goes a long way and keeps the mixture from becoming runny.
Watch Out for These Mistakes While Cooking
- Skipping the Gelatin Step: If you don’t bloom and dissolve the gelatin properly, the cheesecake won’t set well, leading to a runny texture.
- Overmixing the Filling: Be gentle when folding in whipped cream—overmixing can deflate the air and lead to a dense filling.
- Warm Compote in Cold Cheesecake: Always let the raspberry layer cool completely before adding it to avoid melting the base.
- Using Low-Fat Cream Cheese: Full-fat cream cheese gives the best flavor and texture. Low-fat versions can lead to a watery finish.
- Impatient Cutting: Don’t cut the cheesecake before it’s properly chilled—it will fall apart and ruin the presentation.
- Uneven Layering: Take your time smoothing each layer to avoid lopsided slices later.
- Crust Not Pressed Firmly: A loose crust will crumble when sliced. Press down with a flat-bottomed cup for stability.
- Overloading with Garnish: While it’s tempting to pile on the toppings, keep it elegant—too much weight can cause the cheesecake to crack.
What to Serve With Pink Velvet Raspberry Cheesecake?
Pairing this decadent dessert with the right accompaniments can elevate the whole experience. Whether you’re creating a full dessert table or a romantic dinner finish, these options complement the cheesecake beautifully.
8 Recommendations
1. Glass of Sparkling Rosé
The crisp bubbles and subtle sweetness of rosé enhance the fruity raspberry notes and add a celebratory touch.
2. Fresh Mint Tea
A refreshing mint tea helps cleanse the palate and balances the richness of the cheesecake.
3. Vanilla Bean Ice Cream
For an extra indulgent plate, add a small scoop of vanilla bean ice cream—simple yet perfect.
4. Chocolate-Dipped Strawberries
Serve on the side for an added romantic vibe. They visually complement the pink tones and add a rich cocoa bite.
5. Mini Lemon Tartlets
The bright citrus flavors offer contrast and add a bit of tartness to balance the creamy cheesecake.
6. Shortbread Cookies
Buttery and crisp, shortbread offers texture contrast and a classic pairing with berry-forward desserts.
7. Espresso or Cappuccino
Bitter espresso brings out the sweet, tangy layers of the cheesecake and cuts through its richness.
8. Berry Medley Salad
Fresh strawberries, blueberries, and blackberries lightly tossed in honey and mint pair naturally with the cheesecake’s raspberry theme.
These options are not only delicious companions but also bring balance and elegance to your dessert course.
Storage Instructions
Proper storage keeps your Pink Velvet Raspberry Cheesecake looking and tasting fresh for days.
- Refrigerator: Store the cheesecake in an airtight container or cover it tightly with plastic wrap. It will stay fresh for up to 5 days in the fridge. For best texture and flavor, let slices sit at room temperature for about 10 minutes before serving.
- Freezer: Yes, you can freeze it! Slice the cheesecake first, then wrap each piece in plastic wrap and foil. Store in a freezer-safe bag or container for up to 1 month. Thaw in the fridge overnight before serving. Avoid decorating with whipped cream before freezing—add that after thawing for the best look.
Estimated Nutrition (per slice, based on 12 servings)
| Nutrient | Amount |
|---|---|
| Calories | ~385 kcal |
| Protein | 5 g |
| Fat | 27 g |
| Saturated Fat | 17 g |
| Carbohydrates | 30 g |
| Sugar | 20 g |
| Fiber | 1 g |
| Cholesterol | 90 mg |
| Sodium | 220 mg |
Note: These values are estimates and can vary based on brands and exact ingredient amounts.
Frequently Asked Questions
1. Can I use frozen raspberries for the compote?
Yes, frozen raspberries work great. Just make sure to thaw them first and drain any excess liquid before cooking.
2. Is it possible to make this cheesecake without gelatin?
You can use agar-agar as a vegetarian substitute, but it sets firmer and may alter the texture slightly. Gelatin offers the smoothest, creamiest result.
3. Can I make it ahead of time?
Absolutely! This cheesecake is perfect for making a day in advance. In fact, it tastes even better after chilling overnight.
4. How do I get a smooth top?
Use an offset spatula to level the top layer gently. Tapping the pan on the counter also helps to settle any air pockets.
5. Why did my cheesecake crack?
Cracking usually happens if the cheesecake wasn’t set completely or was moved while still soft. Always chill thoroughly before slicing.
6. Can I add a chocolate layer to this?
Yes! You can add a thin layer of melted white chocolate between the crust and the filling for a decadent twist.
7. What if I don’t have a springform pan?
You can use a regular cake pan lined with parchment paper for easy lifting. Just make sure to chill it extra well before unmolding.
8. How can I make it more vibrant pink?
Use a drop or two of gel food coloring—not liquid—to intensify the hue without watering down the batter.
Conclusion
The Pink Velvet Raspberry Cheesecake is more than a dessert—it’s an experience. From its silky, no-bake filling to the eye-catching raspberry swirls and whipped topping, this cheesecake makes every slice feel like a celebration. Whether you’re hosting a party or just craving a standout sweet treat, this recipe delivers elegance, ease, and unforgettable flavor.
Get ready to wow your guests—or yourself—with a slice of creamy pink perfection.
Pink Velvet Raspberry Cheesecake
- Total Time: 6 hours 40 minutes
- Yield: 12 slices
- Diet: Vegetarian
Description
Looking for a stunning and delicious dessert that steals the spotlight? This Pink Velvet Raspberry Cheesecake is the ultimate no-bake treat. Featuring a buttery graham cracker crust, creamy pink velvet cheesecake filling, and a vibrant raspberry swirl, this dessert is a dreamy mix of rich, fruity, and velvety textures. It’s perfect for celebrations, date nights, or when you want something indulgent yet effortless. A must-try for anyone who loves easy recipes, no-bake desserts, dinner ideas, and show-stopping party food ideas.
Ingredients
1 ½ cups graham cracker crumbs
¼ cup granulated sugar
6 tablespoons unsalted butter, melted
1 ½ cups fresh or frozen raspberries
2 tablespoons granulated sugar
1 tablespoon lemon juice
1 tablespoon water
1 teaspoon cornstarch
16 oz cream cheese, softened
¾ cup powdered sugar
1 teaspoon vanilla extract
1 cup heavy whipping cream, chilled
2 ½ teaspoons unflavored gelatin
¼ cup warm water
Pink gel food coloring (optional)
¾ cup heavy whipping cream (for topping)
2 tablespoons powdered sugar (for topping)
Fresh raspberries (for garnish)
White chocolate curls or pink sprinkles (optional)
Instructions
1. In a bowl, mix graham cracker crumbs, sugar, and melted butter until evenly moistened. Press into the bottom of a 9-inch springform pan. Chill while prepping the filling.
2. In a saucepan, cook raspberries, sugar, lemon juice, and water over medium heat until berries break down. Stir in cornstarch and simmer until thickened. Cool completely.
3. Sprinkle gelatin over warm water and let bloom for 5 minutes. Microwave for 10 seconds to dissolve.
4. In a chilled bowl, whip 1 cup of heavy cream until soft peaks form. Set aside.
5. In another bowl, beat cream cheese until smooth. Add powdered sugar and vanilla. Blend in food coloring and dissolved gelatin.
6. Gently fold in whipped cream until fully incorporated.
7. Pour half of the filling over the crust. Spoon and swirl in half the raspberry compote. Repeat with remaining filling. Smooth the top and chill at least 6 hours or overnight.
8. Whip remaining cream with powdered sugar. Pipe onto set cheesecake and garnish with raspberries and decorations.
9. Slice with a warm knife for clean cuts. Serve chilled.
Notes
Let the cheesecake chill overnight for perfect texture.
Always cool the raspberry compote before layering to prevent melting.
Use gel food coloring for vivid color without altering texture.
- Prep Time: 35 minutes
- Cook Time: 5 minutes
- Category: Dessert
- Method: No-Bake
- Cuisine: American
Nutrition
- Serving Size: 1 slice
- Calories: 385
- Sugar: 20
- Sodium: 220
- Fat: 27
- Saturated Fat: 17
- Unsaturated Fat: 8
- Trans Fat: 0
- Carbohydrates: 30
- Fiber: 1
- Protein: 5
- Cholesterol: 90