

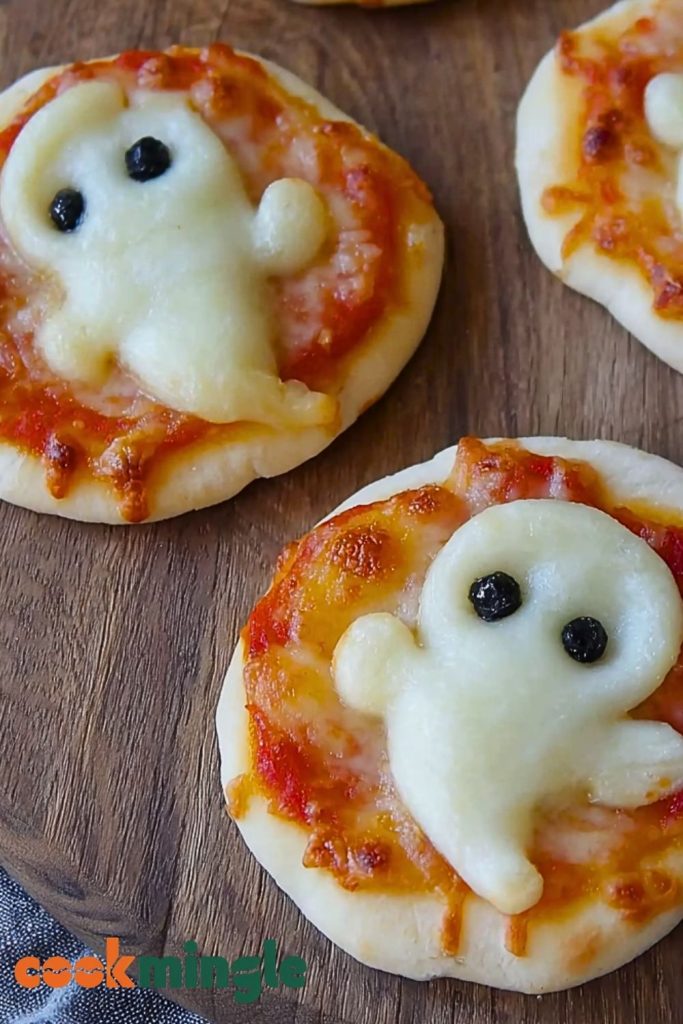
These Adorable Mini Ghost Pizzas are the perfect spooky snack to charm your Halloween crowd! Made with fluffy pizza dough, rich tomato sauce, gooey mozzarella, and playful olive eyes, they bring a fun, festive twist to traditional mini pizzas. Each little pie is topped with a ghost-shaped piece of cheese that melts into a ghoulishly cute figure—sure to delight kids and adults alike.
Whether you’re hosting a Halloween party, preparing themed lunchbox treats, or just looking for a fun dinner idea during spooky season, these mini ghost pizzas strike the perfect balance between delicious and creative. Best of all, they’re quick to assemble, easy to customize, and totally freezer-friendly.
Why You’ll Love This Mini Ghost Pizza Recipe
- Kid-friendly & party-ready – The fun ghost shape makes this a hit with little ones and a star on any Halloween spread.
- Simple ingredients – Uses classic pizza components: dough, sauce, cheese, and olives.
- Fun to make – Get the whole family involved in shaping ghosts and placing eyes.
- Customizable – Add pepperoni, veggies, or switch the cheese for dietary needs.
- Great for prepping ahead – Make them earlier in the day and bake just before serving.
Preparation Phase & Tools to Use (Essential Tools and Equipment, and the Importance of Each Tool)
To bring these Adorable Mini Ghost Pizzas to life, you’ll need a few basic kitchen tools—each playing a key role in making the process smooth, clean, and enjoyable.
- Rolling Pin: Essential for flattening the dough evenly into mini rounds. Ensures uniform thickness for consistent baking.
- Ghost Cookie Cutter or Knife: To cut out the ghost shape from the mozzarella cheese. A cookie cutter makes it quick and cute; a sharp knife works if you’re confident in freehand cutting.
- Baking Sheet: Your pizzas need a sturdy, flat surface to bake evenly. Lined with parchment paper, it prevents sticking and allows easy cleanup.
- Pizza Cutter or Round Cutter: Useful for cutting out the dough into uniform circles for the base.
- Parchment Paper: Prevents sticking and ensures a clean base without burnt spots underneath.
- Small Spoon: Ideal for spreading the pizza sauce without tearing the dough.
- Oven: A reliable oven with accurate temperature control is key to achieving melty cheese and golden edges.
Preparation Tips
- Use chilled cheese: Cold mozzarella slices are easier to cut into shapes and won’t melt too quickly before the dough finishes baking.
- Keep dough at room temp: Let your pizza dough sit at room temperature for 15–20 minutes before rolling—it’ll be more pliable and less likely to snap back.
- Cut everything before assembly: Pre-cut your cheese ghosts and olive eyes so the assembly process flows without delay.
- Avoid over-saucing: Use just a thin layer of sauce to keep the mini pizzas from becoming soggy.
- Use a light dusting of flour: When rolling the dough, lightly flour your surface and rolling pin to prevent sticking without drying out the dough.
- Chill the dough circles before baking: A quick 10-minute chill in the fridge helps hold the shape better, especially if the kitchen is warm.
Ingredients for This Adorable Mini Ghost Pizzas Recipe
These spooky little pizzas are made with simple, everyday ingredients that come together in a delightfully festive way. Here’s what you’ll need:
- 1 can (13.8 oz) refrigerated pizza dough (or homemade dough, if preferred)
- ½ cup pizza sauce – your favorite jarred or homemade version
- 8 oz mozzarella cheese block or slices – firm enough to cut into ghost shapes
- 8–10 black olives – sliced lengthwise for eyes
- 1 tablespoon olive oil – for brushing the dough edges (optional for golden finish)
- All-purpose flour – for dusting the surface while rolling the dough
Optional Add-ins (if you want to customize):
- Mini pepperoni
- Crushed red pepper flakes
- Italian seasoning
- Grated Parmesan cheese
- Diced bell peppers or mushrooms (if you want to sneak in some veggies)
These quantities make about 10–12 mini ghost pizzas, depending on the size of your dough circles.

Step 1: Prepare Your Workstation
Lightly flour a clean surface and roll out the pizza dough to about ¼-inch thickness. Using a round cookie cutter (about 3 inches in diameter) or a glass, cut out mini pizza bases. Transfer them to a parchment-lined baking sheet.
Step 2: Preheat and Shape the Ghosts
Preheat your oven to 400°F (200°C). While it heats, slice your mozzarella into roughly ¼-inch thick pieces. Use a ghost-shaped cookie cutter or a sharp knife to cut out little ghost figures. Set aside. Slice black olives in half lengthwise, then cut them into small oval “eyes.”
Step 3: Add Sauce and Assemble
Spread a thin layer of pizza sauce onto each dough circle using a spoon. Be careful not to overdo it—just enough to cover the center, leaving a small border.
Step 4: Place the Cheese Ghosts
Gently place one mozzarella ghost onto the center of each mini pizza. Add two olive “eyes” to each ghost, pressing them lightly into the cheese so they stick.
Step 5: Optional Oil Brushing
If you want a golden crust, lightly brush the exposed dough edges with olive oil.
Step 6: Bake to Perfection
Bake the mini pizzas in the preheated oven for 10–12 minutes, or until the cheese is melted and just slightly golden, and the dough is puffed and lightly browned at the edges.
Step 7: Cool Slightly & Serve
Let the pizzas cool for 3–5 minutes before serving. This helps the cheese set and avoids burning little mouths!
Notes
- Mozzarella matters: Use low-moisture mozzarella slices or a block you can cut—fresh mozzarella tends to release too much moisture and can distort the ghost shape.
- Customize the base: You can use homemade dough, store-bought dough, or even pre-made mini naan or flatbreads for a shortcut.
- Ghost size = pizza size: Make sure your mozzarella ghosts fit neatly onto the dough rounds. If they’re too big, they’ll melt over the edge and lose their shape.
Watch Out for These Mistakes While Cooking
- Overloading with sauce: Too much sauce will make the dough soggy and may prevent it from cooking evenly. Use just enough to coat.
- Using too soft cheese: Soft or fresh mozzarella will spread too much during baking. Go for firm or pre-sliced low-moisture mozzarella.
- Cutting dough unevenly: Uneven dough rounds lead to inconsistent cooking—some may be underdone while others burn. Roll it evenly.
- Skipping preheat: Always preheat the oven. Starting with a cold oven throws off cooking times and may lead to chewy crusts.
- Burning the ghosts: Keep an eye on the cheese while baking—once it starts bubbling and browning, it’s ready. Overcooking can distort the ghost face.
- Forgetting parchment paper: It prevents sticking and helps crisp the base. Baking directly on a tray may cause sticking or burnt bottoms.
What to Serve With Adorable Mini Ghost Pizzas?
These cute Halloween-themed pizzas are delicious on their own, but they really shine when served with fun and flavorful sides. Whether you’re planning a party or a festive family dinner, here are some tasty additions to complete the spooky spread.
8 Recommendations
- Pumpkin Soup – A cozy, creamy soup made with roasted pumpkin or squash adds warmth and a fall vibe to your meal.
- Witch’s Broomstick Pretzels – Pretzel sticks tied with string cheese strips for a fun and salty snack.
- Spooky Veggie Tray – Arrange carrots, bell peppers, and cucumbers into a skeleton or monster face with ranch dip.
- Bloody Marinara Dip – Serve extra pizza sauce or marinara in a cauldron-style bowl for dunking your mini pizzas.
- Monster Eyeball Caprese Bites – Cherry tomatoes, mozzarella balls, and olives on toothpicks—great for keeping the spooky theme.
- Halloween Pasta Salad – Use black bean pasta or tri-colored rotini with olives, cheese cubes, and Italian dressing.
- Roasted Garlic Bread Fingers – Slice breadsticks into “fingers” and add almond slices for fingernails—fun and delicious!
- Apple Cider or Halloween Punch – Serve warm spiced apple cider or a chilling red punch with floating lychee “eyeballs” for drinks.
These pairings will not only complement your ghost pizzas but also keep the festive energy high for your guests.
Storage Instructions
Got leftovers? These Adorable Mini Ghost Pizzas store well and reheat beautifully, making them great for next-day snacks or lunchboxes.
- Refrigeration: Place cooled mini pizzas in an airtight container and refrigerate for up to 3 days.
- Freezing: Let them cool completely, then layer between parchment paper in a freezer-safe container or zip-top bag. Freeze for up to 1 month.
- Reheating:
- Oven: Reheat at 350°F (175°C) for 6–8 minutes.
- Microwave: 20–30 seconds per pizza, though this may soften the crust.
- Air fryer: Reheat at 325°F (160°C) for 4–5 minutes for a crispier bite.
Estimated Nutrition (Per Mini Pizza – Approximate Values)
- Calories: 130 kcal
- Protein: 6 g
- Carbohydrates: 14 g
- Fat: 6 g
- Saturated Fat: 2.5 g
- Unsaturated Fat: 2 g
- Trans Fat: 0 g
- Cholesterol: 15 mg
- Fiber: 1 g
- Sugar: 1 g
- Sodium: 280 mg
- Serving Size: 1 mini pizza
These values will vary depending on the dough and cheese you use, as well as any added toppings.
Frequently Asked Questions
1. Can I make the mini ghost pizzas ahead of time?
Yes! You can assemble them a few hours in advance and store them in the fridge until ready to bake. If freezing, bake first, then freeze and reheat as needed.
2. What type of cheese works best for cutting ghost shapes?
Low-moisture mozzarella (either sliced or from a block) is best—it holds its shape well while still melting nicely. Avoid fresh mozzarella, which is too wet and spreads too much.
3. I don’t have a ghost-shaped cutter—what can I do?
No problem! Use a small paring knife to freehand ghost shapes. They’re meant to be whimsical, so don’t worry about perfection.
4. Can I use store-bought pizza crust or naan?
Absolutely. Mini naan rounds or pre-baked pizza crusts are excellent time-savers. Just adjust baking time since the base is already cooked.
5. Are these mini pizzas vegetarian?
Yes—as long as your cheese and sauce are vegetarian-friendly (some cheeses contain animal rennet), this recipe is entirely meat-free.
6. Can I make these gluten-free?
Definitely. Just swap the dough with your favorite gluten-free pizza dough. Keep an eye on baking time as it may vary slightly.
7. What’s the best way to get kids involved?
Let them cut out the cheese ghosts, add sauce, and place the olive eyes. It’s a safe, creative, and super fun way for kids to help in the kitchen.
8. Will the cheese ghosts lose shape while baking?
They may melt slightly around the edges, but if your cheese is cold and thick enough (¼ inch), they’ll mostly hold their ghostly outline.
Conclusion
These Adorable Mini Ghost Pizzas are more than just a Halloween treat—they’re a fun, creative way to bring spooky cheer to your kitchen with minimal effort and maximum flavor. Whether you’re throwing a haunted bash or just looking for an exciting dinner idea during October, these mini pizzas are guaranteed to be a crowd-pleaser. Easy to prep, fun to decorate, and totally customizable, they bring all the festive vibes with none of the fuss.
Ready to haunt your kitchen with deliciousness? Let the ghost-making begin!

Adorable Mini Ghost Pizzas
- Total Time: 27 minutes
- Yield: 10–12 mini pizzas
- Diet: Vegetarian
Description
Make your Halloween snacks unforgettable with these Adorable Mini Ghost Pizzas—a fun, spooky twist on the classic mini pizza. Perfect for parties, lunchboxes, or themed dinners, these ghost-shaped cheesy bites use simple ingredients like pizza dough, mozzarella, and olives. A kid-friendly and quick Halloween food idea, they’re customizable, freezer-friendly, and a festive addition to any spooky menu. Whether you’re after an easy recipe, fun dinner ideas, or Halloween food ideas, this one is sure to deliver ghostly goodness.
Ingredients
1 can (13.8 oz) refrigerated pizza dough
0.5 cup pizza sauce
8 oz mozzarella cheese block or slices
8 to 10 black olives
1 tablespoon olive oil
All-purpose flour for dusting
Instructions
1. Lightly flour a surface and roll out the pizza dough to about ¼ inch thick. Cut into 3-inch rounds and transfer to a parchment-lined baking sheet.
2. Preheat oven to 400°F (200°C). Cut mozzarella slices into ghost shapes using a cookie cutter or knife. Slice olives into small oval pieces for eyes.
3. Spread a thin layer of pizza sauce onto each dough round, avoiding the edges.
4. Place a cheese ghost on each pizza round. Add two olive eyes to each ghost.
5. (Optional) Brush edges of the dough with olive oil for a golden finish.
6. Bake for 10–12 minutes until the cheese melts and the crust turns golden.
7. Let cool for 3–5 minutes before serving.
Notes
Use low-moisture mozzarella to ensure the ghost shape holds while baking.
Don’t overload the sauce—it can make the dough soggy.
Chill the dough rounds briefly before baking to help maintain shape.
- Prep Time: 15 minutes
- Cook Time: 12 minutes
- Category: Appetizer / Snack
- Method: Baking
- Cuisine: American
Nutrition
- Serving Size: 1 mini pizza
- Calories: 130
- Sugar: 1 g
- Sodium: 280 mg
- Fat: 6 g
- Saturated Fat: 2.5 g
- Unsaturated Fat: 2 g
- Trans Fat: 0 g
- Carbohydrates: 14 g
- Fiber: 1 g
- Protein: 6 g
- Cholesterol: 15 mg