

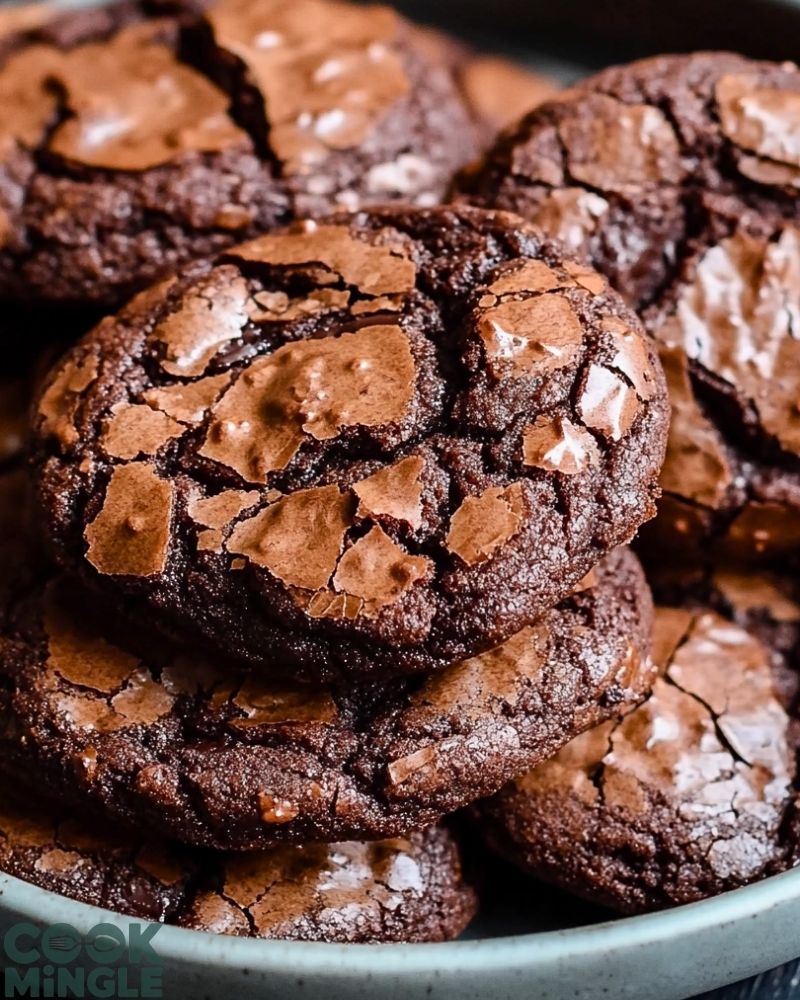
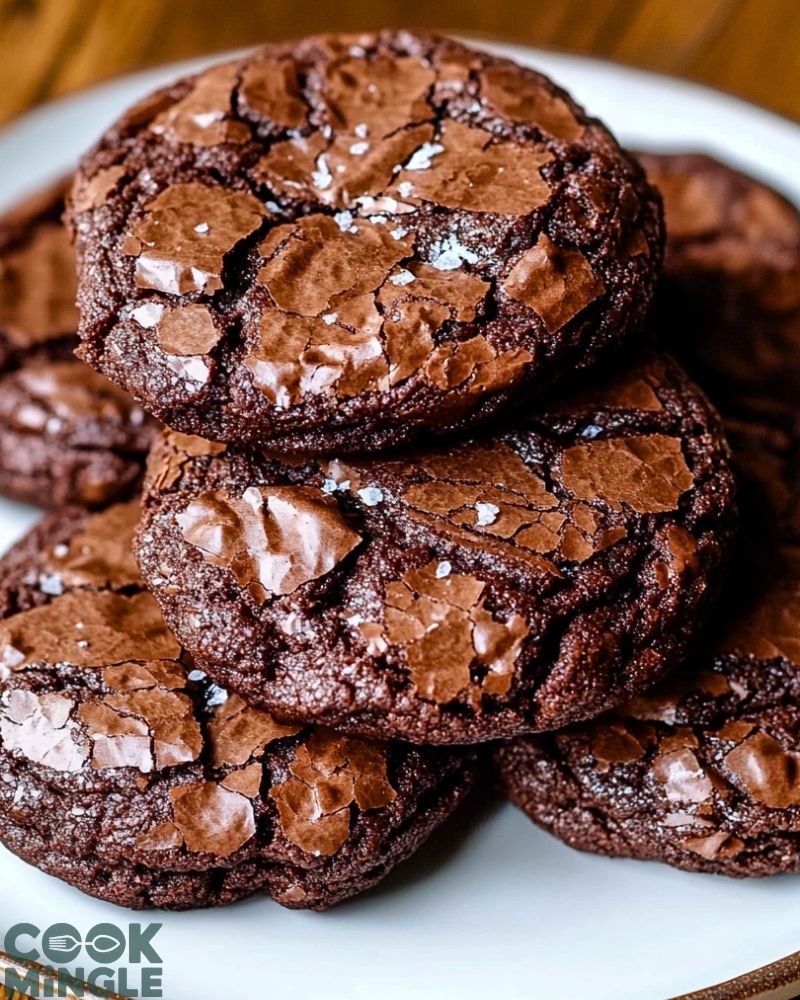
If you’re someone who finds it impossible to choose between a rich, fudgy brownie and a perfectly chewy cookie—welcome to dessert heaven. These brownie cookies combine the best of both worlds. I remember the first time I pulled a batch out of the oven: the cracked, glossy tops, the warm chocolate aroma, and that pinch of flaky sea salt on top—it was instant love. They were gone within minutes, and I knew I had something special.
I’ve been making these brownie cookies for everything from cozy movie nights to holiday dessert platters, and they never fail to impress. They’re indulgent but not over-the-top, and the texture is what dreams are made of: crisp around the edges, gooey in the center, and loaded with chocolatey richness. It’s like biting into a brownie that’s been transformed into cookie form—utterly irresistible.
Why You’ll Love This Brownie Cookies Recipe
- Crackly tops, fudgy centers: These cookies have that classic shiny brownie crust and a soft, melty middle.
- No mixer needed: Everything is whisked together by hand—simple, fast, and efficient.
- Rich in real chocolate: Not just cocoa powder—these are packed with melted chocolate chunks for depth and intensity.
- Perfect for any occasion: Whether you’re baking for guests, gifts, or just to treat yourself, they deliver every time.
- Customizable: Add nuts, espresso powder, or a sprinkle of flaky sea salt to take them up a notch.
What Kind of Chocolate Should I Use for Brownie Cookies?
When it comes to making brownie cookies, the chocolate you choose makes a huge difference. I always reach for a good-quality dark chocolate—something in the 60–70% cocoa range. It gives the cookies that deep, complex flavor that borders on bittersweet without being too intense. You can also mix in some semi-sweet chips or chunks if you want a milder taste.
Avoid milk chocolate as the primary chocolate here; it’s too sweet and lacks the intensity needed to balance the sugar in the batter. And if you want those pockets of melted chocolate throughout the cookie? Chop up a bar instead of using chips—bars melt more smoothly and create those dreamy gooey bites.
Options for Substitutions
While this recipe is chocolate-forward and doesn’t need much tampering, there are a few smart swaps you can make:
- Butter Substitute: You can use vegan butter or even refined coconut oil (solid, not melted) if you’re avoiding dairy. Just know it may slightly change the texture.
- Egg Substitute: Flax eggs work here (1 tbsp ground flax + 3 tbsp water = 1 egg), though the texture will be a bit less chewy and more cakey.
- Gluten-Free Flour: Use a 1:1 gluten-free baking blend. These cookies are quite forgiving and hold up well with the right flour mix.
- Sugar Options: Brown sugar adds moisture and a slight caramel note, while coconut sugar is a great unrefined alternative.
- Add-Ins: Feel free to stir in chopped nuts, white chocolate chips, or even a swirl of peanut butter or tahini for a twist.
Ingredients for This Brownie Cookies Recipe
Each ingredient in these brownie cookies plays an important role in building that signature texture and flavor. Here’s what you’ll need and why it matters:
- Dark Chocolate (60–70% cocoa)
This is the heart of the cookie—rich, smooth, and slightly bitter to balance the sweetness. It gives that true “brownie” intensity. - Unsalted Butter
Melted with the chocolate, butter adds richness and moisture. It’s essential for creating that fudgy bite. - Granulated Sugar
Helps create those crackly tops and sweetens the batter. It also contributes to the slightly crisp edges. - Brown Sugar
Adds depth and a hint of molasses flavor, plus helps with that chewy, moist center. - Large Eggs
They provide structure and act as a binder. Eggs also help create the glossy top when whisked properly with the sugar. - Vanilla Extract
A splash of vanilla rounds out the chocolate flavor and adds warmth. - All-Purpose Flour
Just enough to give the cookies structure without making them cakey. Too much and you lose that signature brownie feel. - Cocoa Powder (unsweetened)
Boosts the chocolate flavor and adds a drier texture to help balance the melted chocolate and butter. - Baking Powder
A small amount helps the cookies rise slightly and prevents them from being too dense. - Salt
Just a pinch in the batter enhances all the other flavors. A few flakes on top make them irresistible. - Flaky Sea Salt (for topping)
Optional, but highly recommended. That final salty crunch takes the cookies over the top.
Step 1: Melt the Chocolate and Butter
Start by chopping your dark chocolate into small chunks. In a heatproof bowl over a saucepan of simmering water (or in short bursts in the microwave), melt the chocolate with the butter. Stir until silky smooth and fully combined, then set it aside to cool slightly while you prepare the rest.
Step 2: Whisk the Eggs and Sugars
In a large mixing bowl, whisk the eggs, granulated sugar, and brown sugar together for a full 2–3 minutes until the mixture is thick, pale, and slightly glossy. This step is key to achieving that crinkly top later on.
Step 3: Add Vanilla and Chocolate Mixture
Stir in the vanilla extract, then slowly pour in the melted chocolate-butter mixture. Whisk until fully incorporated and the batter is rich and uniform.
Step 4: Combine the Dry Ingredients
In a separate bowl, sift together the flour, cocoa powder, baking powder, and salt. Gently fold the dry ingredients into the wet batter using a spatula. Be careful not to overmix—you want the batter just combined.
Step 5: Chill the Dough
The dough will be loose and brownie-like at this stage. Chill it in the refrigerator for 20–30 minutes to firm it up slightly, making it easier to scoop and helping the cookies hold their shape while baking.
Step 6: Scoop and Bake
Preheat your oven to 350°F (175°C) and line a baking sheet with parchment paper. Scoop the chilled dough using a medium cookie scoop or tablespoon, spacing each cookie about 2 inches apart. Sprinkle the tops with flaky sea salt.
Bake for 10–12 minutes, or until the edges are set and the tops are shiny and cracked. The centers will still be soft—they’ll continue to cook as they cool.
Step 7: Cool on the Tray
Let the cookies cool on the baking sheet for about 5 minutes before transferring them to a wire rack. This helps them set properly and keeps that chewy, fudgy center intact.
How Long to Cook the Brownie Cookies
Brownie cookies bake quickly, and timing is everything to nail that signature fudgy texture. Here’s what to keep in mind:
- Baking Time: 10 to 12 minutes at 350°F (175°C)
The edges should look set, while the centers remain slightly soft. If they still look a bit underbaked in the middle—that’s perfect. They’ll firm up as they cool, ensuring a chewy, gooey bite. - Cooling Time: 5 minutes on the baking tray
This resting time allows the cookies to finish setting without drying out. Don’t skip it!
Tips for Perfect Brownie Cookies
Want to get those irresistible crinkles and soft middles every time? These tips will help:
- Whisk the eggs and sugar well
This builds volume and creates the shiny, crackly tops everyone loves. - Use good-quality chocolate
The better the chocolate, the deeper and more satisfying the flavor. Don’t skimp here. - Don’t overbake
If the centers look fully set in the oven, the cookies are probably overdone. Take them out when they’re just slightly underbaked in the center. - Chill the dough
Even just 20–30 minutes in the fridge will help thicken the batter and give you cookies that hold their shape and have chewy edges. - Top with flaky salt
This isn’t just for looks—sea salt enhances the chocolate and adds an addictive contrast. - Use parchment paper
It ensures an even bake and makes clean-up a breeze. - Let them rest on the tray
Don’t rush to move them—five minutes on the tray helps them set up without falling apart. - Experiment with add-ins
Chopped nuts, espresso powder, or white chocolate chunks can take these to the next level if you’re feeling creative.
Watch Out for These Mistakes While Cooking
Even though brownie cookies are simple to make, a few missteps can throw off the texture or flavor. Here’s what to avoid:
- Overmixing the Batter
Once you add the dry ingredients, gently fold just until combined. Overmixing can lead to tough, cakey cookies. - Using Low-Quality Chocolate
This recipe relies heavily on chocolate for both flavor and texture. Bargain chocolate can make the cookies taste flat or greasy. - Skipping the Chill Time
The batter is soft and needs time in the fridge to firm up. Skipping this step can cause your cookies to spread too thin. - Overbaking
These cookies continue cooking after they’re out of the oven. If they look fully set inside the oven, you’ve likely gone too far. - Measuring Flour Incorrectly
Too much flour can dry out the cookies. Spoon and level it rather than scooping straight from the bag. - Using Cold Eggs
Room temperature eggs mix more easily with sugar and help emulsify the batter properly. - Baking on a Hot Tray
If reusing a baking sheet, let it cool between batches. A hot tray can melt the dough too quickly, causing spreading. - Neglecting the Sea Salt Finish
That tiny sprinkle of flaky sea salt adds balance and contrast—don’t leave it off unless you absolutely must.
What to Serve With Brownie Cookies?
These brownie cookies are excellent on their own, but they also shine alongside some complementary treats and drinks. Here are some delicious pairings:
1. A Scoop of Vanilla Ice Cream
Melty vanilla ice cream on a warm brownie cookie? Dessert bliss.
2. Espresso or Strong Coffee
The deep chocolate pairs beautifully with bitter coffee—perfect for a grown-up treat.
3. A Glass of Cold Milk
Classic and nostalgic, nothing beats milk and cookies.
4. Fresh Berries
Strawberries, raspberries, or even cherries add a refreshing contrast to the richness.
5. Peanut Butter Drizzle
Warm peanut butter or a peanut butter sauce over the cookies is heavenly.
6. Whipped Cream
Light, fluffy whipped cream adds an airy texture to balance the dense chewiness.
7. Chocolate Sauce or Ganache
Double down on chocolate for an ultra-decadent dessert.
8. Mint Tea or Herbal Infusion
A soothing mint tea offers a refreshing finish to this indulgent treat.
Storage Instructions
Brownie cookies store beautifully, making them ideal for make-ahead treats or midweek indulgences. Here’s how to keep them fresh:
- Room Temperature:
Store in an airtight container at room temp for up to 4 days. Place a piece of parchment between layers to prevent sticking. - Refrigeration:
Not necessary unless your kitchen is particularly warm. If you do refrigerate, let the cookies sit at room temp for 10–15 minutes before serving to regain their chewy texture. - Freezing Baked Cookies:
Once completely cooled, you can freeze brownie cookies in a single layer on a tray, then transfer them to a zip-top bag or airtight container. Freeze for up to 2 months. Thaw at room temp or microwave for a few seconds to enjoy warm. - Freezing the Dough:
Scoop the dough into balls, freeze on a tray, then store in a freezer-safe bag. Bake from frozen—just add 1–2 minutes to the baking time.
Estimated Nutrition
Here’s a general nutritional estimate per 1 brownie cookie (based on a batch of 18 cookies and standard ingredients):
- Calories: ~160 kcal
- Fat: 9 g
- Saturated Fat: 5 g
- Carbohydrates: 18 g
- Sugar: 13 g
- Protein: 2 g
- Fiber: 1 g
- Sodium: 60 mg
Keep in mind these numbers can vary slightly depending on the chocolate brand, butter type, or any additions like nuts or extra toppings.
Frequently Asked Questions
1. Can I make the dough ahead of time?
Absolutely! You can make the dough and refrigerate it for up to 48 hours. Just let it sit at room temperature for 10–15 minutes before scooping if it’s too firm.
2. Why didn’t my cookies get that shiny, crackly top?
The key is whisking the eggs and sugars thoroughly. This step aerates the mixture and contributes to the glossy crust.
3. Can I use cocoa powder instead of melted chocolate?
You’ll lose that rich, fudgy texture and flavor. Cocoa alone won’t provide the same structure or depth. Use both for best results.
4. How do I know when they’re done baking?
Look for set edges and a glossy, slightly cracked top. The centers should appear soft but not runny—they’ll continue to cook after baking.
5. Can I double the recipe?
Yes, this recipe scales beautifully. Just make sure to chill the dough well if you’re baking in batches, and rotate your trays halfway through baking.
6. What kind of cocoa powder should I use?
Unsweetened natural cocoa powder works best. Dutch-processed is okay, but it may alter the rise slightly depending on your baking powder.
7. Can I make them gluten-free?
Yes! Use a 1:1 gluten-free flour blend. The texture might be slightly different, but the results are still rich and delicious.
8. Do they taste better the next day?
Surprisingly, yes. The flavor deepens and the texture settles into that perfect brownie-cookie hybrid by the second day.
Conclusion
Brownie cookies are a dream come true for anyone who can’t choose between a brownie and a cookie. With their glossy tops, chewy centers, and rich chocolate flavor, they’re destined to become a favorite in your baking rotation. I love how easy they are to pull together—no mixer, no fancy equipment—and yet they taste like something from a high-end bakery. Whether you’re baking for a crowd or hoarding them for yourself (no judgment!), these cookies hit every note of indulgence, comfort, and chocolatey bliss.

Brownie Cookies Recipe
- Total Time: 45 minutes
- Yield: 18 cookies
Description
Crackly on the outside, fudgy on the inside—these Brownie Cookies are the perfect cross between two beloved desserts. Whether you’re looking for a quick breakfast indulgence, a cozy evening snack, or easy dessert ideas for a gathering, this easy recipe is packed with deep chocolate flavor and chewy, rich texture. It’s a must-try for anyone who loves food ideas that feel both decadent and homemade. From the moment they hit the oven, the rich cocoa aroma fills your kitchen with warmth and anticipation. Perfect for easy dinner desserts, holiday cookie trays, or sweet snack moments, these cookies will become your new go-to.
Ingredients
- 8 oz dark chocolate (60–70% cocoa), chopped
- 1/2 cup unsalted butter
- 2/3 cup granulated sugar
- 1/3 cup brown sugar
- 2 large eggs (room temperature)
- 1 tsp vanilla extract
- 1/2 cup all-purpose flour
- 2 tbsp unsweetened cocoa powder
- 1/2 tsp baking powder
- 1/4 tsp salt
- Flaky sea salt, for topping (optional)
Instructions
- Preheat oven to 350°F (175°C). Line a baking sheet with parchment paper.
- In a heatproof bowl, melt the chopped chocolate and butter together until smooth. Set aside to cool slightly.
- In a large bowl, whisk eggs, granulated sugar, and brown sugar for 2–3 minutes until pale and thick.
- Stir in the vanilla extract and the melted chocolate mixture.
- In a separate bowl, sift together flour, cocoa powder, baking powder, and salt.
- Fold dry ingredients into the wet mixture until just combined.
- Chill the dough for 20–30 minutes to firm up.
- Scoop the dough onto the prepared baking sheet, spacing each cookie about 2 inches apart.
- Sprinkle with flaky sea salt, if using.
- Bake for 10–12 minutes, until edges are set and tops are glossy and cracked.
- Cool on the tray for 5 minutes before transferring to a wire rack.
- Prep Time: 15 minutes
- Chill Time: 20 minutes
- Cook Time: 10 minutes