

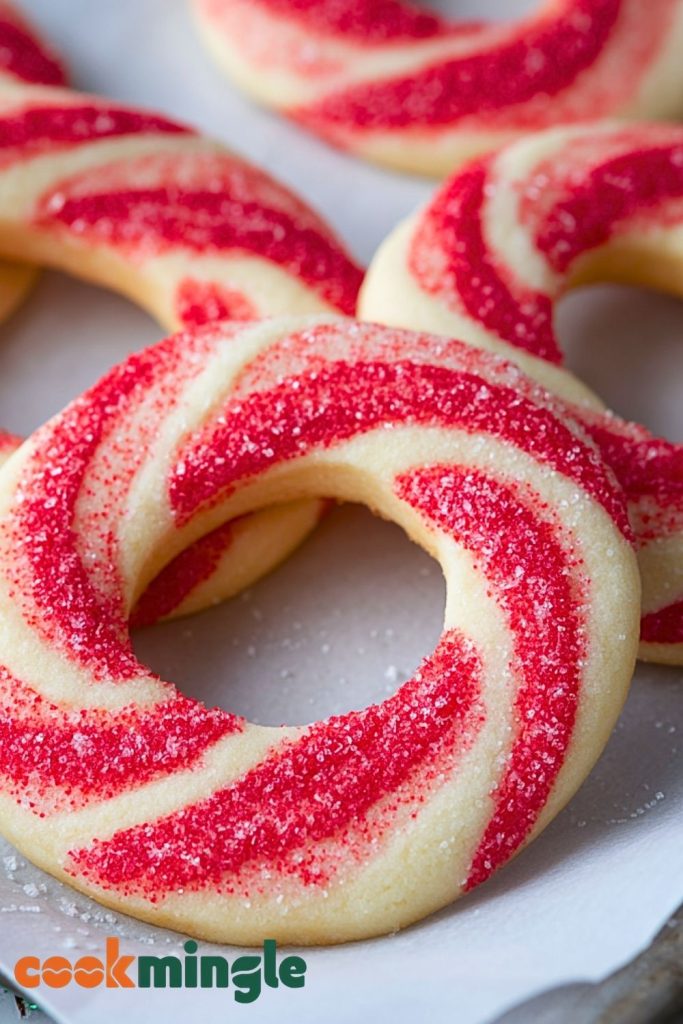
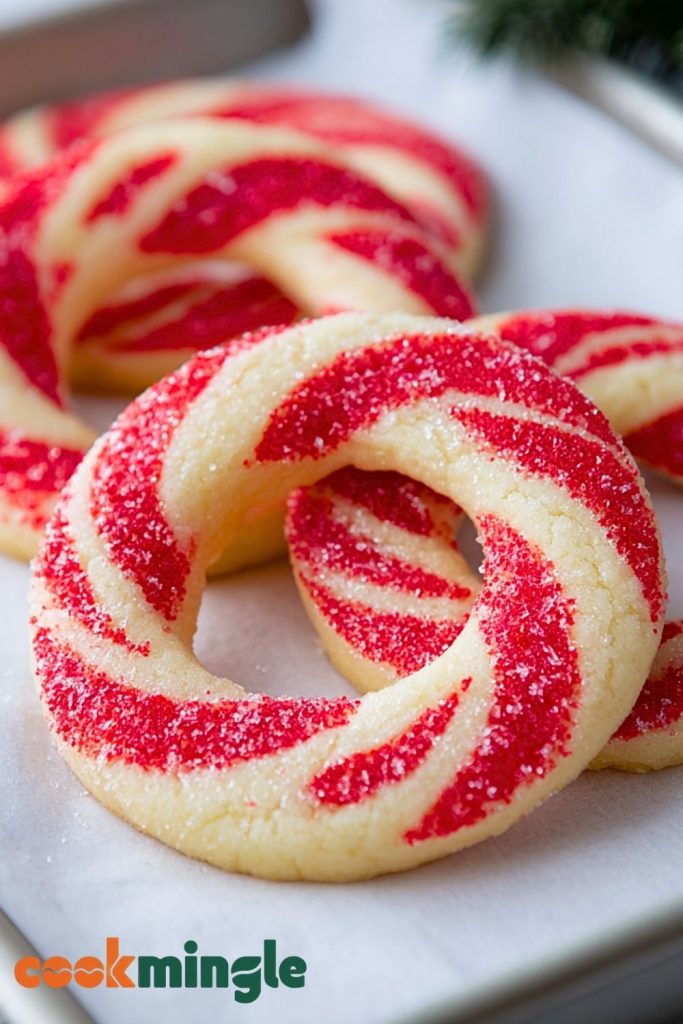
These Candy Cane Cookies are a whimsical treat that combines the charm of holiday nostalgia with the buttery softness of a sugar cookie. Shaped into perfect peppermint-inspired twists, they’re as delightful to look at as they are to eat. Their red-and-white swirls sparkle with sugar and instantly add festive cheer to any dessert table. Light, crumbly, and delicately sweet, they melt in your mouth while adding a touch of crunch from the sugar coating.
Whether you’re baking for a holiday cookie exchange, filling a festive cookie tin, or simply enjoying a cozy winter baking session, these Candy Cane Cookies never disappoint. Their classic peppermint scent, buttery flavor, and show-stopping design make them a standout addition to your holiday baking lineup. And the best part? They’re surprisingly simple to make, even with their eye-catching design!
Why You’ll Love This Candy Cane Cookies Recipe
- Festive & Eye-Catching: The vibrant red and white stripes bring instant holiday cheer.
- Kid-Friendly Activity: Rolling and twisting the dough is a fun hands-on project.
- Customizable Flavor: You can add peppermint extract or keep it a pure buttery vanilla.
- Make-Ahead Friendly: Freeze the dough or baked cookies for easy holiday prep.
- Perfect Texture: Buttery, tender, and just a little crisp on the outside from the sugar.
- Gift-Worthy: Their unique shape and sparkle make them great for gifting.
Preparation Phase & Tools to Use (Essential Tools and Equipment + Their Importance)
Before you dive into the fun of twisting colorful dough into festive shapes, gathering the right tools will make this process smoother and more enjoyable. These aren’t just recommendations—they’re essentials for making perfect Candy Cane Cookies.
- Stand Mixer or Hand Mixer: Creaming the butter and sugar until fluffy is crucial for the right cookie texture. A stand mixer makes this easier and faster, but a hand mixer works well too.
- Mixing Bowls (2–3 sizes): You’ll need at least two—one for the dough and another for separating and coloring part of it.
- Food Coloring Gel: This gives the red swirl its bright, rich tone without adding extra moisture like liquid coloring might.
- Plastic Wrap or Parchment Paper: For chilling the dough to make it easier to handle and shape.
- Baking Sheets + Parchment Paper or Silicone Mats: Prevents sticking and promotes even baking without overbrowning.
- Measuring Cups and Spoons: Accurate measurements are key to getting the right consistency in the dough.
- Cookie Cutter (Optional for Ring Shape): If you’re going for wreath-like cookies instead of the classic cane shape, a round cookie cutter adds elegance.
- Rolling Surface and Hands!: Much of the shaping is done by hand—rolling, twisting, and forming the dough into candy cane designs.
Preparation Tips
- Soften Your Butter Properly: Let the butter sit at room temperature until just soft—not melty. This makes creaming easier and gives the cookies their tender crumb.
- Use Gel Food Coloring: It creates a vivid red dough without altering the texture, unlike liquid dyes which can make the dough sticky.
- Chill the Dough: After mixing and coloring, chilling prevents the dough from being too soft or sticky when shaping.
- Even Dough Strands: Roll your dough ropes evenly in thickness and length for uniform cookies. A kitchen scale can help ensure equal portions.
- Don’t Overbake: These cookies are meant to be pale. Look for just a hint of golden brown on the bottoms—too much and they’ll lose their soft texture.
- Work in Batches: If the dough gets too soft while shaping, pop it back in the fridge to firm up again.
- Dust with Granulated Sugar Before Baking: It adds sparkle and a delicate crunch to the outside.
Ingredients for This Candy Cane Cookies Recipe
These classic holiday cookies rely on simple ingredients, but each plays a key role in achieving their soft, buttery texture and signature swirl. Here’s everything you need:
- 1 cup (226g) unsalted butter, softened – for a rich, tender crumb
- 1 cup (200g) granulated sugar – sweetens and helps with texture
- 1 large egg – binds the dough and adds richness
- 1 tsp vanilla extract – adds classic flavor
- ½ tsp peppermint extract (optional) – for that festive candy cane taste
- 2 ½ cups (310g) all-purpose flour – the base that gives structure
- ½ tsp salt – balances the sweetness
- Red gel food coloring – to create that vibrant swirl
- Extra granulated sugar (for rolling) – gives sparkle and a light crunch
Optional:
- Powdered sugar – for dusting before serving (optional but festive)
- Cookie cutters – if shaping into rings instead of canes
Make sure all your ingredients are at room temperature before you begin. This ensures the dough comes together smoothly without overmixing.
Step 1: Cream the Butter and Sugar
In a large mixing bowl, cream together the softened butter and granulated sugar using a stand mixer or hand mixer on medium speed. Beat until the mixture is light, fluffy, and pale—this should take about 2–3 minutes.
Step 2: Add Egg and Flavorings
Crack in the egg and beat until well incorporated. Then add the vanilla extract and, if using, the peppermint extract. Mix for another 30 seconds to fully combine.
Step 3: Mix the Dry Ingredients
In a separate bowl, whisk together the all-purpose flour and salt. Gradually add the dry mixture to the wet ingredients, mixing on low speed until a soft dough forms. Do not overmix—stop as soon as the dough comes together.
Step 4: Divide and Color the Dough
Split the dough into two equal halves. Leave one half plain. Add red gel food coloring to the other half and knead it in gently until the color is evenly distributed. Start with a small amount and increase as needed until you reach a bold red tone.
Step 5: Chill the Dough
Wrap both dough portions in plastic wrap and refrigerate for 30–45 minutes. Chilling makes the dough easier to handle and helps maintain the cookie shapes during baking.
Step 6: Shape the Cookies
Take equal portions of red and white dough and roll each into 6-inch ropes about ¼ inch thick. Place the two ropes side by side, gently twist them together, then form into either a cane shape or a wreath ring. Place on a baking sheet lined with parchment paper.
Step 7: Coat with Sugar
Lightly roll each formed cookie in granulated sugar or sprinkle sugar over the top. This adds a festive sparkle and slight crunch after baking.
Step 8: Bake
Preheat your oven to 350°F (175°C). Bake the cookies for 8–10 minutes, or until the edges are just starting to turn golden. Do not overbake—these cookies are meant to stay light in color and tender.
Step 9: Cool and Serve
Allow the cookies to cool on the baking sheet for 5 minutes before transferring them to a wire rack to cool completely. Once cooled, dust with powdered sugar if desired, and enjoy!
Notes
- Flavor Flexibility: Peppermint extract gives these cookies a classic candy cane vibe, but you can leave it out or substitute with almond extract for a different twist.
- Keep Dough Cool: Warm dough is harder to shape. If your kitchen is warm or the dough softens too quickly, refrigerate it again for 10–15 minutes before continuing.
- Color Precision: Use gel food coloring, not liquid. It produces bold color without compromising the dough’s texture.
Watch Out for These Mistakes While Cooking
- Skipping the Chill Time: Dough that isn’t properly chilled will be sticky and difficult to shape, and may spread during baking.
- Using Too Much Food Coloring: A little gel goes a long way. Too much can make the dough taste bitter or stain hands.
- Overworking the Dough: Kneading or rolling the dough too much can make your cookies tough. Handle it gently and briefly.
- Uneven Rope Sizes: If the red and white ropes are different sizes, your cookies will bake unevenly and look lopsided.
- Baking Too Long: These cookies should stay pale. If you wait for golden tops, they’ll be dry.
- Crowding the Baking Sheet: The cookies may spread slightly, so leave space between them.
- Skipping the Sugar Coating: That final sugar roll gives them a festive finish and slight crunch—don’t skip it!
- Not Letting Them Cool Properly: They’ll be fragile right out of the oven. Let them rest before moving, or they may break.
What to Serve With Candy Cane Cookies?
These festive cookies shine on their own, but pairing them with the right beverages and treats can elevate your holiday spread or dessert table. Whether you’re entertaining guests, cozying up on a winter night, or packing holiday treat boxes, here are some perfect pairings:
8 Recommendations
- Hot Chocolate with Whipped Cream
The creamy richness of hot cocoa is a perfect companion to the cool peppermint notes and buttery texture of the cookies. - Peppermint Mocha or Holiday Coffee
Pairing similar flavors makes for a cozy, themed treat—especially for afternoon pick-me-ups. - Vanilla Ice Cream
Sandwich a scoop between two cookies for a festive holiday ice cream sandwich. - Eggnog (Classic or Vegan)
The warmth and spice of eggnog contrast beautifully with the coolness of peppermint. - White Chocolate Drizzle
Add a drizzle over the cookies for a luxurious twist—or serve them with white chocolate bark. - Cheesecake Bites
Serve alongside mini cheesecake bites for a rich and creamy complement to the crisp cookies. - Holiday Cookie Platter
Mix these with gingerbread men, shortbread stars, and snowball cookies for a stunning variety. - Cranberry or Mulled Cider
Fruity and spiced drinks balance the cookie’s buttery flavor and refresh the palate.
Storage Instructions
Candy Cane Cookies store beautifully, making them ideal for baking ahead of the holidays or gifting in cookie tins. Here’s how to keep them fresh and festive:
- Room Temperature: Store cookies in an airtight container at room temperature for up to 1 week. Layer with parchment paper to prevent sticking.
- Freezer (Unbaked Dough): Shape the dough into canes or wreaths, place on a tray to freeze until solid, then transfer to a zip-top bag. Freeze for up to 2 months. Bake directly from frozen, adding 1–2 extra minutes.
- Freezer (Baked Cookies): Freeze completely cooled cookies in a container or freezer bag for up to 2 months. Thaw at room temp before serving.
- Avoid Refrigeration: Refrigerators can dry out the cookies—opt for room temperature or freezing instead.
Estimated Nutrition (Per Cookie)
Note: Based on a batch of 24 cookies
- Calories: 145
- Total Fat: 7g
- Saturated Fat: 4.5g
- Unsaturated Fat: 2g
- Trans Fat: 0g
- Cholesterol: 25mg
- Sodium: 55mg
- Carbohydrates: 18g
- Fiber: 0g
- Sugars: 9g
- Protein: 1g
- Serving Size: 1 cookie
- Diet: Vegetarian
- Category: Dessert / Holiday Cookies
- Method: Baked
- Cuisine: American
These values are approximate and can vary based on exact ingredients and size of cookies.
Frequently Asked Questions
1. Can I make the dough ahead of time?
Yes! You can refrigerate the dough for up to 3 days or freeze it for up to 2 months. Just let it soften slightly before shaping.
2. Do I have to use peppermint extract?
Not at all. It’s optional. You can use vanilla only, or swap in almond extract for a different festive twist.
3. How do I keep the colors from bleeding together?
Make sure the dough is well-chilled before shaping and don’t over-handle it. Gel food coloring also helps prevent bleeding better than liquid dye.
4. Can I use natural food coloring?
Yes, but the colors may be less vibrant. Beet powder or natural red gel colorants work well for a festive hue without synthetic dyes.
5. What if I don’t have gel food coloring?
Liquid food coloring can be used, but go light—it can make the dough sticky. If you use liquid, reduce other moisture slightly and chill the dough longer.
6. Why are my cookies spreading too much?
Your dough may be too warm, or you may have overmixed it. Always chill your shaped cookies before baking for best results.
7. Can I double the recipe?
Absolutely! This recipe doubles beautifully. You can even freeze half the batch to bake later during the holiday season.
8. How do I ship these cookies?
Wrap each cookie individually in parchment or wax paper, then pack snugly in a cookie tin or box with padding. Choose a faster shipping method to maintain freshness.
Conclusion
Candy Cane Cookies aren’t just beautiful—they’re a joyful, hands-on baking experience and a holiday classic that appeals to all ages. With their soft buttery texture, a hint of peppermint, and eye-catching swirl, these cookies are perfect for festive gifting, cookie swaps, or simply enjoying with a cozy drink by the fire. Whether you’re a beginner baker or a seasoned holiday pro, this recipe is a guaranteed crowd-pleaser that brings holiday cheer with every bite.
Stay tuned for the printable version in Part 9!

Candy Cane Cookies
- Total Time: 30 minutes
- Yield: 24 cookies
- Diet: Vegetarian
Description
Celebrate the holidays with these **Candy Cane Cookies**—a festive, buttery treat that looks just as magical as it tastes. Twisted red and white cookie dough creates a peppermint-inspired swirl that’s both fun to make and irresistible to eat. Perfect for **easy holiday baking**, **cookie exchanges**, or **gifting**, this recipe brings festive cheer in every bite. These cookies are a show-stopping addition to your **Christmas dessert table**, and a fun baking project to enjoy with kids. Whether you’re looking for **holiday cookie ideas**, a **quick dessert recipe**, or **fun food ideas for winter**, these cookies check all the boxes.
Ingredients
1 cup unsalted butter softened
1 cup granulated sugar
1 large egg
1 teaspoon vanilla extract
1/2 teaspoon peppermint extract optional
2 1/2 cups all-purpose flour
1/2 teaspoon salt
Red gel food coloring
Granulated sugar for rolling
Instructions
1. Cream the butter and sugar in a large mixing bowl until light and fluffy.
2. Add the egg, vanilla extract, and peppermint extract (if using), and beat until fully combined.
3. In a separate bowl, whisk together the flour and salt. Gradually mix into the wet ingredients to form a soft dough.
4. Divide the dough in half. Leave one portion plain and color the other with red gel food coloring.
5. Wrap both dough portions and chill in the refrigerator for 30–45 minutes.
6. Roll equal pieces of red and white dough into ropes, twist together, and form into candy cane or wreath shapes.
7. Roll shaped cookies in granulated sugar and place them on a lined baking sheet.
8. Bake at 350°F (175°C) for 8–10 minutes, just until the bottoms begin to lightly brown.
9. Let cookies cool on the baking sheet for 5 minutes, then transfer to a wire rack to cool completely.
Notes
Chill the dough before shaping to make it easier to handle and prevent spreading.
Use gel food coloring for vivid color without altering dough texture.
Don’t overbake—these cookies should stay light in color for a soft texture.
- Prep Time: 20 minutes
- Cook Time: 10 minutes
- Category: Dessert / Holiday Cookies
- Method: Baked
- Cuisine: American
Nutrition
- Serving Size: 1 cookie
- Calories: 145
- Sugar: 9g
- Sodium: 55mg
- Fat: 7g
- Saturated Fat: 4.5g
- Unsaturated Fat: 2g
- Trans Fat: 0g
- Carbohydrates: 18g
- Fiber: 0g
- Protein: 1g
- Cholesterol: 25mg