
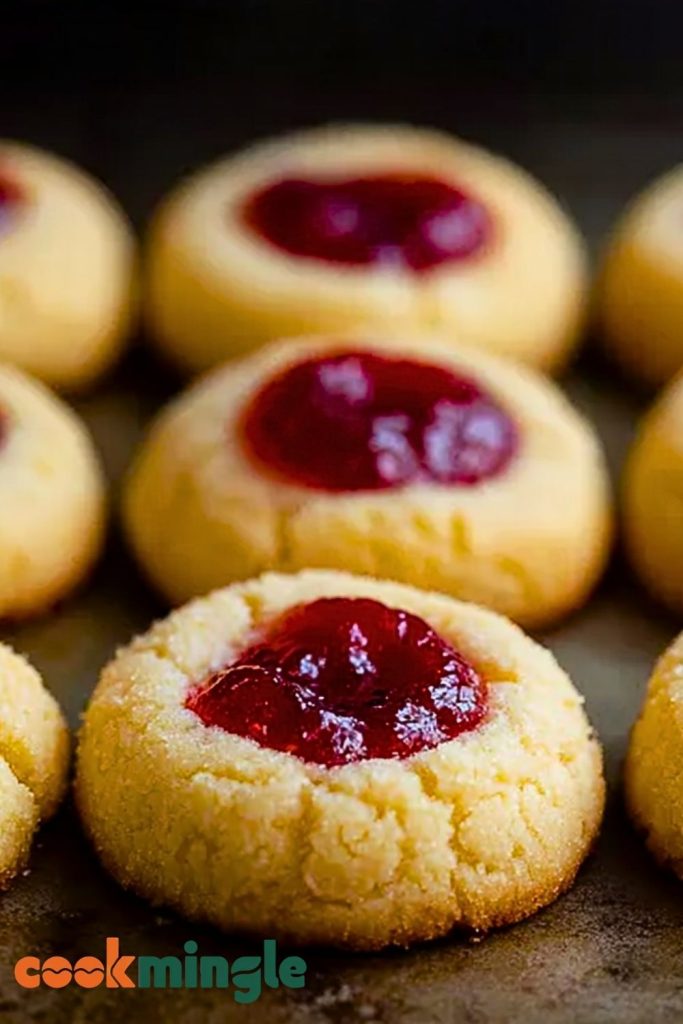
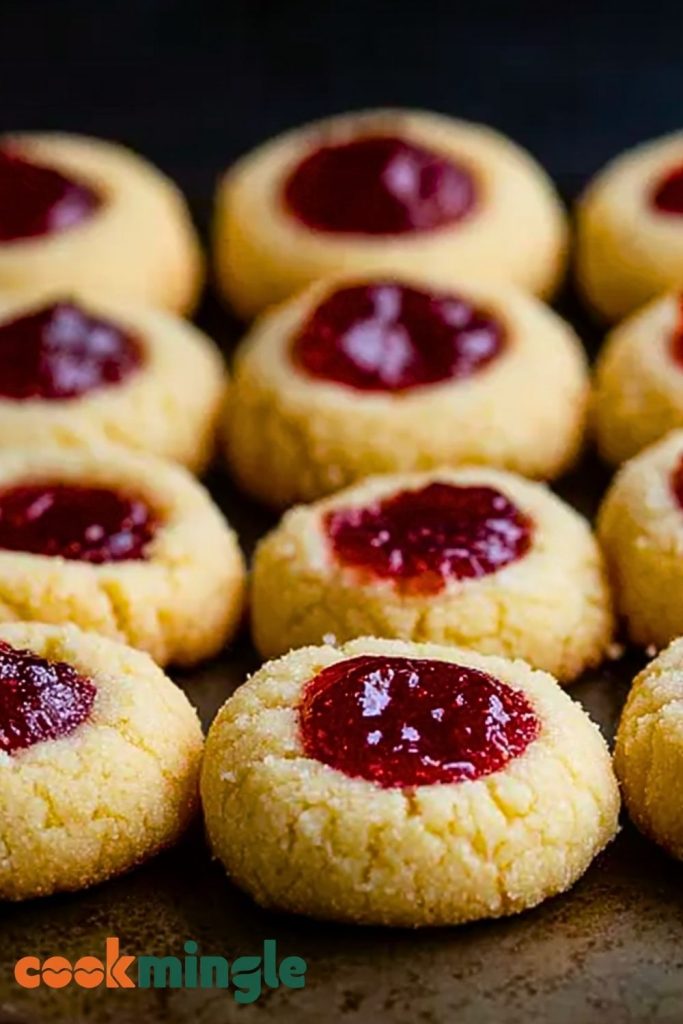
Few treats capture the charm of homemade baking quite like Classic Butter Thumbprint Cookies. With their delicate, buttery shortbread base and vibrant jewel-toned jam centers, these cookies are as beautiful to look at as they are delicious to eat. Whether served at holiday gatherings, weekend tea parties, or as a cozy everyday indulgence, they never fail to bring a smile. Each bite offers the perfect balance of melt-in-your-mouth richness and fruity sweetness, making them a timeless favorite across generations.
These cookies are also incredibly versatile—you can personalize the jam filling with your favorite flavors, from classic raspberry or strawberry to fig, apricot, or even lemon curd. Plus, their small size and eye-catching appearance make them ideal for cookie exchanges or edible gifts. They’re as fun to make as they are to eat, especially if you enjoy baking with kids or adding a little nostalgia to your kitchen.
Why You’ll Love This Classic Butter Thumbprint Cookies Recipe
- Buttery, melt-in-your-mouth texture
- Simple, everyday ingredients
- Customizable with different jam flavors
- Perfect for holidays, parties, or gifts
- Kid-friendly and fun to make
Preparation Phase & Tools to Use
To get started on this recipe, you’ll want to have the following tools handy:
- Mixing bowls: For creaming the butter and sugar, and for mixing the dough.
- Electric hand mixer or stand mixer: Essential for achieving a light, fluffy butter-sugar mixture.
- Measuring cups and spoons: Accuracy is key in baking.
- Baking sheet: A heavy-duty, non-stick baking sheet helps cookies bake evenly.
- Parchment paper or silicone baking mat: Prevents sticking and ensures easy cleanup.
- Teaspoon or thumb: For creating the signature indent in the cookies.
- Small spoon or piping bag: For neatly adding jam to each cookie.
Each of these tools plays a key role in ensuring your cookies turn out just right, from the texture of the dough to the presentation of the finished product.
Preparation Tips
For best results, make sure your butter is at room temperature before you begin—this helps it cream smoothly with the sugar and gives the cookies their signature tender texture. Chill the dough for about 30 minutes before shaping the cookies; this helps prevent spreading during baking. When forming the indentations, do so gently to avoid cracking the dough. Fill each thumbprint with jam before baking to allow the filling to set nicely in the oven. And lastly, allow the cookies to cool completely on a wire rack to help them firm up properly without crumbling.
Ingredients for this Classic Butter Thumbprint Cookies Recipe
- 1 cup (2 sticks) unsalted butter, softened to room temperature
- 2/3 cup granulated sugar
- 2 large egg yolks
- 1 teaspoon pure vanilla extract
- 1/4 teaspoon almond extract (optional, but adds a lovely flavor)
- 2 cups all-purpose flour
- 1/4 teaspoon salt
- 1/2 cup fruit jam or preserves (raspberry, strawberry, apricot, or your favorite)
- Extra granulated sugar for rolling (optional)
Step 1: Cream the Butter and Sugar
In a large mixing bowl, beat the softened butter and granulated sugar together using a hand mixer or stand mixer fitted with the paddle attachment. Mix on medium speed until the mixture is light and fluffy—about 2–3 minutes. This step ensures a tender, airy texture in the cookies.
Step 2: Add the Egg Yolks and Flavorings
Add in the egg yolks, vanilla extract, and almond extract (if using). Continue to beat until the ingredients are well combined and the mixture is smooth.
Step 3: Incorporate the Dry Ingredients
In a separate bowl, whisk together the flour and salt. Gradually add this flour mixture into the wet ingredients, mixing on low speed until a soft dough forms. Avoid overmixing to maintain a delicate cookie texture.
Step 4: Chill the Dough
Cover the dough with plastic wrap and chill in the refrigerator for at least 30 minutes. This step is essential to make the dough easier to handle and to prevent the cookies from spreading too much during baking.
Step 5: Preheat and Prep
Preheat your oven to 350°F (175°C). Line a baking sheet with parchment paper or a silicone baking mat for even baking and easy cleanup.
Step 6: Shape the Cookies
Scoop out 1-tablespoon portions of dough and roll them into smooth balls. If desired, roll each dough ball in a little granulated sugar for added texture and sparkle. Place the balls about 2 inches apart on the prepared baking sheet.
Step 7: Make the Thumbprints
Using your thumb or the back of a rounded teaspoon, gently press an indentation into the center of each cookie. Be careful not to press all the way through the dough.
Step 8: Fill with Jam
Using a small spoon or piping bag, fill each indentation with about 1/2 teaspoon of jam. Don’t overfill, as the jam can bubble over during baking.
Step 9: Bake the Cookies
Bake in the preheated oven for 12–15 minutes, or until the edges are just beginning to turn golden. The centers should remain light in color. Remove from the oven and let the cookies cool on the baking sheet for 5 minutes before transferring them to a wire rack.
Step 10: Cool and Serve
Allow the cookies to cool completely on a wire rack. The jam centers will firm up as they cool, creating the perfect contrast to the soft, buttery cookie base. Enjoy immediately or store for later indulgence.
Notes
These Classic Butter Thumbprint Cookies are best enjoyed the day they’re made, but they also store beautifully. They offer a delicate bite with just the right touch of sweetness, and you can easily adapt them to suit any occasion. Try different jam flavors, or even a small dollop of chocolate ganache or lemon curd for a gourmet twist.
Watch Out for These Mistakes While Cooking
- Using cold butter: Always soften the butter to room temperature. Cold butter won’t cream properly and can result in dense cookies.
- Skipping the chill step: Chilling the dough is essential. It helps maintain the cookie shape and prevents spreading.
- Pressing too hard: Creating the thumbprint should be gentle—pressing too hard can cause the dough to crack or create holes.
- Overfilling the jam: Filling the indent too much can cause the jam to overflow and burn.
- Overbaking: These cookies should remain pale with only lightly golden edges. Overbaking makes them dry.
Storage Instructions
Once the cookies are completely cool, store them in an airtight container at room temperature for up to 5 days. To freeze, place them in a single layer on a baking sheet until solid, then transfer to a freezer-safe container with parchment paper between layers. They’ll keep well for up to 2 months. Thaw at room temperature before serving.
Estimated Nutrition (Per Cookie – approx. 1 of 24)
- Calories: 110
- Total Fat: 6g
- Saturated Fat: 3.5g
- Unsaturated Fat: 2g
- Trans Fat: 0g
- Cholesterol: 20mg
- Sodium: 40mg
- Total Carbohydrates: 13g
- Dietary Fiber: 0g
- Total Sugars: 6g
- Protein: 1g
Frequently Asked Questions
Can I make the dough ahead of time?
Yes! You can prepare the dough up to 3 days in advance. Keep it wrapped tightly in the refrigerator until you’re ready to bake.
What type of jam works best?
Thicker jams or preserves work best because they won’t run as easily when baked. Raspberry, apricot, and strawberry are favorites.
Can I freeze these cookies?
Absolutely. Once cooled, store them in an airtight container with layers separated by parchment. Freeze for up to 2 months.
Do I have to use almond extract?
No, it’s optional. But it adds a lovely nutty depth that complements the buttery base.
Can I make these gluten-free?
Yes, you can substitute a 1:1 gluten-free baking flour blend. Make sure it contains xanthan gum for proper texture.
How do I keep the cookies from cracking?
Roll the dough into smooth balls and press gently when making the indent. Chilling the dough helps reduce cracking too.
Why did my cookies spread too much?
Your dough may have been too warm or too soft. Always chill the dough before baking.
Can I use a different filling besides jam?
Definitely! Chocolate ganache, lemon curd, or even caramel work wonderfully in place of jam.
Conclusion
Classic Butter Thumbprint Cookies are a nostalgic treat that blend ease with elegance. With a tender, buttery crumb and vibrant, jammy centers, they’re perfect for any occasion—from holiday trays to cozy afternoon tea. With a few simple techniques and a bit of creativity, you’ll have a batch of delightful cookies that taste just as amazing as they look.
Classic Butter Thumbprint Cookies
- Total Time: 30 minutes (+30 minutes chill time)
- Yield: 24 cookies
Description
Bring a touch of nostalgia to your kitchen with these Classic Butter Thumbprint Cookies—a delightful combination of buttery shortbread and fruity jam centers. Perfect as a quick dessert, holiday treat, or easy recipe for baking with kids, these cookies deliver the ideal blend of tender crumb and sweet, gooey filling. Whether you’re looking for breakfast ideas, healthy snack options (with a touch of indulgence), or easy dinner party desserts, this is one of those timeless food ideas that fits right in.
Ingredients
1 cup unsalted butter, softened
2/3 cup granulated sugar
2 large egg yolks
1 teaspoon vanilla extract
1/4 teaspoon almond extract (optional)
2 cups all-purpose flour
1/4 teaspoon salt
1/2 cup fruit jam or preserves (raspberry, strawberry, apricot, etc.)
Extra granulated sugar for rolling (optional)
Instructions
1. In a large mixing bowl, beat the softened butter and sugar until light and fluffy (2–3 minutes).
2. Add the egg yolks, vanilla, and almond extract. Beat until combined.
3. In another bowl, whisk the flour and salt. Gradually add to the butter mixture and mix until dough forms.
4. Chill dough for at least 30 minutes to firm up.
5. Preheat oven to 350°F (175°C). Line baking sheet with parchment paper.
6. Roll 1-tablespoon scoops of dough into balls. Optional: roll in sugar.
7. Gently press thumb or teaspoon into center to make an indent.
8. Fill each indentation with about 1/2 teaspoon jam.
9. Bake 12–15 minutes, until edges are lightly golden.
10. Cool on baking sheet 5 minutes, then transfer to wire rack to cool fully.
Notes
Use room temperature butter to ensure smooth, fluffy creaming.
Chill the dough for better texture and shape retention.
Don’t overfill the jam—just enough to fill the indentation without overflow.
- Prep Time: 15 minutes
- Cook Time: 15 minutes
- Category: Dessert
- Method: Baking
- Cuisine: American
Nutrition
- Serving Size: 1 cookie
- Calories: 110
- Sugar: 6g
- Sodium: 40mg
- Fat: 6g
- Saturated Fat: 3.5g
- Unsaturated Fat: 2g
- Trans Fat: 0g
- Carbohydrates: 13g
- Fiber: 0g
- Protein: 1g
- Cholesterol: 20mg