

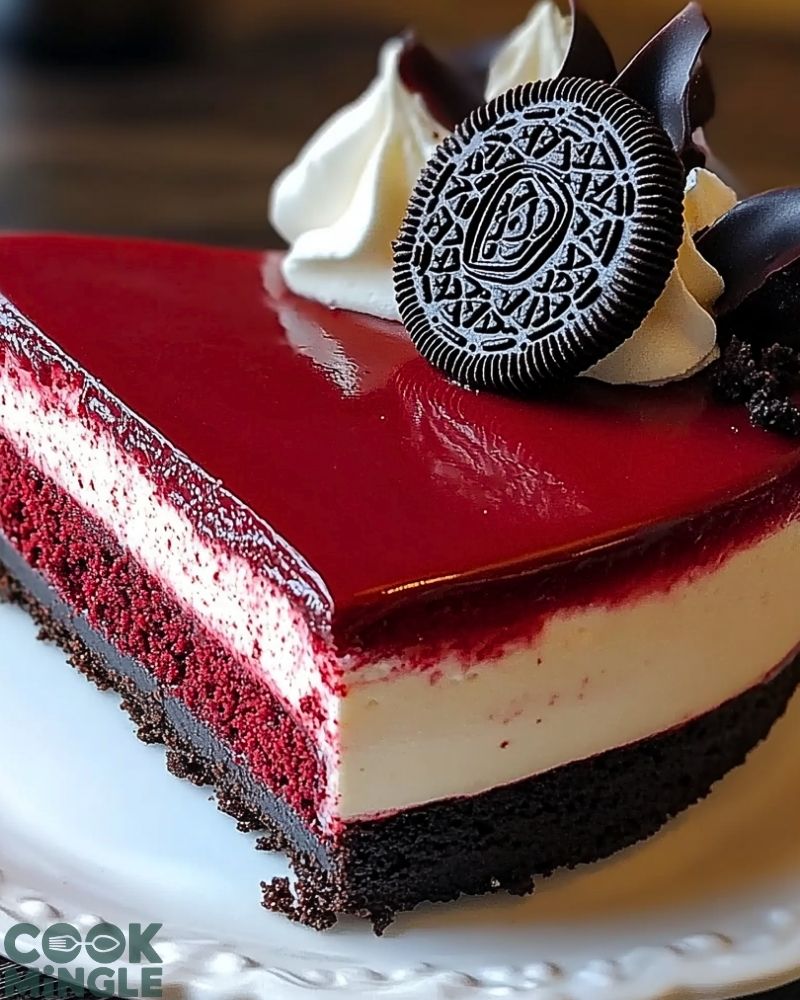
There’s something magical about the moment you slice into a silky, deep red cheesecake and see that rich hue contrast against a dark Oreo crust. I remember the first time I made this Decadent Red Velvet Oreo Cheesecake—it was for a friend’s birthday. One bite in, and everyone around the table was silent, just taking in the blend of flavors. It’s smooth, tangy, chocolatey, and just the right amount of sweet.
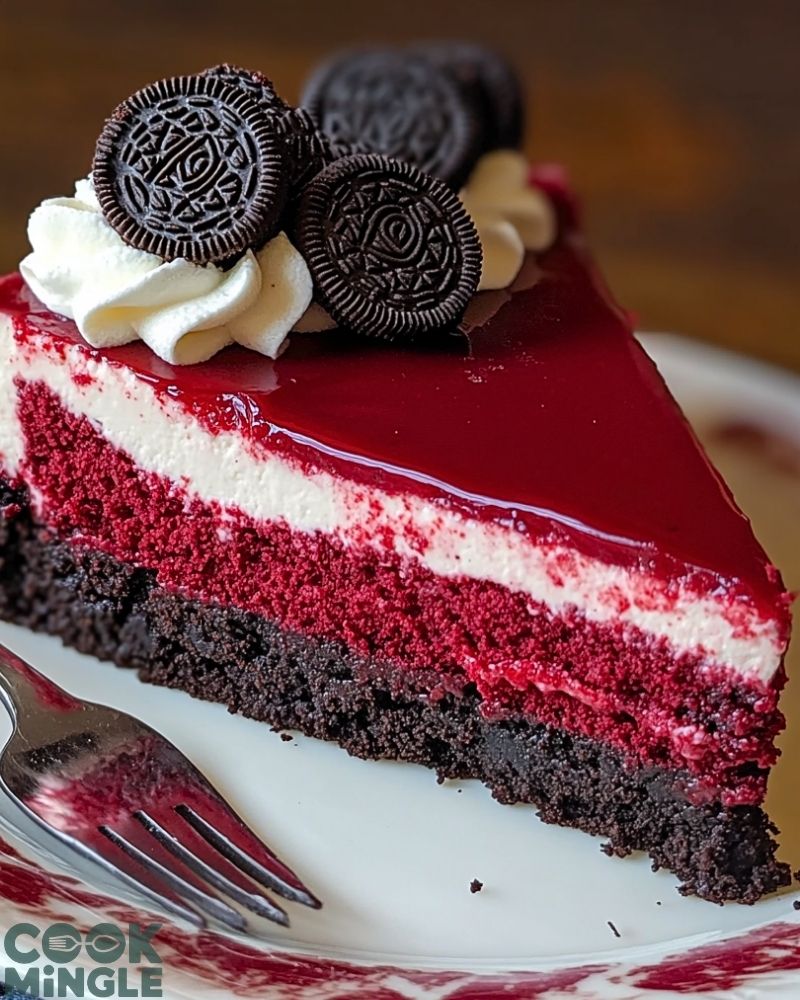
This recipe is a showstopper. The creaminess of the cheesecake filling balances perfectly with the crunchy Oreo base, and the hint of cocoa in the red velvet adds a lovely depth. Whether you’re baking it for a celebration or just because you want to treat yourself, this cheesecake never disappoints.
Why You’ll Love This Decadent Red Velvet Oreo Cheesecake
- It’s visually stunning. The vibrant red filling and dark crust create a striking contrast that’s perfect for impressing guests.
- No water bath required. Unlike traditional cheesecakes, this one sets beautifully without the need for tricky techniques.
- Texture heaven. It’s creamy, airy, and velvety all in one bite, sitting atop a crunchy, chocolatey Oreo base.
- Oreo + cheesecake = love. Need I say more?
What Kind of Oreos Should I Use?
When it comes to the base of this cheesecake, I always reach for classic chocolate Oreos. They provide that deep, cocoa-rich crunch that complements the red velvet flavor beautifully. That said, if you want to play around, you can try using double-stuffed for a thicker, creamier crust or even chocolate cream Oreos to bump up the decadence. Just make sure to include the filling when pulsing them—it helps the crust bind together.
Options for Substitutions
Whether you’re customizing for dietary needs or just using what’s on hand, this cheesecake has some wiggle room:
- Oreos: Swap in chocolate graham crackers or gluten-free sandwich cookies for a different twist.
- Cream Cheese: You can substitute part of the cream cheese with mascarpone for a slightly tangier, lighter texture.
- Red Food Coloring: Beet powder or natural food dye can be used as a more natural alternative, though the color will be subtler.
- Whipped Cream Topping: Prefer a lighter touch? Use Greek yogurt whipped with honey for a tangy finish.
- Sugar: Coconut sugar or maple sugar will give it a deeper, slightly caramel-like flavor.
Ingredients for This Decadent Red Velvet Oreo Cheesecake
Each ingredient in this cheesecake brings something essential to the table—flavor, texture, or structure. Here’s why each one matters:
- Oreos (with filling): These serve as the foundation for the crust, adding a chocolaty crunch that contrasts beautifully with the smooth filling.
- Unsalted Butter: Melted butter helps bind the crushed Oreos together, giving the crust its structure.
- Cream Cheese: The heart of any cheesecake. It delivers richness, tanginess, and a luscious, creamy texture.
- Granulated Sugar: Balances the tang of the cream cheese and brings sweetness to both the filling and the flavor of the cocoa.
- Eggs: Essential for setting the cheesecake. They help it hold its shape while staying smooth and custardy.
- Sour Cream: Adds moisture and a subtle tang, making the cheesecake ultra-smooth and flavorful.
- Heavy Cream: It lightens the batter slightly and contributes to that dreamy, airy texture.
- Cocoa Powder: A touch of cocoa gives the cheesecake its signature red velvet depth.
- Red Food Coloring: This gives the cheesecake its bold, vibrant red hue—without it, it’s just not red velvet!
- Vanilla Extract: Rounds out the flavor, adding warmth and balance to the creamy filling.
- Whipped Cream & Oreo Cookie (for garnish): Totally optional, but highly recommended for presentation and a final hit of indulgence.
Step 1: Prepare the Oreo Crust
Start by crushing your Oreos (filling included) in a food processor until they become fine crumbs. Pour in the melted butter and pulse again until the texture resembles wet sand. Press this mixture firmly into the bottom of a springform pan lined with parchment paper. Use the back of a spoon or a flat-bottomed glass to compact the crust. Chill it in the fridge while you work on the filling.
Step 2: Make the Creamy Red Velvet Filling
In a large bowl, beat the cream cheese until completely smooth and creamy. Add the sugar and mix again until well combined and fluffy. Crack in the eggs one at a time, mixing on low speed after each addition to avoid incorporating too much air. This helps prevent cracking.
Step 3: Add Flavor and Color
Stir in the sour cream, heavy cream, vanilla extract, and cocoa powder. Blend until smooth. Now add your red food coloring—start with a little and build up to your desired shade of rich red velvet. Mix gently until the color is evenly distributed.
Step 4: Assemble and Bake
Pour the red velvet batter over the chilled Oreo crust and smooth the top with a spatula. Tap the pan on the counter to release any trapped air bubbles. Bake in a preheated oven at 325°F (160°C) for about 50–60 minutes, or until the edges are set but the center still jiggles slightly when you shake the pan.
Step 5: Cool and Chill
Once baked, turn off the oven and crack the door open. Let the cheesecake rest inside for 1 hour—this gradual cooling helps avoid surface cracks. After that, transfer it to the fridge and chill for at least 4 hours, preferably overnight, so it fully sets and develops its flavor.
How Long to Cook the Decadent Red Velvet Oreo Cheesecake
The ideal baking time for this cheesecake is 50 to 60 minutes at 325°F (160°C). You’ll know it’s done when the edges are set but the center still has a gentle wobble—think soft-set Jell-O. Don’t worry if it looks a little underdone in the center; it will continue to set as it cools. Once baked, let it rest in the oven with the door cracked open for 1 hour, then chill in the refrigerator for at least 4 hours, but overnight is best for a firm, flavorful texture.
Tips for Perfect Red Velvet Oreo Cheesecake
- Use room temperature ingredients. Cold cream cheese and eggs can lead to a lumpy batter and uneven baking.
- Don’t overmix. Once you add the eggs, mix just until combined. Overmixing incorporates too much air, which can cause cracks.
- Tap out air bubbles. After pouring the batter into the pan, gently tap the pan on the counter to release hidden bubbles that could disrupt the texture.
- Use a springform pan. It makes removing the cheesecake clean and easy, especially with a cookie crust.
- Chill thoroughly. Four hours is the minimum, but an overnight chill will reward you with the best texture and flavor.
- Wipe the knife. When slicing, clean your knife between cuts for those clean, professional-looking edges.
- Don’t skip the rest time. Letting the cheesecake cool slowly helps prevent sudden temperature shifts, which are often the culprit behind cracks.
- Garnish just before serving. Add whipped cream and Oreos right before serving for the freshest presentation and best texture.
Watch Out for These Mistakes While Cooking
Even a decadent cheesecake can go sideways if you miss a few key details. Here are the common pitfalls to steer clear of:
- Skipping the crust chill: If you don’t let the crust set in the fridge before adding the filling, it may crumble or mix with the batter.
- Using cold cream cheese: This leads to a lumpy batter. Always allow it to come to room temperature before mixing.
- Overbaking: The cheesecake should still jiggle slightly in the center when it’s done. Overbaking leads to dryness and cracking.
- Not cooling gradually: A sudden shift from hot oven to cold counter can cause surface cracks. Letting it rest in the oven first prevents this.
- Too much food coloring: A little goes a long way. Too much can add a bitter taste and an artificial hue.
- High-speed mixing after eggs are added: This can whip in air and make the cheesecake puff then collapse.
- Opening the oven frequently: Resist the urge! Temperature swings can mess with the structure.
- Skipping the chill: This dessert needs to set fully to reach that dense, creamy cheesecake perfection.
What to Serve With Decadent Red Velvet Oreo Cheesecake?
Complement the richness of this cheesecake with sides or drinks that balance or enhance its flavor. Here are 8 tasty options:
1. Hot Coffee or Espresso
The slight bitterness of coffee cuts through the sweetness of the cheesecake and enhances the cocoa flavor.
2. Fresh Berries
Strawberries, raspberries, or blueberries add a refreshing tartness and a beautiful pop of color.
3. Sparkling Wine
A glass of bubbly makes it feel instantly celebratory and cleanses the palate between bites.
4. Dark Chocolate Shavings
Sprinkle on top before serving for an elegant and indulgent finish.
5. Vanilla Bean Ice Cream
Mild and creamy, it pairs wonderfully with the tangy richness of the cheesecake.
6. Orange Zest or Sauce
Citrus brings a burst of brightness that contrasts the deep cocoa and cream cheese flavors.
7. Matcha Latte
Earthy matcha offers a bold contrast and a hint of bitterness that pairs surprisingly well.
8. Salted Caramel Drizzle
Adds a sweet-savory complexity that elevates every bite of this already decadent dessert.
Storage Instructions
Once you’ve sliced into your Decadent Red Velvet Oreo Cheesecake, proper storage is key to keeping it fresh and flavorful.
- Refrigerator: Store leftovers in an airtight container or cover the cheesecake tightly with plastic wrap. It will keep well in the fridge for up to 5 days. Be sure to keep it chilled at all times to preserve the creamy texture.
- Freezer: If you’d like to save it for later, cheesecake freezes beautifully. Wrap individual slices or the whole cake (un-garnished) tightly in plastic wrap and then foil. Freeze for up to 2 months. To serve, thaw in the refrigerator overnight.
- Avoid freezing with toppings. Whipped cream and cookie garnish are best added fresh after thawing.
Estimated Nutrition
Here’s a general nutritional breakdown per slice, assuming the cheesecake yields 12 slices. Keep in mind, actual values may vary depending on specific brands and ingredient amounts:
- Calories: ~520
- Total Fat: 36g
- Saturated Fat: 21g
- Cholesterol: 135mg
- Sodium: 320mg
- Carbohydrates: 40g
- Sugar: 31g
- Protein: 7g
- Fiber: 1g
Frequently Asked Questions
How do I know when the cheesecake is fully baked?
Look for set edges and a center that jiggles slightly, like Jell-O. It shouldn’t be liquid, but don’t wait for it to firm completely in the oven—carryover heat finishes the job.
Can I make this cheesecake ahead of time?
Absolutely! In fact, it’s best made a day in advance. Chill overnight to allow the flavors to deepen and the texture to set fully.
Can I skip the red food coloring?
Yes, you can. The cocoa and vanilla flavors will still shine, though it won’t have that signature red velvet look. You can also use natural alternatives like beet powder for a milder red tone.
My cheesecake cracked—what did I do wrong?
Cracks usually come from overbaking or rapid cooling. Next time, don’t overmix after adding eggs, and cool gradually in the oven with the door slightly open.
Can I use low-fat cream cheese?
It’s not recommended. The fat content in full-fat cream cheese is essential for the rich texture and flavor. Low-fat versions can lead to a watery or grainy cheesecake.
How do I get clean slices?
Use a sharp knife dipped in hot water and wiped clean between each slice. This helps glide through the cheesecake smoothly for photo-worthy cuts.
Is this recipe gluten-free?
Not as written, since classic Oreos contain gluten. However, you can substitute with gluten-free sandwich cookies and ensure all other ingredients are certified gluten-free.
Can I make mini versions of this cheesecake?
Definitely! Use a muffin tin lined with cupcake liners. Reduce baking time to about 18–22 minutes, and keep an eye on the center jiggle test.
Conclusion
Decadent Red Velvet Oreo Cheesecake is the kind of dessert that commands attention—and delivers on every promise. It’s rich yet balanced, showy but comforting, and ideal for everything from birthday bashes to cozy weekend baking. Whether you’re making it for the first time or revisiting it as a favorite, this recipe will always hit the sweet spot.
Decadent Red Velvet Oreo Cheesecake
- Total Time: 1 hour 10 minutes
- Yield: 12 slices
Description
Indulge in the ultimate dessert experience with this Decadent Red Velvet Oreo Cheesecake. It combines a crunchy chocolate Oreo crust with a rich, velvety red velvet cheesecake filling and a dreamy, creamy finish. Perfect for celebrations or as a showstopping centerpiece for dinner ideas, this easy recipe is a favorite among cheesecake lovers. Whether you need a quick breakfast treat or a luxurious dessert to impress, this cake delivers unforgettable flavor in every slice. Sweet, tangy, and chocolatey—it’s everything you crave in one heavenly bite.
Ingredients
- 24 Oreo cookies (with filling)
- 5 tablespoons unsalted butter, melted
- 24 oz (3 blocks) cream cheese, softened
- 1 cup granulated sugar
- 3 large eggs
- 1 cup sour cream
- 1/2 cup heavy cream
- 1 tablespoon vanilla extract
- 1 tablespoon unsweetened cocoa powder
- 1 tablespoon red food coloring (or to preference)
- Whipped cream and crushed Oreos for garnish (optional)
Instructions
- Preheat oven to 325°F (160°C). Line the bottom of a springform pan with parchment paper.
- Crush Oreos into fine crumbs using a food processor. Mix in melted butter until well combined.
- Press the mixture into the base of the pan and chill in the fridge while making the filling.
- Beat softened cream cheese until smooth. Add sugar and mix until fluffy.
- Add eggs one at a time, mixing gently after each.
- Stir in sour cream, heavy cream, vanilla extract, cocoa powder, and red food coloring.
- Pour filling over the crust. Smooth the top and tap the pan on the counter to release air bubbles.
- Bake for 50–60 minutes. The center should slightly jiggle while the edges are set.
- Turn off oven and let cheesecake cool inside with the door ajar for 1 hour.
- Chill in the refrigerator for at least 4 hours or overnight.
- Before serving, garnish with whipped cream and crushed Oreos if desired.
- Prep Time: 20 minutes
- Cook Time: 50 minutes