

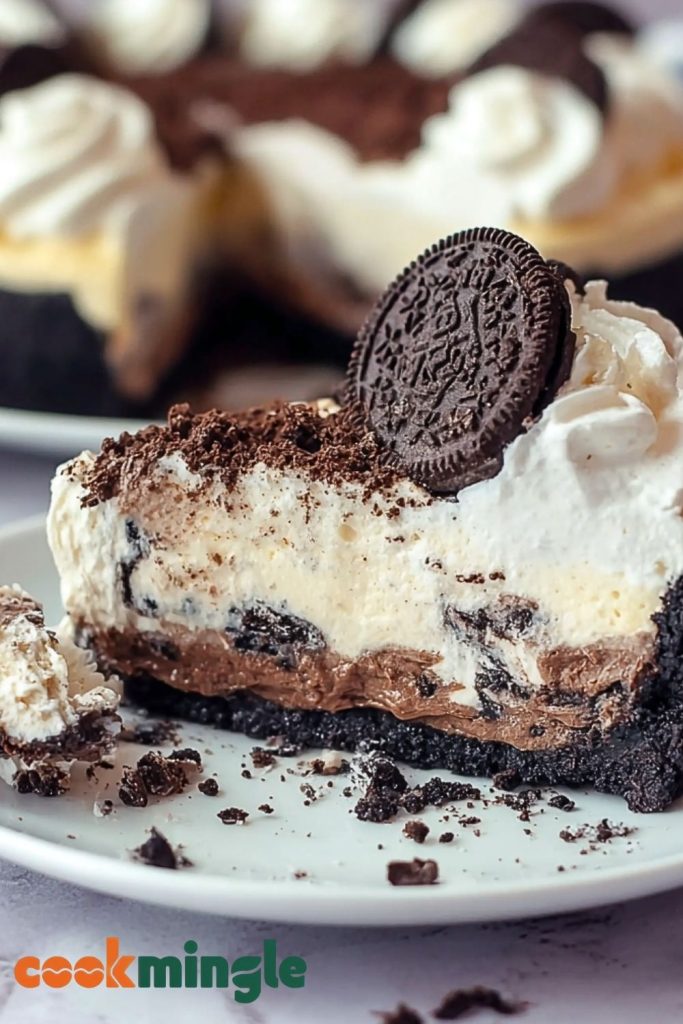
When I first made this Easy No-Bake Oreo Pie, I wasn’t expecting it to vanish within minutes—but it did. This dessert is everything you want in a sweet treat: creamy, crunchy, chocolatey, and incredibly simple to make. Whether you’re prepping it for a potluck, a birthday, or just a cozy night in, it hits all the right notes with barely any effort. The magic lies in its texture: the velvety filling combined with the rich Oreo crust creates a melt-in-your-mouth experience that’s irresistible.
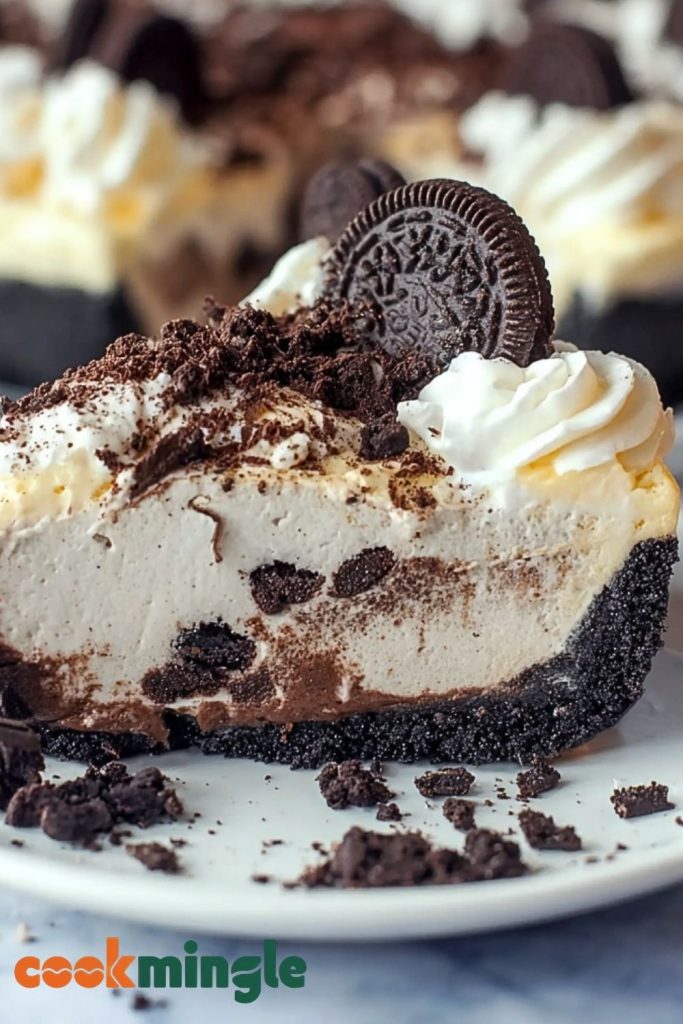
What I love most is that it doesn’t require an oven. That’s right—no baking, no worrying about burnt crusts or soggy centers. Just a handful of ingredients, a bit of mixing, and a chill in the fridge. It’s the kind of dessert that feels fancy without being fussy. Trust me, once you try it, you’ll keep coming back to this one.
Why You’ll Love This Easy No-Bake Oreo Pie
This pie is a dream for anyone short on time but craving a decadent dessert. It’s rich but light, chocolatey without being too sweet, and visually stunning without any decorating stress. Plus, it’s a total crowd-pleaser—both kids and adults go wild for it.
What Kind of Oreos Should I Use?
Classic Oreos work beautifully in this recipe, giving the crust and filling that perfect chocolatey crunch and flavor. But you can absolutely play around with flavors—Golden Oreos for a vanilla twist, or even Mint Oreos if you’re into that cool flavor combo. Just keep in mind that different varieties may slightly alter the sweetness and texture.
Options for Substitutions
If you’re dairy-free, swap the cream cheese with a dairy-free alternative and use coconut cream instead of heavy cream. Want to reduce the sugar? Try using a reduced-sugar sandwich cookie or a low-carb version of Oreos. You can also make it gluten-free with gluten-free sandwich cookies and a GF-approved whipped topping. This recipe is flexible enough to accommodate many dietary preferences without losing its charm.
Ingredients for This Easy No-Bake Oreo Pie
- Oreo cookies (classic) – These form both the crust and add crunch to the creamy filling. Their chocolatey flavor is essential.
- Unsalted butter – Melted butter binds the Oreo crumbs into a firm, sliceable crust.
- Cream cheese – Softened to room temperature, this gives the pie a tangy, creamy base.
- Powdered sugar – Adds sweetness and a smooth texture to the filling without any graininess.
- Vanilla extract – Just a touch enhances the flavor of the cream cheese mixture.
- Heavy whipping cream – Whipped into soft peaks, it makes the filling airy and rich.
- Extra Oreos (chopped or crushed) – Folded into the filling for added texture and Oreo overload.
- Cocoa powder or chocolate shavings (optional topping) – Dust the top for a professional finish.
- Whipped cream (optional for topping) – Swirls on top make it even more tempting.
Step 1: Make the Oreo Crust
Crush the Oreo cookies in a food processor until fine crumbs form. Mix in melted butter and stir until the texture resembles wet sand. Press the mixture into the bottom and up the sides of a pie dish. Use the bottom of a glass to pack it tightly. Chill in the freezer for at least 20 minutes to firm up.
Step 2: Prepare the Creamy Filling
In a large mixing bowl, beat the softened cream cheese until smooth and fluffy. Add in powdered sugar and vanilla extract, continuing to beat until everything is well blended.
Step 3: Whip the Cream
In a separate bowl, whip the heavy cream until it forms soft peaks. This step is crucial for that fluffy texture. Gently fold the whipped cream into the cream cheese mixture using a spatula—don’t stir too aggressively, or you’ll deflate the airiness.
Step 4: Fold in Crushed Oreos
Chop or lightly crush additional Oreo cookies and fold them into the filling. This gives the pie that irresistible cookies-and-cream texture and look.
Step 5: Assemble the Pie
Spoon the filling into the chilled crust and smooth the top with a spatula. At this point, you can dust the top with cocoa powder or chocolate shavings if desired.
Step 6: Chill to Set
Refrigerate the pie for at least 4 hours, or overnight if you have the time. The longer it chills, the firmer and easier it is to slice.
Step 7: Add Final Toppings
Before serving, add decorative swirls of whipped cream and a few extra Oreo pieces on top for presentation. Serve chilled and enjoy every creamy bite.
How Long to Prepare the Easy No-Bake Oreo Pie
Prep Time: The actual hands-on prep takes about 20 minutes. That includes crushing the Oreos, mixing the filling, and assembling the pie. If you’re multitasking or prepping with kids, it might stretch to 30 minutes.
Chill Time: While you won’t need to bake anything, the pie does need to firm up in the refrigerator for a minimum of 4 hours. Overnight is ideal for the perfect texture and clean slices.
Tips for Perfect Easy No-Bake Oreo Pie
- Use full-fat cream cheese for the creamiest filling and best structure.
- Chill your mixing bowl before whipping the cream to help it whip faster and hold its shape.
- Crush the Oreos finely for the crust, but leave small chunks in the filling for texture.
- Allow the pie to chill long enough so it slices cleanly—patience pays off!
- Wipe your knife between slices to keep each piece picture-perfect.
Watch Out for These Mistakes While Cooking
- Using low-fat cream cheese: This can result in a runnier filling.
- Not chilling the crust: If the crust isn’t firm, it can crumble when slicing.
- Overmixing whipped cream into the filling: You’ll lose the fluffiness and end up with a denser pie.
- Skipping the chill time: The pie won’t set properly and may collapse when cut.
- Using warm ingredients: This can prevent the pie from firming up well.
What to Serve With Easy No-Bake Oreo Pie?
1. Fresh Berries
The tartness of strawberries or raspberries cuts through the richness beautifully.
2. Vanilla Ice Cream
Serve a small scoop on the side for an ultra-decadent dessert.
3. Hot Coffee or Espresso
A dark roast coffee balances the sweetness of the pie nicely.
4. Chocolate Sauce Drizzle
A warm drizzle of chocolate syrup amps up the chocolate factor even more.
5. Whipped Cream & Mint
Garnish with a dollop of whipped cream and a fresh mint leaf for a classy finish.
Storage Instructions
Refrigerator: Store leftover Oreo pie in the refrigerator, covered with plastic wrap or in an airtight container. It stays fresh for up to 4–5 days. Make sure it’s chilled until serving to maintain the creamy texture.
Freezer: You can freeze this pie for longer storage—just wrap it tightly in plastic wrap, then foil, and place it in a freezer-safe bag. It can last up to 2 months. Thaw in the refrigerator overnight before serving.
Estimated Nutrition (per slice – based on 8 servings)
- Calories: ~420 kcal
- Fat: 28g
- Saturated Fat: 16g
- Carbohydrates: 38g
- Sugar: 26g
- Protein: 4g
- Fiber: 1g
- Sodium: 220mg
Frequently Asked Questions
Can I make this pie in advance?
Yes! In fact, it’s best when made the day before to allow it to fully set and develop flavor.
Can I use store-bought whipped topping instead of whipping cream?
Absolutely. It’s a great shortcut and still delivers a creamy, fluffy filling.
What can I use instead of Oreos for the crust?
You can use any chocolate sandwich cookie or even chocolate graham crackers if you prefer a less sweet base.
Is it safe to freeze with whipped cream on top?
Yes, but for best presentation, add whipped cream toppings just before serving.
Can I make this pie vegan?
Yes! Use vegan cream cheese, coconut cream, and dairy-free sandwich cookies. It turns out just as delicious.
Conclusion
This Easy No-Bake Oreo Pie is proof that great desserts don’t need to be complicated. With its luscious texture, deep chocolate flavor, and minimal prep, it’s the kind of recipe you’ll turn to again and again. Perfect for holidays, birthdays, or just a weekend treat, it’s as satisfying to make as it is to eat. Simple, sweet, and guaranteed to impress—this pie truly has it all.

Easy No-Bake Oreo Pie Everyone Will Love
- Total Time: 4 hours 20 minutes
- Yield: 8 slices
Description
Craving something sweet, quick, and unbelievably delicious? This *Easy No-Bake Oreo Pie* is the answer. It’s the ultimate dessert that requires zero baking—just mix, chill, and devour. Perfect for last-minute dessert ideas, quick breakfast sweets, or indulgent snack time treats. With its creamy filling, Oreo-studded crust, and effortless prep, it’s a winner for anyone who loves easy recipes, food ideas for gatherings, or just a satisfying dessert without the oven.
Ingredients
2 cups crushed Oreo cookies
6 tablespoons unsalted butter, melted
8 oz cream cheese, softened
1 cup powdered sugar
1 teaspoon vanilla extract
1 cup heavy whipping cream
8 Oreo cookies, chopped
1 tablespoon cocoa powder (optional, for dusting)
1 cup whipped cream (optional, for topping)
Instructions
1. Crush Oreo cookies until fine using a food processor or zip-top bag with a rolling pin.
2. Mix crushed Oreos with melted butter until it resembles wet sand.
3. Press the mixture into a pie dish to form a crust and freeze for 20 minutes.
4. Beat cream cheese in a bowl until smooth.
5. Add powdered sugar and vanilla extract, mixing until fully combined.
6. In a separate bowl, whip the heavy cream until soft peaks form.
7. Gently fold whipped cream into the cream cheese mixture.
8. Fold in chopped Oreo cookies for added texture and flavor.
9. Spread filling evenly into the chilled crust and smooth the top.
10. Dust with cocoa powder or add optional toppings like whipped cream and extra Oreo pieces.
11. Chill the pie for at least 4 hours, preferably overnight.
12. Slice and serve cold for best results.
Notes
Chill the pie overnight for the cleanest slices and firmest texture.
Always use full-fat cream cheese for best results.
For extra Oreo flavor, line the crust with a few whole cookies before adding the filling.
- Prep Time: 20 minutes
- Cook Time: 0 minutes
- Category: Dessert
- Method: No-Bake
- Cuisine: American
Nutrition
- Serving Size: 1 slice
- Calories: 420
- Sugar: 26g
- Sodium: 220mg
- Fat: 28g
- Saturated Fat: 16g
- Unsaturated Fat: 10g
- Trans Fat: 0g
- Carbohydrates: 38g
- Fiber: 1g
- Protein: 4g
- Cholesterol: 60mg