

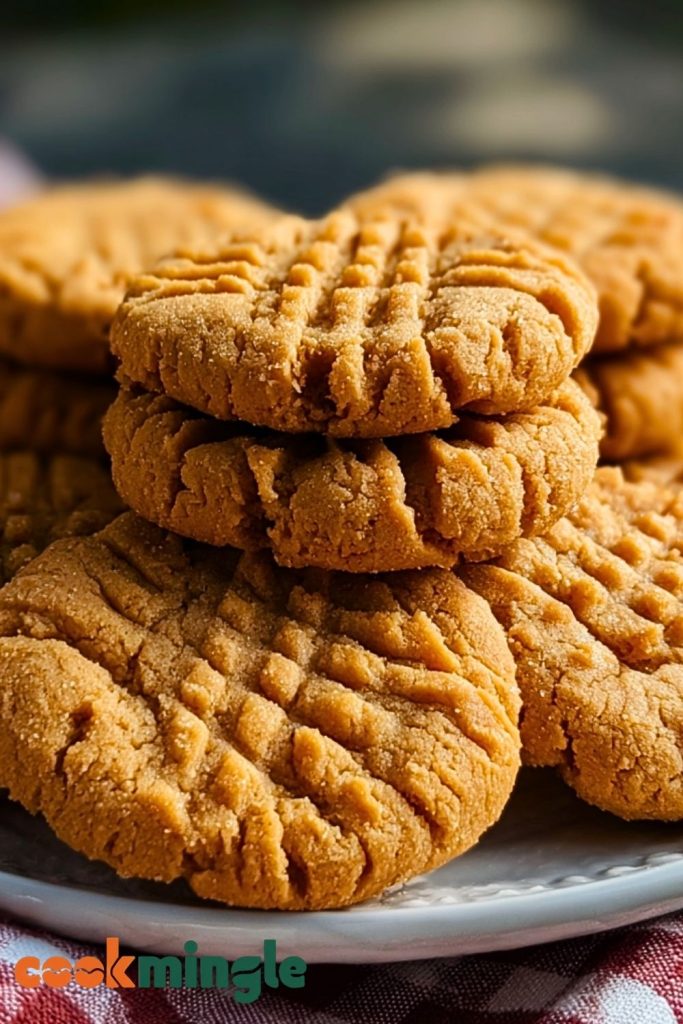
Golden, soft, and gently crisp on the edges, these cookies are packed with nostalgic comfort and rich, roasted peanut flavor. Jimmy Carter’s Grandmother’s Peanut Butter Cookies aren’t just a classic dessert—they’re a warm hug from the past. These are the kind of cookies that fill the kitchen with a buttery aroma and vanish faster than you can say “plains peanut.” With their signature fork-tine crisscross tops and tender centers, they feel like a timeless treat from a simpler era.
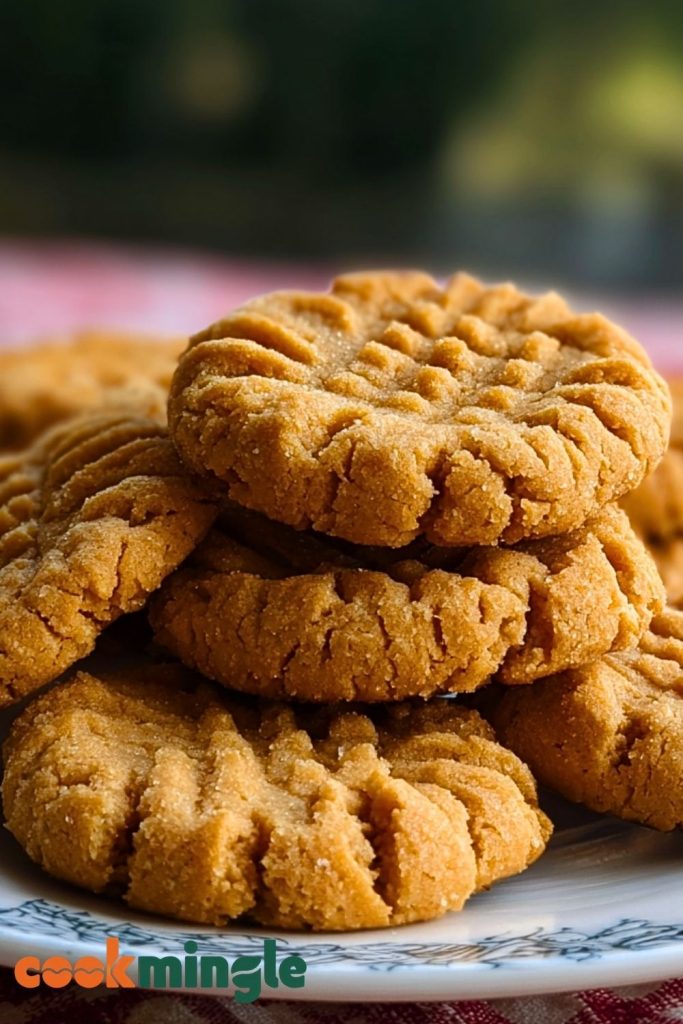
Made with pantry staples and a heavy dose of tradition, this recipe harks back to Southern kitchens where the peanut reigns supreme. Jimmy Carter, America’s peanut farmer president, famously cherished these cookies from his grandmother’s recipe box. And once you try them, you’ll understand why they’ve stood the test of time—perfect with a glass of milk, a cup of coffee, or right out of the cookie jar.
Why You’ll Love This Peanut Butter Cookie Recipe
- Classic flavor, never boring: With just the right amount of sweetness and a bold peanut punch, these cookies remind you why the classics became classics.
- Perfect texture: Soft in the center with crisp, golden edges—just the way a peanut butter cookie should be.
- Simple ingredients, no fuss: Everything you need is probably already in your kitchen.
- Full of tradition: A true Southern heirloom recipe with real family roots.
- Ideal for any occasion: Bake sales, lunchboxes, or just a cozy night in—they fit in everywhere.
- Freezer-friendly: Make a big batch, freeze, and bake whenever the craving hits.
- Customizable: Add chocolate chips, crushed peanuts, or even a sprinkle of flaky salt on top.
- Kid-approved: From dough to bite, it’s a fun baking experience the whole family will enjoy.
Preparation Phase & Tools to Use (Essential Tools and Equipment, and the Importance of Each Tool)
Before you dive into making Jimmy Carter’s Grandmother’s Peanut Butter Cookies, gathering the right tools will make your baking smoother and more enjoyable. Here’s what you’ll need and why:
- Mixing Bowls (at least two) – One for dry ingredients and another for wet ingredients. Separating these helps evenly distribute the baking soda and salt through the flour before combining.
- Electric Hand Mixer or Stand Mixer – Creaming butter and sugar thoroughly is key to soft cookies. A mixer gives you the power and consistency to do this efficiently.
- Measuring Cups and Spoons – Precision is everything in baking. Make sure you’re using the right measurements, especially for baking soda and peanut butter.
- Rubber Spatula – Perfect for scraping every last bit of dough from the bowl.
- Cookie Scoop or Spoon – Ensures uniform cookie size so they bake evenly.
- Fork – To press the signature crisscross pattern onto each cookie.
- Baking Sheets – Use heavy-duty, flat cookie sheets for even heat distribution.
- Parchment Paper or Silicone Baking Mat – Prevents sticking and helps cookies bake evenly without burning on the bottom.
- Cooling Rack – Letting cookies cool completely on a rack keeps them from becoming soggy on the bottom.
Having all of these ready before you begin creates a smooth, mess-free experience and helps prevent errors during mixing and baking.
Preparation Tips
- Use room-temperature ingredients: Softened butter and eggs at room temp blend more easily and produce a better texture.
- Don’t overmix the dough: Once you combine the dry ingredients with the wet, mix just until incorporated to avoid tough cookies.
- Chill if needed: If your dough feels too soft or sticky, chilling it for 20–30 minutes will make scooping easier and reduce spreading in the oven.
- Be consistent with size: Uniform cookie dough balls bake more evenly and make for a prettier final result.
- Crisscross with care: Gently flatten the cookies with a fork—too much pressure will over-flatten them and they’ll spread too thin.
- Preheat the oven: Make sure it’s fully at temperature before the cookies go in to ensure proper rising and texture.
Ingredients for Jimmy Carter’s Grandmother’s Peanut Butter Cookies
This recipe uses simple pantry staples to create something unforgettable. Here’s everything you’ll need:
- 1 cup creamy peanut butter – The star of the show. Use a traditional peanut butter (like Jif or Skippy) for best results.
- 1/2 cup unsalted butter, softened – Adds richness and ensures a tender crumb.
- 1/2 cup granulated sugar – For classic sweetness and structure.
- 1/2 cup packed brown sugar – Brings a deep, molasses-like flavor and moisture.
- 1 large egg – Binds the dough and adds softness.
- 1 1/4 cups all-purpose flour – The base of the cookie, providing body and chew.
- 1/2 teaspoon baking soda – Gives a slight lift, keeping the cookies from being too dense.
- 1/4 teaspoon salt – Balances the sweetness and enhances the peanut flavor.
- 1 teaspoon vanilla extract – Rounds out the flavor with a warm, subtle note.
Optional but delicious additions:
- A handful of chopped roasted peanuts for crunch.
- A sprinkle of flaky sea salt on top before baking for contrast.
Step 1: Cream the Butter, Peanut Butter, and Sugars
In a large mixing bowl, beat together the softened butter, peanut butter, granulated sugar, and brown sugar using a hand or stand mixer. Beat on medium speed for 2–3 minutes, until the mixture is light and fluffy. This creaming step is crucial—it adds air to the dough, ensuring tender cookies.
Step 2: Add the Egg and Vanilla
Crack in the egg and pour in the vanilla extract. Mix until just combined. Scrape down the sides of the bowl with a spatula to ensure everything blends evenly.
Step 3: Mix the Dry Ingredients Separately
In another bowl, whisk together the flour, baking soda, and salt. Mixing them beforehand guarantees even distribution of the leavening agent and salt in the dough.
Step 4: Combine Wet and Dry Mixtures
Gradually add the dry ingredients to the wet mixture in 2–3 additions, mixing on low speed. Stop mixing once no flour streaks remain. The dough will be soft but not sticky.
Step 5: Scoop and Shape the Dough
Use a cookie scoop or spoon to form tablespoon-sized dough balls. Roll them gently between your palms, then place them on a parchment-lined baking sheet, leaving about 2 inches between each cookie.
Step 6: Create the Signature Crisscross
Use the tines of a fork to press down gently on each dough ball in one direction, then again in the opposite direction to make the classic crisscross pattern.
Step 7: Bake
Bake in a preheated 350°F (175°C) oven for 10–12 minutes, or until the edges are golden and the centers are set but still soft. Don’t overbake—they continue to firm up as they cool.
Step 8: Cool
Let cookies rest on the baking sheet for 5 minutes, then transfer them to a wire rack to cool completely. This helps them set without becoming too crisp.
Notes
- Type of Peanut Butter Matters: Stick with commercial creamy peanut butter (like Jif or Skippy) for consistent texture. Natural peanut butters with oil separation can lead to crumbly or greasy cookies.
- Rest Before Eating: These cookies taste even better after they’ve cooled for about an hour—the flavors settle, and the texture becomes perfect.
- Double Batch Friendly: This dough doubles easily and freezes well, making it perfect for preparing ahead for holidays or gatherings.
Watch Out for These Mistakes While Cooking
- Using cold butter: Cold butter won’t cream properly with the sugars, which affects the cookie’s texture.
- Skipping the crisscross: The fork marks aren’t just decorative—they flatten the cookies to help them bake evenly.
- Overbaking: These cookies can go from soft to dry quickly. Take them out when the edges are golden but the center still looks soft.
- Not measuring flour correctly: Too much flour makes the cookies dry and cakey. Spoon and level your flour for accuracy.
- Crowding the baking sheet: Give cookies room to spread. Overcrowding can cause uneven baking and soft centers.
- Ignoring chill time (if dough is soft): Warm dough spreads too quickly. If your dough feels too warm, a quick chill in the fridge makes shaping easier and baking more consistent.
- Substituting natural peanut butter without adjusting: Natural peanut butter has a different moisture content and requires recipe tweaks to work well.
- Not rotating the baking sheet: If your oven has hot spots, rotating the sheet halfway through baking helps ensure even browning.
What to Serve With Jimmy Carter’s Grandmother’s Peanut Butter Cookies?
These nostalgic cookies pair beautifully with a wide range of flavors and drinks, making them a versatile treat for any occasion. Whether you’re serving them at a gathering or enjoying a quiet snack, here are some delicious companions.
8 Recommendations
- Cold Milk – The timeless combo: dunk a warm cookie into an ice-cold glass of milk for peak comfort.
- Vanilla Ice Cream – Make an easy peanut butter cookie sandwich or crumble cookies over a scoop for dessert.
- Coffee or Espresso – The roasted notes of coffee pair perfectly with the deep nuttiness of the cookies.
- Hot Chocolate – Especially in colder seasons, this pairing creates a cozy, nostalgic treat.
- Apple Slices with Cinnamon – The sweet and fresh crunch of apples balances the richness of the cookies.
- Dark Chocolate Squares – The bitterness of dark chocolate enhances the peanut butter flavor without overpowering it.
- Greek Yogurt with Honey – Add a couple of cookies on the side of a yogurt bowl for a textural contrast and a fun breakfast idea.
- Banana Smoothie – Peanut butter and banana are a natural match. A smoothie brings a refreshing, healthy twist to your snack.
Storage Instructions
To keep Jimmy Carter’s Grandmother’s Peanut Butter Cookies fresh and delicious:
- Room Temperature: Store cookies in an airtight container for up to 5 days. Add a slice of bread to the container to keep them soft.
- Refrigeration: Not recommended unless your kitchen is very warm; they tend to dry out in the fridge.
- Freezing Baked Cookies: Place cooled cookies in a single layer in a freezer-safe bag or container. Freeze for up to 2 months. Thaw at room temperature.
- Freezing Dough: Roll the dough into balls, press with a fork, and freeze on a baking sheet until solid. Then store in a freezer bag for up to 3 months. Bake from frozen—just add an extra minute or two to the baking time.
Estimated Nutrition (Per Cookie – Approximate)
- Calories: 170
- Total Fat: 10g
- Saturated Fat: 3g
- Unsaturated Fat: 6g
- Trans Fat: 0g
- Cholesterol: 15mg
- Sodium: 120mg
- Carbohydrates: 17g
- Fiber: 1g
- Sugar: 9g
- Protein: 4g
- Serving Size: 1 cookie
- Diet: Vegetarian
- Category: Dessert / Snack
- Method: Baked
- Cuisine: Southern / American
Note: Nutrition will vary slightly depending on peanut butter brand and optional add-ins.
Frequently Asked Questions
1. Can I use natural peanut butter instead of regular?
You can, but it’s tricky. Natural peanut butter often separates and has a thinner texture, which can result in oily or crumbly cookies. If using it, stir well and consider reducing other fats slightly.
2. Do I have to chill the dough before baking?
Not always, but if the dough is too soft or your kitchen is warm, chilling for 20–30 minutes helps prevent over-spreading.
3. Why is there a crisscross pattern on peanut butter cookies?
The fork marks help flatten the dense dough so it bakes evenly. It also gives the cookies their signature, nostalgic look.
4. Can I make these cookies gluten-free?
Yes! Substitute the all-purpose flour with a 1:1 gluten-free baking flour blend. Check that your baking soda is certified gluten-free as well.
5. Can I freeze the cookie dough?
Absolutely. Scoop and press the dough balls, freeze them on a tray, then transfer to a bag. You can bake them straight from the freezer—just add a minute or two to the baking time.
6. How do I know when they’re done baking?
Look for lightly golden edges and soft centers. The cookies will continue to set as they cool, so don’t wait for them to look fully done in the oven.
7. Can I add chocolate chips or other mix-ins?
Yes! Chocolate chips, chopped peanuts, or even a swirl of Nutella can make fun variations on this classic cookie.
8. How long will these cookies stay fresh?
Stored properly in an airtight container at room temperature, they stay fresh for about 5 days. After that, their texture starts to decline slightly.
Conclusion
Jimmy Carter’s Grandmother’s Peanut Butter Cookies are more than just a recipe—they’re a delicious slice of Southern heritage. With their rich flavor, soft texture, and nostalgic charm, these cookies are bound to become a family favorite in your home too. Whether you stick to the classic or add your own twist, one thing’s certain: every bite tells a story of warmth, tradition, and timeless comfort.
Stay tuned for the printable recipe in the next part, perfect for saving, sharing, or sticking to your fridge!
Jimmy Carter’s Grandmother’s Peanut Butter Cookies
- Total Time: 22 minutes
- Yield: 24 cookies
- Diet: Vegetarian
Description
Step back into a Southern kitchen with these nostalgic, soft, and golden peanut butter cookies inspired by Jimmy Carter’s grandmother. A perfect combination of sweet and salty, with the signature crisscross design and rich roasted peanut flavor, these cookies are an easy recipe for dessert, snack, or even breakfast ideas. If you’re craving comfort food or looking for a quick baking win, this cookie delivers timeless charm and unbeatable taste.
Ingredients
1 cup creamy peanut butter
1/2 cup unsalted butter, softened
1/2 cup granulated sugar
1/2 cup packed brown sugar
1 large egg
1 1/4 cups all-purpose flour
1/2 teaspoon baking soda
1/4 teaspoon salt
1 teaspoon vanilla extract
Instructions
1. In a large bowl, cream together peanut butter, softened butter, granulated sugar, and brown sugar until light and fluffy.
2. Add the egg and vanilla extract. Mix until well combined.
3. In a separate bowl, whisk together flour, baking soda, and salt.
4. Gradually add dry ingredients to the wet mixture, mixing until just combined.
5. Scoop tablespoon-sized portions of dough and roll into balls.
6. Place on a parchment-lined baking sheet with 2 inches between each.
7. Use a fork to press a crisscross pattern gently onto each dough ball.
8. Bake in a preheated 350°F (175°C) oven for 10–12 minutes, until edges are golden.
9. Let cookies cool on the sheet for 5 minutes, then transfer to a wire rack to cool completely.
Notes
Use commercial creamy peanut butter (like Jif or Skippy) for consistent texture.
Don’t overbake; remove from oven when edges are golden and centers are soft.
Cookies taste even better after cooling completely—flavors deepen with time.
- Prep Time: 10 minutes
- Cook Time: 12 minutes
- Category: Dessert
- Method: Baked
- Cuisine: Southern / American
Nutrition
- Serving Size: 1 cookie
- Calories: 170
- Sugar: 9g
- Sodium: 120mg
- Fat: 10g
- Saturated Fat: 3g
- Unsaturated Fat: 6g
- Trans Fat: 0g
- Carbohydrates: 17g
- Fiber: 1g
- Protein: 4g
- Cholesterol: 15mg