
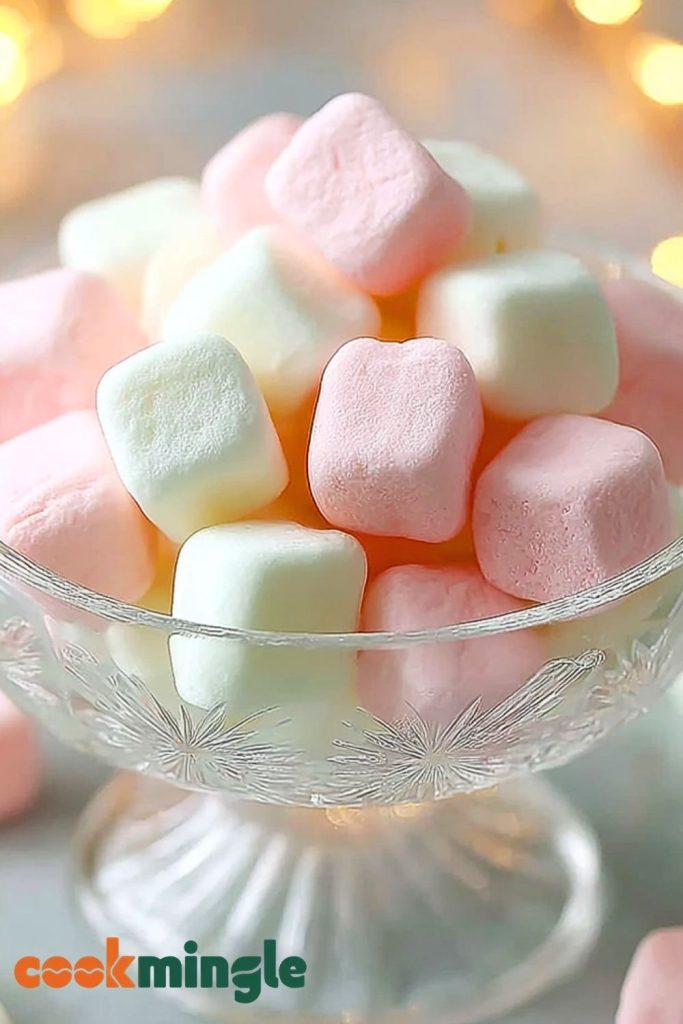
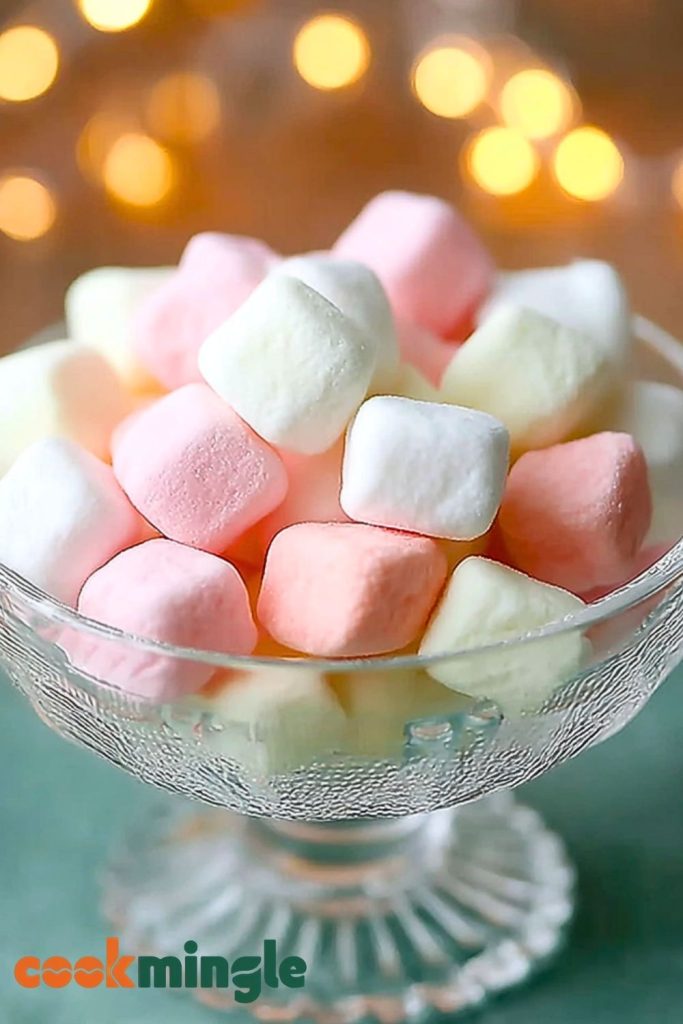
There’s something undeniably charming about a bowl of Old-Fashioned Butter Mints sitting out at a holiday gathering or tucked into a candy dish at grandma’s house. I’ve always had a soft spot for these little pillows of sweetness—the way they melt in your mouth with a creamy, buttery finish makes them simply irresistible. Making them from scratch brings back a warm nostalgia that store-bought versions just can’t touch.
I love how easy and fun it is to whip up a batch of these pastel-colored treats. They’re perfect for baby showers, weddings, holiday parties, or just to enjoy as a homemade indulgence. With only a handful of ingredients and a little patience, you can create these soft, melt-in-your-mouth mints that everyone will be reaching for.
Why You’ll Love This Old-Fashioned Butter Mints Recipe
Old-Fashioned Butter Mints aren’t just adorable—they’re the kind of treat that feels fancy without the fuss. You’ll love how easy they are to make, how beautifully they present on a dessert table, and how customizable they are with flavors and colors. Plus, they store well, making them a great make-ahead candy for holidays or gifting.
What Flavoring Should I Use for Butter Mints?
Peppermint is the classic go-to, and it adds that familiar fresh bite you expect in a butter mint. But don’t stop there—vanilla, lemon, almond, or even strawberry extracts can all bring unique spins to your homemade batch. Just a few drops go a long way, so taste as you go to find your perfect minty match.
Options for Substitutions
If you’re dairy-free, try using vegan butter—it won’t be exactly the same, but it still gives a smooth, creamy result. Powdered sugar is a must, but if you’re avoiding corn-based sugars, some organic versions use tapioca starch instead. You can also play with colors using natural food dyes like beet powder or spirulina for a more wholesome touch. For flavor, as mentioned, try citrus or vanilla if you’re not a peppermint fan.
Ingredients for this Old-Fashioned Butter Mints Recipe
- Unsalted Butter – This is the heart of the recipe. It adds a rich, creamy base that gives the mints their signature melt-in-your-mouth texture.
- Powdered Sugar – Acts as the sweetener and the bulk of the mint dough. Its fine texture helps the dough stay soft and smooth.
- Heavy Cream – Just a small amount helps to loosen the dough and make it pliable without becoming sticky.
- Peppermint Extract – Adds that classic cool, minty flavor. You can substitute or combine with other extracts like vanilla or almond.
- Salt – Enhances the flavor and balances out the sweetness.
- Food Coloring (optional) – A touch of pastel pink, yellow, or green makes these mints look just as delightful as they taste.
Step 1: Cream the Butter
Start by beating the softened unsalted butter in a large mixing bowl until it’s fluffy and light in color. This step is essential for the mints to have a smooth and airy texture.
Step 2: Add Flavoring and Cream
Mix in the peppermint extract and heavy cream. Stir until well incorporated. You can taste and adjust the peppermint extract depending on how strong you want the flavor.
Step 3: Incorporate the Powdered Sugar
Gradually add the powdered sugar, one cup at a time, beating continuously. As the dough starts to stiffen, you may need to switch to kneading by hand. You’re looking for a dough that’s smooth, non-sticky, and holds its shape.
Step 4: Add Color (Optional)
Divide the dough into portions if you want to use multiple colors. Add a drop or two of food coloring to each portion and knead until the color is evenly distributed. Pastels work beautifully for a vintage touch.
Step 5: Shape the Mints
Roll small pieces of dough into ropes about ½ inch thick. Cut into bite-sized squares or small pillow shapes using a sharp knife or dough cutter.
Step 6: Let Them Dry
Place the mints on a parchment-lined baking sheet. Allow them to air-dry at room temperature for at least 12 hours, or overnight. This step ensures they firm up on the outside but stay soft on the inside.
How Long to Prepare the Old-Fashioned Butter Mints Recipe
Making butter mints is simple but does require some patience. The active prep time, where you mix, color, and shape the dough, will take about 30 to 45 minutes depending on how many colors or flavors you’re using.
The crucial part comes next: drying time. After shaping the mints, they need to sit out at room temperature to dry for at least 12 hours, preferably overnight. This helps them form a slight crust on the outside while remaining soft and creamy inside.
Tips for Perfect Old-Fashioned Butter Mints
- Use room-temperature butter for a smoother dough.
- Always sift the powdered sugar to avoid lumps.
- Don’t skip the drying step—it’s key to the perfect texture.
- If the dough becomes too sticky, add a bit more powdered sugar while kneading.
- Want neat, uniform mints? Use a ruler and sharp knife for precise cuts.
Watch Out for These Mistakes While Cooking
- Overmixing the dough can make it tough instead of soft.
- Too much extract can overpower the flavor and create bitterness.
- Skipping the drying time will result in overly soft mints that don’t hold their shape.
- Using salted butter can clash with the sweet, minty flavor profile.
- Adding food coloring too late can lead to uneven colors—add it early while the dough is soft.
What to Serve With Old-Fashioned Butter Mints?
1. Coffee or Espresso
The cool minty flavor complements hot, strong coffee beautifully.
2. Tea Sandwiches
Perfect for bridal showers, baby showers, or afternoon teas.
3. Chocolate Desserts
Serve alongside brownies or chocolate cake for a refreshing contrast.
4. Holiday Cookie Platters
Add visual appeal and flavor variety to a classic cookie spread.
5. Ice Cream
Butter mints make a charming and tasty garnish for scoops of vanilla or chocolate ice cream.
Storage Instructions
Room Temperature:
Once the butter mints have dried completely, store them in an airtight container at room temperature. They’ll stay fresh for up to 2 weeks.
Refrigeration:
Not necessary, but if you live in a hot climate, you can refrigerate them in a sealed container. Just bring them to room temperature before serving for the best texture.
Freezing:
You can freeze butter mints for up to 3 months. Lay them in a single layer on a baking sheet, freeze until solid, then transfer to a freezer bag or airtight container. Thaw at room temp before serving.
Estimated Nutrition
(Per 5-piece serving)
- Calories: 110
- Total Fat: 6g
- Saturated Fat: 3.5g
- Cholesterol: 15mg
- Sodium: 5mg
- Total Carbohydrates: 15g
- Sugars: 14g
- Protein: 0g
Frequently Asked Questions
Can I make butter mints in advance?
Absolutely! In fact, they’re perfect for making ahead since they need drying time and store well.
Can I use food gel instead of liquid coloring?
Yes, gel food coloring works well and won’t alter the texture of the dough.
How do I make them without a mixer?
You can cream the butter by hand using a sturdy spoon and mix the dough with your hands. It’s a bit more work, but totally doable.
Do they taste better over time?
Yes! A few days after drying, the flavor often deepens slightly, and the texture improves.
Can I double the recipe?
Definitely. Just be sure to divide the dough before adding color so you can manage the portions easily.
Conclusion
Old-Fashioned Butter Mints are a sweet, creamy throwback treat that’s as delightful to make as it is to share. With just a handful of ingredients and a little patience, you can create something timeless, colorful, and completely customizable. Whether you’re preparing them for a celebration or just to have a nostalgic treat on hand, these mints are sure to charm everyone who tries them.

Old-Fashioned Butter Mints
- Total Time: 12 hours 45 minutes
- Yield: About 150 mints
- Diet: Vegetarian
Description
These Old-Fashioned Butter Mints are soft, creamy, and melt-in-your-mouth delicious. A nostalgic, pastel-hued candy that’s perfect for holidays, weddings, baby showers, or just a sweet homemade treat. Made with real butter, peppermint extract, and powdered sugar, this easy recipe brings vintage charm to your dessert table. Ideal for make-ahead gifts or party favors, it’s a quick breakfast table addition, an easy dinner finale, or a healthy snack alternative when made with natural ingredients. A standout among food ideas, breakfast ideas, and classic candy favorites.
Ingredients
1/2 cup unsalted butter, softened
2 cups powdered sugar, sifted (plus more if needed)
1 tablespoon heavy cream
1/2 teaspoon peppermint extract
1 pinch salt
Optional: food coloring (a drop or two per batch)
Instructions
1. In a large bowl, beat the softened butter until light and fluffy.
2. Add peppermint extract and heavy cream. Mix until well combined.
3. Gradually add powdered sugar, mixing continuously until a dough forms.
4. Knead the dough by hand until smooth and pliable.
5. Divide dough if using different colors and knead food coloring into each portion.
6. Roll dough into 1/2-inch ropes and cut into small pillow-shaped pieces.
7. Spread pieces on parchment-lined tray and let dry at room temperature for at least 12 hours.
8. Once dried, store in airtight containers.
Notes
Make sure your butter is fully softened before beating to ensure a smooth dough.
If the dough feels sticky while shaping, dust with a bit more powdered sugar.
Use gel food coloring for more vibrant colors without changing dough consistency.
- Prep Time: 45 minutes
- Cook Time: 0 minutes
- Category: Candy
- Method: No-Bake
- Cuisine: American
Nutrition
- Serving Size: 5 pieces
- Calories: 110
- Sugar: 14g
- Sodium: 5mg
- Fat: 6g
- Saturated Fat: 3.5g
- Unsaturated Fat: 2g
- Trans Fat: 0g
- Carbohydrates: 15g
- Fiber: 0g
- Protein: 0g
- Cholesterol: 15mg