

Pear salad might sound unusual at first, but it’s a surprisingly delightful combination of sweet and savory flavors. This simple yet elegant dish has been a favorite at family gatherings, potlucks, and holiday meals. The juicy sweetness of canned pears, paired with creamy mayonnaise, sharp cheddar cheese, and a maraschino cherry on top, creates a refreshing contrast that’s sure to leave an impression.
What’s even better is that pear salad is a quick and easy dish to prepare. Whether you’re looking for a unique side for a dinner party or just want something light and satisfying, this recipe is a great option. The ingredients are simple and easy to find, making this salad a hassle-free treat to enjoy any time of year.
Why You’ll Love This Pear Salad
This pear salad is one of those dishes that always manages to surprise people. Its unexpected combination of flavors and textures will have everyone asking for the recipe. The cool, crisp pear contrasts beautifully with the creamy mayonnaise and sharp cheddar cheese, and the maraschino cherry adds a touch of sweetness and a pop of color. It’s both visually stunning and absolutely delicious. Plus, it’s a fun twist on traditional salads, making it the perfect choice for any occasion!
What Kind of Pears Should I Use for Pear Salad?
For this pear salad, canned pears are the go-to option because they provide the right balance of sweetness and juiciness, which is key to the dish. They’re also more tender and easy to work with, perfect for pairing with the creamy dressing and cheese. Look for pears packed in syrup or juice rather than in heavy syrup for a more balanced sweetness. If you prefer fresh pears, feel free to use them, but make sure they are ripe and sliced thinly to maintain the salad’s delicate texture.
Options for Substitutions
If you want to get creative or need to work with what you have on hand, there are a few substitutions you can try. Here are some options:
- Mayonnaise: If you’re not a fan of mayo, you can substitute it with Greek yogurt or sour cream for a lighter and tangier version.
- Cheese: While sharp cheddar cheese is traditional, you can switch it up with other cheeses like Swiss, mozzarella, or even a creamy goat cheese for a different flavor profile.
- Maraschino Cherries: If you prefer a more natural topping, you could use fresh cherries, cranberries, or even small pieces of dried fruit to decorate the salad.
- Lettuce: Instead of iceberg lettuce, you can opt for a bed of arugula or spinach for a slightly peppery taste and more nutritional benefits.
Ingredients for This Pear Salad
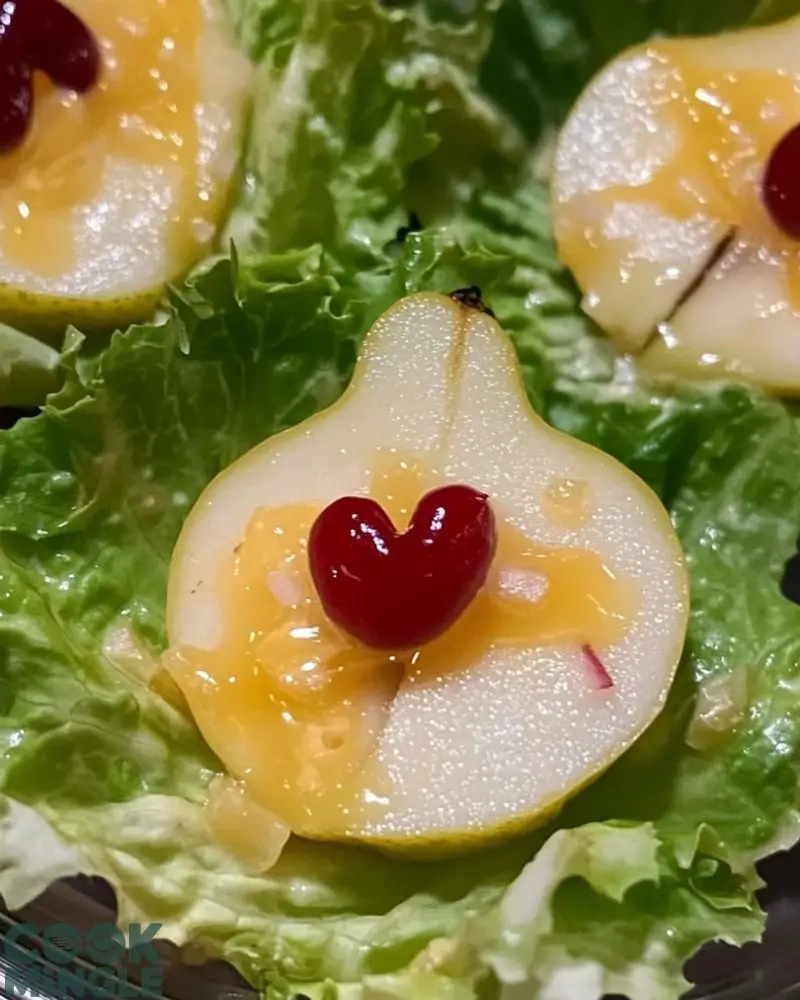
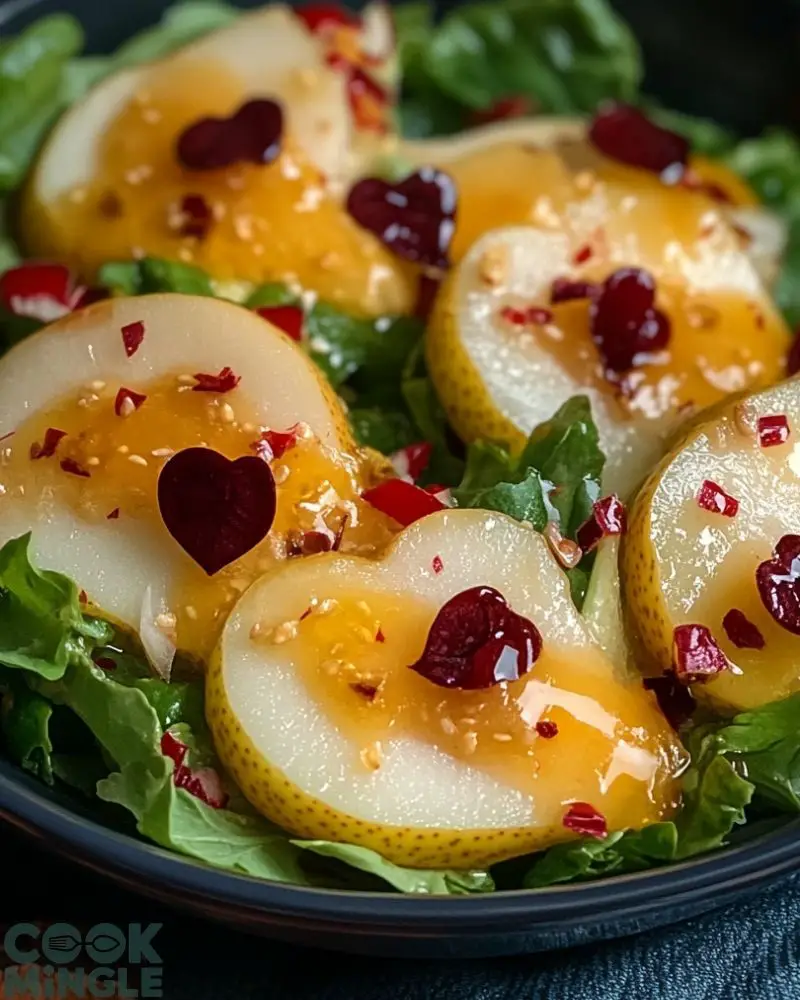
- Canned Pears: The star ingredient of this dish, canned pears add a sweet, juicy flavor that pairs perfectly with the savory elements of the salad.
- Mayonnaise: Used as the creamy base, mayo binds everything together and adds richness to the salad.
- Cheddar Cheese: Sharp cheddar provides a contrasting, tangy flavor that balances the sweetness of the pears and the creaminess of the mayo.
- Maraschino Cherries: These are used as a garnish, adding a touch of sweetness and a burst of color to the dish.
- Lettuce: A crisp base that holds everything in place and adds a fresh texture to the salad.
Step 1: Prepare the Lettuce
Start by washing and drying the lettuce leaves. Lay them out on a serving platter to create a crisp, fresh base for the pear salad. Make sure the leaves are large enough to hold the pears comfortably.
Step 2: Drain the Pears
Open the can of pears and drain the syrup or juice. Gently pat them dry with a paper towel to remove excess moisture, ensuring they won’t make the salad too soggy.
Step 3: Assemble the Salad
Place one pear half on each lettuce leaf. Spoon a dollop of mayonnaise on top of each pear, spreading it evenly. Be generous with the mayo, as it will provide the creamy texture that ties the flavors together.
Step 4: Add the Cheese
Sprinkle the shredded cheddar cheese over the mayonnaise-covered pears. Make sure to cover each one evenly with cheese, allowing the sharpness to complement the sweetness of the pears.
Step 5: Garnish with Cherries
Top each pear with a maraschino cherry for that signature burst of color and sweetness. The cherry not only adds flavor but also enhances the visual appeal of the salad.
Step 6: Serve and Enjoy
Once all the pears are assembled, you’re ready to serve! This pear salad can be enjoyed right away, or chilled for a bit in the refrigerator for extra refreshment.
How Long to Cook the Pear Salad
The great thing about this pear salad is that it requires no cooking! It’s all about assembling the ingredients. However, if you prefer to chill it before serving, place the salad in the fridge for about 30 minutes to an hour to allow the flavors to meld together. This will make the salad even more refreshing.
Tips for Perfect Pear Salad
- Choose the right pears: If you’re using fresh pears, ensure they’re ripe but not overly soft. If using canned pears, opt for those in juice or light syrup for a balanced sweetness.
- Make it ahead: The pear salad can be prepared in advance, but it’s best to add the cherries right before serving to keep them fresh and vibrant.
- Use good quality mayo: For the best flavor, choose a high-quality mayonnaise. You can also experiment with flavored mayos like garlic or Dijon for an extra twist.
- Shred the cheese: For better texture and flavor, shred your cheddar cheese yourself rather than using pre-shredded cheese, which can be less flavorful.
By following these tips, you’ll ensure your pear salad turns out perfectly every time!
Watch Out for These Mistakes While Cooking
- Overworking the Pears: Be careful not to mash or break the pear halves when assembling. Handle them gently to maintain their shape and texture.
- Using Too Much Mayonnaise: While the mayo adds creaminess, it’s important not to overwhelm the dish. Use just enough to coat the pears without drowning them.
- Choosing Underripe Pears: If you’re using fresh pears, make sure they are ripe but not too soft. Under-ripe pears can be too firm and less flavorful, which might alter the salad’s overall taste.
- Skipping the Chill Time: Although this salad doesn’t require cooking, chilling it for a while enhances the flavors and textures. Don’t skip this step if you can spare the time.
What to Serve With Pear Salad?
1. Grilled Chicken
Pair this refreshing salad with grilled chicken for a light and healthy meal. The savory flavor of the chicken complements the sweet pears.
2. Ham Sandwiches
The saltiness of ham sandwiches pairs wonderfully with the sweetness of the pear salad, creating a balanced meal.
3. Roasted Vegetables
Roasted carrots, Brussels sprouts, or potatoes work well as a side dish to balance the freshness of the pear salad.
4. Quiche
A classic, savory quiche can add a rich and satisfying element to your meal alongside the lightness of pear salad.
5. Pork Tenderloin
Roast or grill pork tenderloin to serve with your pear salad. The tender, juicy pork offers a savory contrast to the sweet and creamy salad.
6. Shrimp Skewers
Shrimp skewers, either grilled or lightly seared, are another excellent choice. Their delicate flavor complements the creamy texture of the pear salad.
7. Fresh Bread
Serve this pear salad with a loaf of fresh, crusty bread to soak up any leftover mayo or juice from the pears.
8. Fruit Platter
Pair the pear salad with a colorful fruit platter, creating a light and refreshing meal with varied textures and flavors.
Storage Instructions (and Reheating if Applicable)
Since this pear salad contains fresh ingredients like lettuce and maraschino cherries, it’s best served fresh. However, if you have leftovers, store them in an airtight container in the refrigerator. The salad will keep for up to 1-2 days. Keep in mind that the lettuce will start to wilt and lose its crispness over time, so it’s best enjoyed within a day.
If you’ve made the salad ahead of time and plan to serve it later, you can prep the pear and mayo mixture, but hold off on adding the lettuce and cherry until right before serving to ensure the salad remains crisp.
Note: Reheating is not recommended, as the salad’s texture and freshness will be compromised.
Estimated Nutrition
This pear salad is a light and satisfying option that’s not too heavy on calories. Here’s an approximate breakdown per serving:
- Calories: 150-200 calories per serving
- Carbohydrates: 20-25 grams (mainly from pears)
- Protein: 2-3 grams (mostly from cheese)
- Fat: 10-15 grams (from mayonnaise and cheese)
- Fiber: 2 grams (from pears and lettuce)
This makes it a great side dish or light snack for those looking to enjoy a delicious yet moderately low-calorie option!
Frequently Asked Questions
1. Can I use fresh pears instead of canned pears?
Yes, you can definitely use fresh pears! Just make sure they are ripe and sliced thinly. Keep in mind that canned pears provide a softer, sweeter texture, while fresh pears will be a bit firmer.
2. How long can I store pear salad?
Pear salad is best enjoyed fresh, but it will last in the fridge for 1-2 days. The lettuce will start to wilt after that, so it’s ideal to eat it sooner rather than later.
3. Can I substitute the mayonnaise?
Yes! You can substitute the mayo with Greek yogurt, sour cream, or a mixture of both for a lighter version of the salad. These alternatives will provide a tangy flavor while still offering creaminess.
4. Can I add other fruits to the salad?
Absolutely! You can mix in other fruits like grapes, apples, or even pineapple for a fruity twist. Just make sure the flavors complement the pears.
5. Is this salad gluten-free?
Yes, this pear salad is naturally gluten-free as it does not contain any wheat or gluten-based ingredients.
6. Can I make pear salad ahead of time?
Yes, you can prep the pear and mayo mixture ahead of time and store it in the fridge. Just wait until right before serving to add the lettuce and cherry garnish.
7. What other cheeses can I use besides cheddar?
While sharp cheddar is traditional, you can use cheeses like Swiss, mozzarella, or even goat cheese for a different flavor profile. Choose a cheese that balances well with the sweetness of the pears.
8. Can I serve pear salad at a party or potluck?
Definitely! This salad is a great addition to any party or potluck. It’s easy to transport and sure to be a crowd-pleaser with its unique combination of flavors.
Conclusion
Pear salad is the perfect dish for those who enjoy a mix of sweet and savory flavors. Whether you’re looking for a unique side dish for dinner or a fun addition to a party, this recipe is sure to impress. If you loved this refreshing pear salad, make sure to save it on Pinterest and share it with your family and friends! It’s a recipe they’ll love to try too.

Pear Salad: A Refreshing Twist on a Classic Dish
- Total Time: 10 minutes
- Yield: 6-8 servings
Description
This refreshing pear salad is a delightful combination of sweet canned pears, creamy mayonnaise, sharp cheddar cheese, and a maraschino cherry. It’s easy to make and perfect for any gathering or as a light snack.
Ingredients
- Canned Pears (1 can, halves)
- Mayonnaise (1/2 cup)
- Shredded Cheddar Cheese (1/2 cup)
- Maraschino Cherries (1 jar)
- Lettuce (for serving)
Instructions
- Prepare the Lettuce: Wash and dry the lettuce leaves. Arrange them on a serving platter.
- Drain the Pears: Open the can of pears and drain the syrup or juice. Pat them dry with paper towels.
- Assemble the Salad: Place a pear half on each lettuce leaf. Add a generous dollop of mayonnaise on top of each pear.
- Add the Cheese: Sprinkle shredded cheddar cheese over the mayonnaise on each pear.
- Garnish with Cherries: Place a maraschino cherry on top of each pear for garnish.
- Serve and Enjoy: Serve immediately or chill for 30 minutes before serving for an even fresher taste.
- Prep Time: 10 minutes