

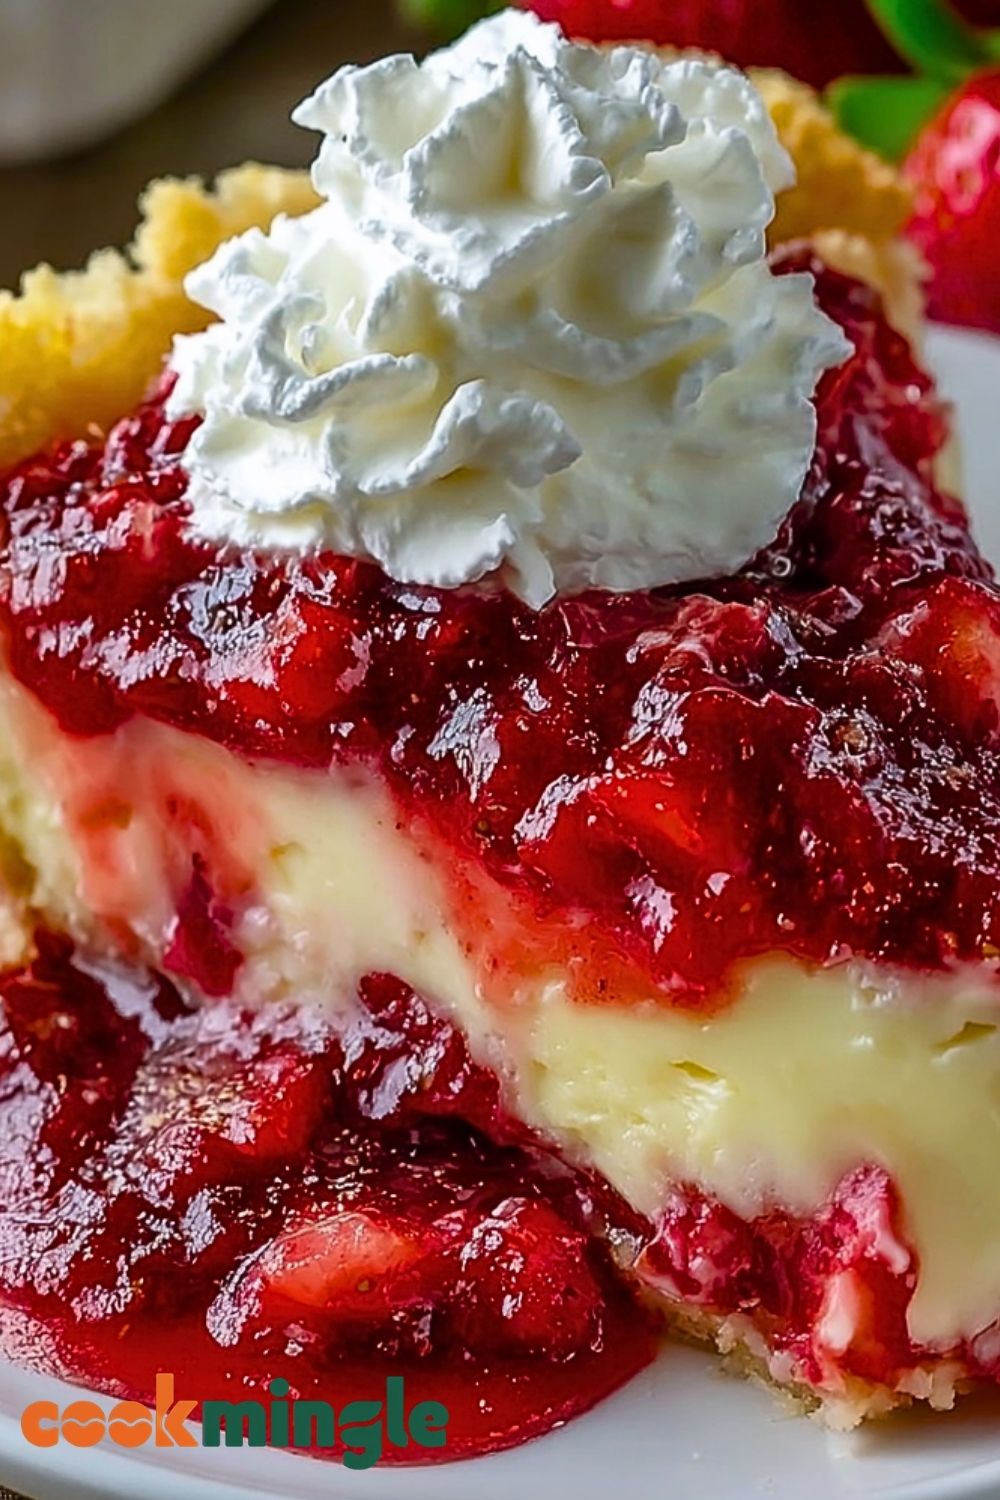
This Strawberry Cheesecake Dump Cake is a luscious fusion of creamy cheesecake filling, sweet strawberries, and a golden buttery crumble that comes together with minimal effort. It’s the kind of dessert that looks like it took hours to make but actually relies on a clever layering method that lets the oven do most of the work. Whether you’re hosting a gathering or just treating yourself to something indulgent, this cake hits the sweet spot between simplicity and show-stopping flavor.

The juicy strawberries add a bright, fruity contrast to the rich cheesecake layer, while the crumbly cake topping brings a satisfying crunch to each bite. And let’s not forget the finishing touch — a generous dollop of whipped cream that makes it irresistible. Best of all, it’s a dump-and-bake dessert, meaning everything goes straight into the baking dish with hardly any mixing. It’s perfect for busy bakers, last-minute plans, or anyone who wants to whip up a crowd-pleaser without breaking a sweat.
Why You’ll Love This Strawberry Cheesecake Dump Cake
- Combines the rich creaminess of cheesecake with the fruity sweetness of strawberries.
- Only a handful of ingredients and minimal prep time.
- Ideal for parties, potlucks, or weekend treats.
- No mixing bowls needed — just dump, layer, and bake.
- Serves beautifully with whipped cream or vanilla ice cream.
Preparation Phase & Tools to Use
To make this cake efficiently, you’ll need a few key tools:
- 9×13-inch baking dish: This size is essential to ensure even layers and proper baking. A glass or ceramic dish works best for even heat distribution.
- Spatula or spoon: To gently spread the layers without mixing them together.
- Can opener: For opening canned strawberry pie filling if you’re going that route.
- Measuring cups: Precision matters to ensure the right balance of creamy and crumbly.
- Oven mitts: Since you’ll be working with a hot dish, safety is key.
Each tool plays a role in keeping this dump cake as simple and mess-free as possible.
Preparation Tips
To get the best results, start by spraying your baking dish with non-stick spray to avoid sticking. When layering the ingredients, be gentle with the cheesecake mixture to keep its texture intact. Pour the cake mix evenly across the top, but don’t stir — that’s the beauty of a dump cake. Drizzle the melted butter across the dry mix as evenly as possible for the perfect golden top. And if you’re using frozen strawberries instead of canned filling, make sure they’re thawed and drained to prevent excess moisture. A little care in layering goes a long way in creating a dessert that’s both beautiful and delicious.
Ingredients for this Strawberry Cheesecake Dump Cake
- 1 can (21 oz) strawberry pie filling (or 2 cups fresh chopped strawberries with 1/4 cup sugar)
- 1 package (8 oz) cream cheese, softened
- 1/3 cup granulated sugar
- 1 tsp vanilla extract
- 1 box (15.25 oz) white or yellow cake mix
- 1/2 cup (1 stick) unsalted butter, melted
- Optional: Whipped cream for topping
- Optional: Fresh strawberries for garnish
Step 1: Prepare the Baking Dish
Preheat your oven to 350°F (175°C). Lightly grease a 9×13-inch baking dish with non-stick cooking spray. This will help prevent sticking and make for easier cleanup.
Step 2: Spread the Strawberry Layer
Pour the strawberry pie filling (or the sugared fresh strawberries) evenly into the bottom of the prepared dish. Use a spoon or spatula to make sure it’s spread in a smooth, even layer that covers the entire base.
Step 3: Add the Cheesecake Mixture
In a medium bowl, beat the softened cream cheese, granulated sugar, and vanilla extract until smooth and creamy. Drop spoonfuls of the cheesecake mixture over the strawberry layer. You don’t need to spread it perfectly — it will melt and blend beautifully as it bakes.
Step 4: Layer the Cake Mix
Sprinkle the dry cake mix directly over the cream cheese and strawberries. Make sure it’s evenly distributed across the entire surface. Do not mix the layers together.
Step 5: Add Melted Butter
Drizzle the melted butter slowly and evenly over the top of the cake mix. This step is key for creating that golden, crumbly topping. If there are dry spots after baking, you can add a touch more melted butter toward the end.
Step 6: Bake
Place the baking dish into the preheated oven and bake for 45-50 minutes, or until the top is golden and the edges are bubbling. Keep an eye on it starting around the 40-minute mark to avoid over-baking.
Step 7: Cool and Serve
Let the dump cake cool for at least 15-20 minutes before serving. This allows the layers to set a bit and makes serving easier. Top with a swirl of whipped cream and garnish with fresh strawberries if desired. Serve warm or chilled.
Notes
Strawberry Cheesecake Dump Cake is best enjoyed slightly warm or fully chilled depending on your preference. The flavors meld beautifully after a few hours in the fridge, making it an excellent make-ahead dessert. If you’re using fresh strawberries instead of canned pie filling, be sure to sweeten and slightly macerate them for a juicier result. You can even experiment with flavors by trying blueberry or cherry pie filling in place of strawberries. For a lighter option, reduce the amount of cake mix or butter slightly, but note it may affect the texture.
Watch Out for These Mistakes While Cooking
- Uneven butter distribution: If the melted butter isn’t evenly drizzled, some parts of the cake mix may remain dry and powdery.
- Overbaking: The edges should be golden and bubbly, but baking too long can lead to a dry topping and burnt edges.
- Skipping the cream cheese softening: Cold cream cheese won’t blend smoothly, leading to lumps in the cheesecake layer.
- Stirring the layers: Resist the urge to mix after layering. The separation is what gives this dump cake its iconic texture.
- Using too much fresh fruit: If substituting fresh strawberries, using more than 2 cups can result in excess liquid and a soggy bottom.
Storage Instructions
Store leftover Strawberry Cheesecake Dump Cake covered in the refrigerator for up to 4 days. Use an airtight container or tightly wrap the baking dish with plastic wrap or foil. To reheat, place a portion in the microwave for 20–30 seconds. You can also serve it chilled straight from the fridge. Freezing is possible for up to 2 months, but the texture may change slightly upon thawing, especially the cheesecake layer.
Estimated Nutrition
(Per serving, based on 12 servings)
- Calories: 320
- Total Fat: 18g
- Saturated Fat: 10g
- Cholesterol: 45mg
- Sodium: 290mg
- Total Carbohydrates: 38g
- Dietary Fiber: 1g
- Sugars: 25g
- Protein: 3g
Frequently Asked Questions
Can I use fresh strawberries instead of pie filling?
Yes, use about 2 cups of chopped strawberries mixed with 1/4 cup sugar to mimic pie filling.
Can I use a different type of cake mix?
Absolutely! Yellow cake mix is a classic choice, but white, vanilla, or even strawberry-flavored cake mix work well.
Can I make this dairy-free?
Yes, by using dairy-free cream cheese and a vegan butter substitute, though the texture may vary slightly.
How do I know when the cake is done?
The top should be golden and the edges bubbly. A few moist crumbs are fine, but it shouldn’t look raw.
Can I double the recipe?
Yes, but use two separate 9×13 pans for even baking.
Do I need to refrigerate the leftovers?
Yes, due to the cream cheese layer, refrigeration is necessary to keep it fresh.
Can I add nuts or coconut on top?
Definitely! Chopped pecans or shredded coconut can add extra flavor and texture to the topping.
Is this gluten-free?
Not by default, but you can make it gluten-free by using a certified gluten-free cake mix.
Conclusion
Strawberry Cheesecake Dump Cake is a dream dessert for both beginners and seasoned bakers. With minimal ingredients and effortless layering, it delivers a decadent treat perfect for any occasion. The rich cream cheese, juicy strawberries, and buttery cake topping combine into a crowd-pleasing masterpiece. Whether you serve it warm with a scoop of ice cream or chilled with whipped cream, this dump cake will have everyone asking for seconds.
Strawberry Cheesecake Dump Cake
- Total Time: 55 minutes
- Yield: 12 servings
- Diet: Vegetarian
Description
Craving a dessert that’s rich, fruity, and ridiculously easy to make? This *Strawberry Cheesecake Dump Cake* is your answer. It’s a quick dessert recipe that fuses creamy cheesecake with sweet strawberry pie filling and a buttery cake topping. Whether you’re in need of easy dinner desserts, birthday food ideas, or just exploring new breakfast ideas (yes, cake counts!), this recipe delivers. It’s the perfect no-fuss solution for last-minute gatherings or when you’re short on time but still want a showstopper.
Ingredients
21 oz strawberry pie filling
8 oz cream cheese, softened
1/3 cup granulated sugar
1 tsp vanilla extract
15.25 oz white or yellow cake mix
1/2 cup unsalted butter, melted
Optional whipped cream for topping
Optional fresh strawberries for garnish
Instructions
1. Preheat your oven to 350°F (175°C) and lightly grease a 9×13-inch baking dish.
2. Spread the strawberry pie filling evenly across the bottom of the dish.
3. In a bowl, beat the softened cream cheese with sugar and vanilla until smooth.
4. Drop spoonfuls of the cheesecake mixture over the strawberries without mixing.
5. Evenly sprinkle the dry cake mix over the cream cheese and strawberries.
6. Slowly drizzle the melted butter over the cake mix to moisten it evenly.
7. Bake for 45–50 minutes or until the top is golden and bubbly around the edges.
8. Let it cool for 15–20 minutes before serving with whipped cream or garnishes.
Notes
Allow the dump cake to rest before serving to help the layers set properly.
Make sure to drizzle the butter evenly to prevent dry patches in the topping.
For best results with fresh strawberries, let them macerate in sugar before use.
- Prep Time: 10 minutes
- Cook Time: 45 minutes
- Category: Dessert
- Method: Baking
- Cuisine: American
Nutrition
- Serving Size: 1 slice
- Calories: 320
- Sugar: 25g
- Sodium: 290mg
- Fat: 18g
- Saturated Fat: 10g
- Unsaturated Fat: 6g
- Trans Fat: 0g
- Carbohydrates: 38g
- Fiber: 1g
- Protein: 3g
- Cholesterol: 45mg