
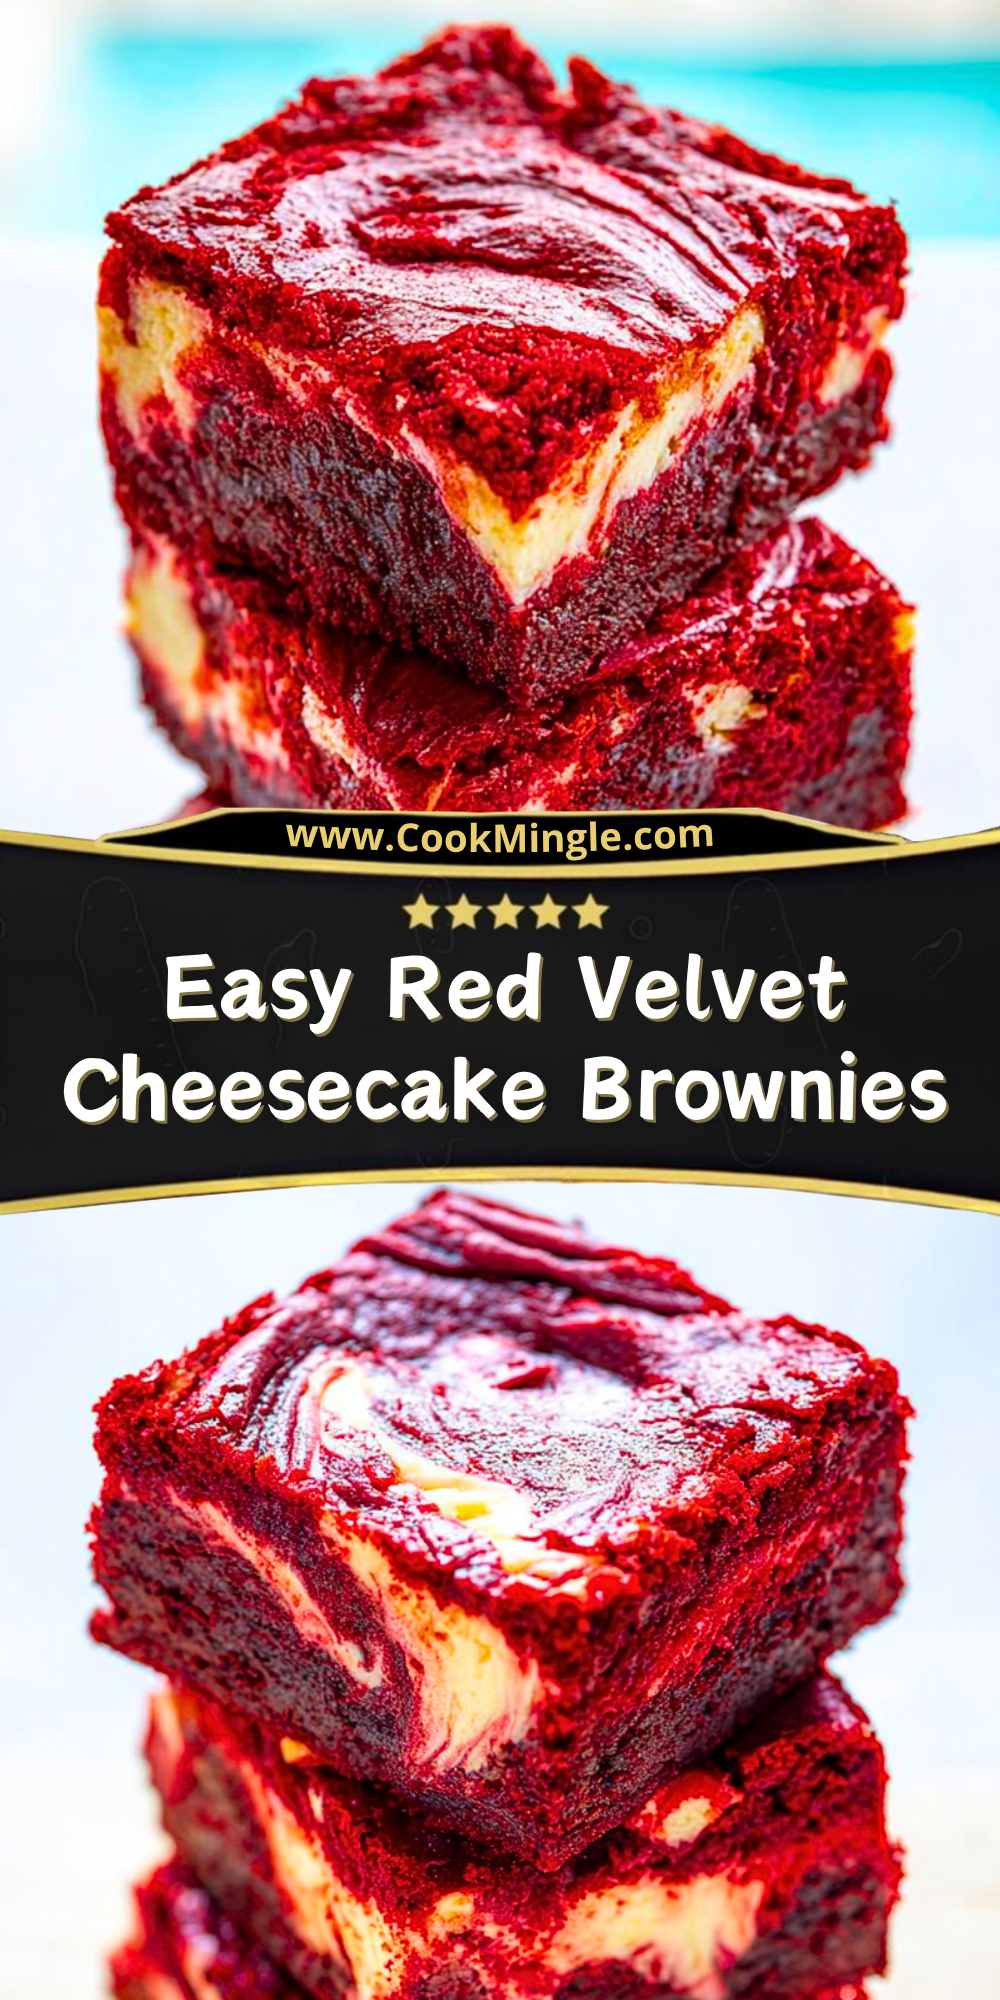
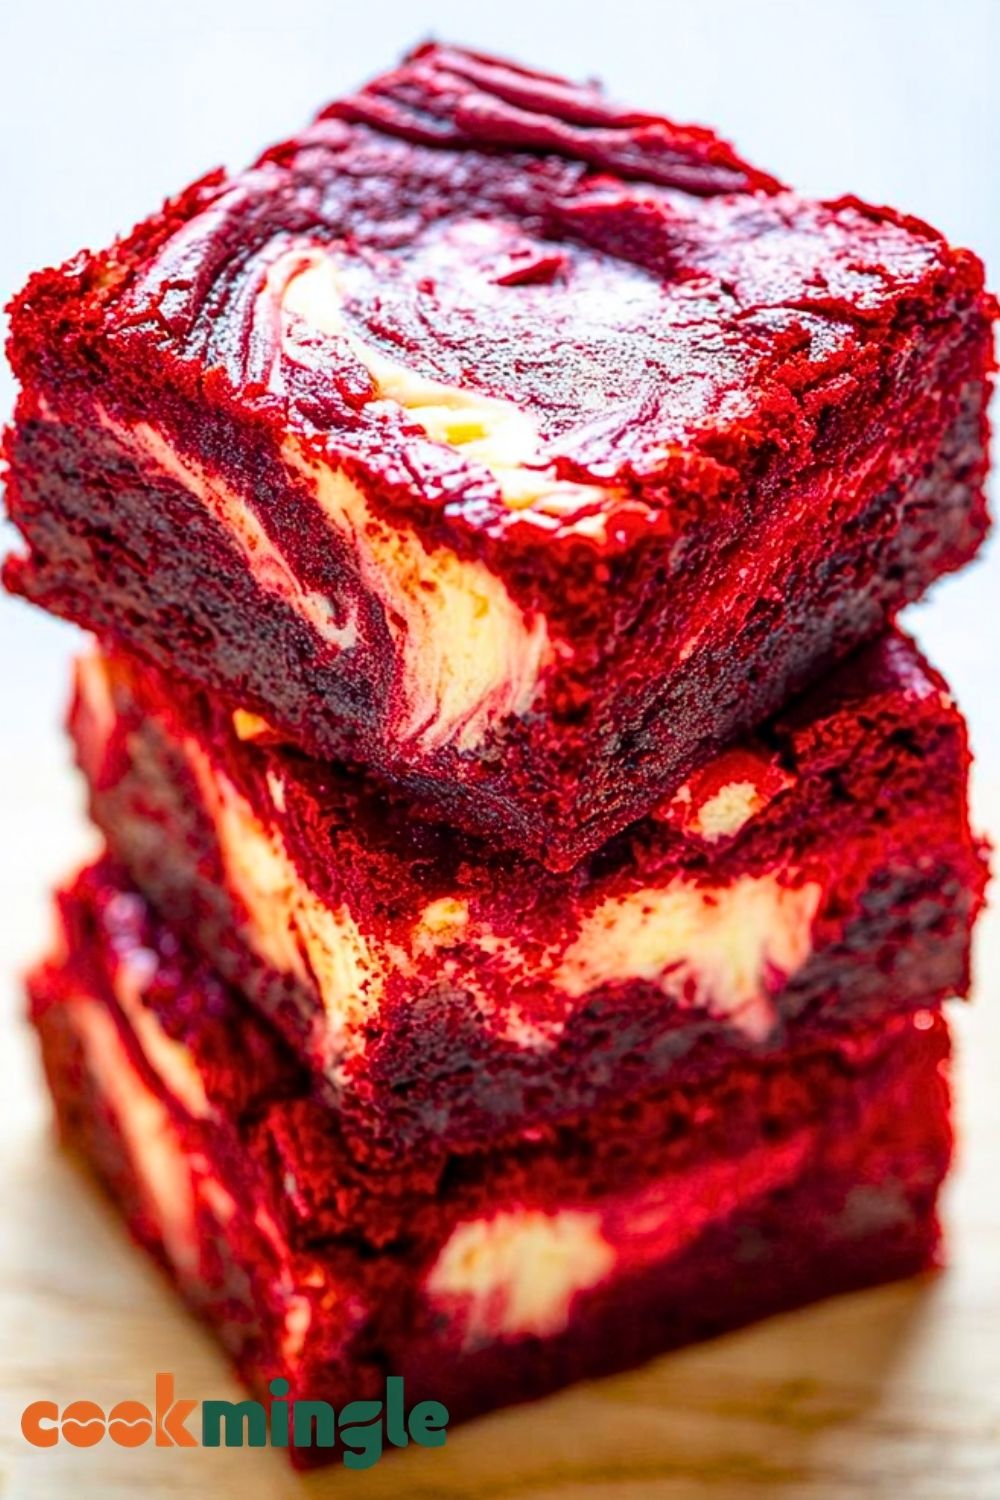
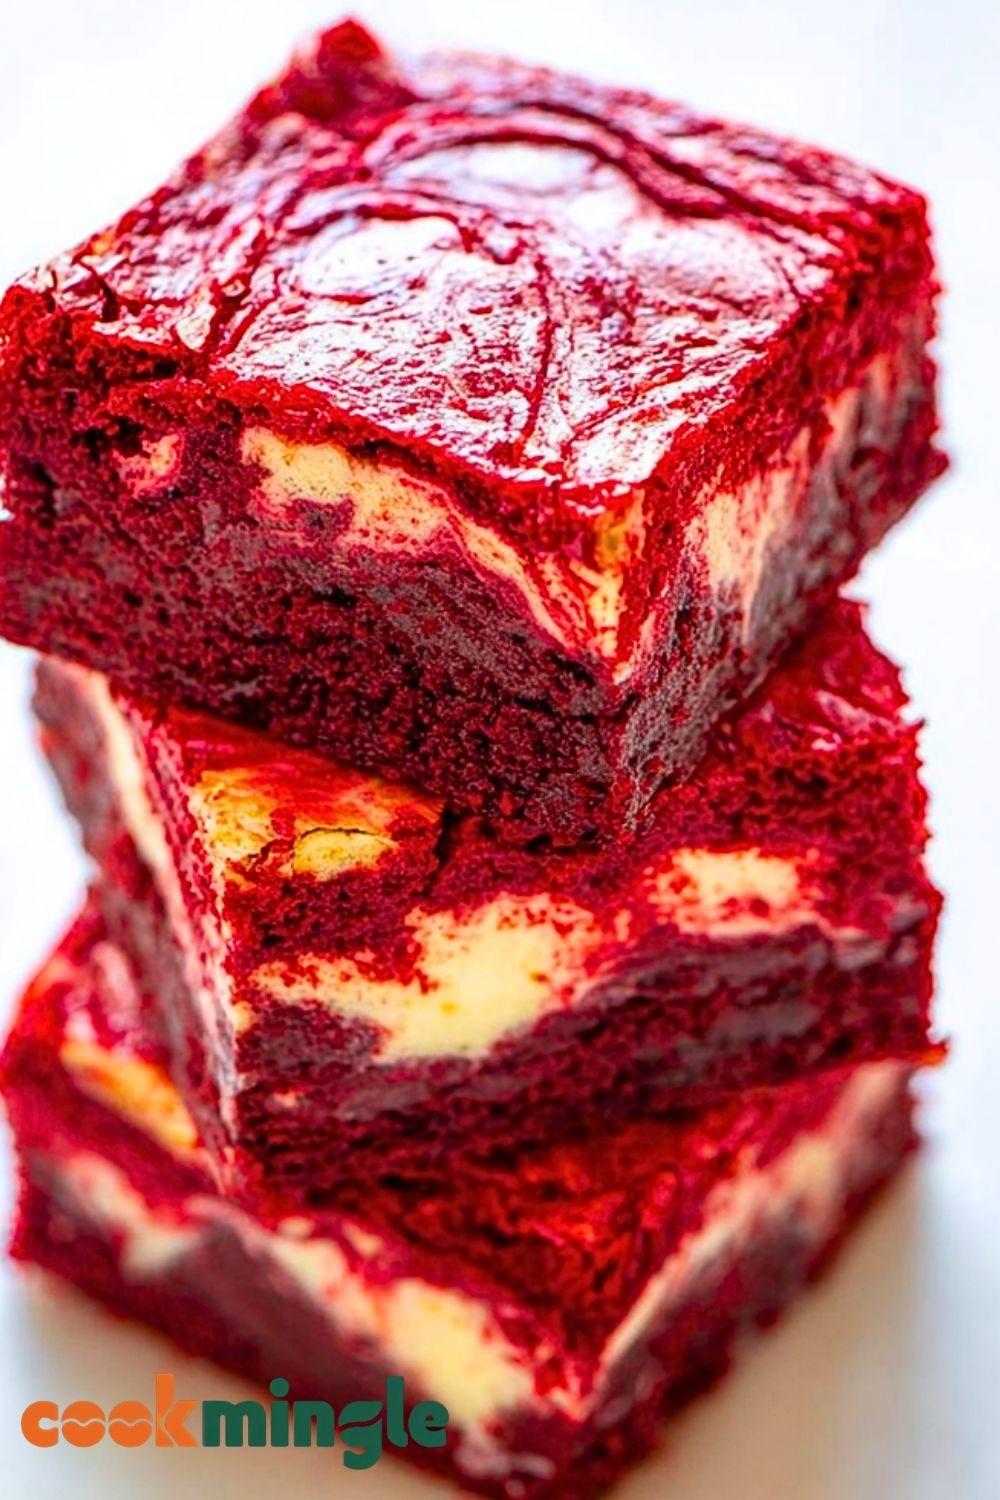
Red velvet desserts always catch my attention, especially when they combine the rich flavor of brownies with the creamy texture of cheesecake. The first time I made these Easy Red Velvet Cheesecake Brownies, I was amazed at how beautiful the swirled top looked fresh out of the oven. Every bite has the perfect balance of chocolate flavor, slight tanginess, and a smooth cheesecake layer that melts into the brownie base.
I also love how simple this dessert is to prepare without needing complicated baking techniques. Whether I’m making them for holidays, birthdays, Valentine’s Day, or just a weekend treat, these brownies always disappear quickly. They look bakery-worthy but come together with pantry staples and a few easy mixing steps.
Why You’ll Love This Easy Red Velvet Cheesecake Brownies Recipe
These brownies are soft, fudgy, and packed with classic red velvet flavor while the cheesecake swirl adds a creamy contrast that makes each square irresistible. The vibrant red color also makes them stand out on any dessert table.
Another reason I enjoy making this recipe is how versatile it is. You can serve these brownies chilled for a denser texture or slightly warm for an extra gooey bite. They’re ideal for parties, potlucks, or simply satisfying a sweet craving at home.
The recipe is beginner-friendly and doesn’t require special equipment beyond a mixing bowl and baking pan. Even if you’re not an experienced baker, you can still create beautiful swirls and rich layers with ease.
What Makes Easy Red Velvet Cheesecake Brownies So Fudgy?
The secret to the incredibly fudgy texture comes from the balance of butter, cocoa powder, and minimal flour in the brownie batter. Red velvet brownies are meant to stay dense and moist instead of cakey, which gives them that rich bakery-style bite.
The cheesecake mixture also plays an important role by adding extra creaminess throughout the brownies. As the layers bake together, the cheesecake swirl keeps the center soft and luscious while creating a beautiful marbled effect on top.
Another important factor is avoiding overbaking. Pulling the brownies out when the center is just slightly set helps preserve that gooey texture after cooling.
Options for Substitutions
If you prefer a deeper chocolate flavor, you can replace part of the cocoa powder with melted dark chocolate. This gives the brownies an even richer taste while keeping the texture fudgy.
Cream cheese can be swapped with mascarpone for a smoother and slightly sweeter cheesecake layer. Greek yogurt cream cheese also works well if you want a lighter option.
For a gluten-free version, use a one-to-one gluten-free flour blend instead of regular flour. The brownies still maintain their dense texture with this substitution.
You can also experiment with natural food coloring alternatives like beet powder if you prefer avoiding artificial coloring. The shade may be softer, but the brownies will still have that signature red velvet appearance.
White chocolate chips, dark chocolate chunks, or chopped pecans can also be mixed into the batter for extra texture and flavor.
Ingredients for This Easy Red Velvet Cheesecake Brownies Recipe
Unsalted Butter
Butter gives these brownies their rich and fudgy texture. It also helps create a smooth batter that stays moist after baking.
Granulated Sugar
Sugar sweetens the brownies while also contributing to the soft and chewy consistency that makes red velvet brownies so satisfying.
Eggs
Eggs help bind the batter together and create structure in both the brownie layer and cheesecake swirl.
Vanilla Extract
Vanilla enhances the chocolate flavor in the brownies while adding warmth and depth to the cheesecake mixture.
Unsweetened Cocoa Powder
Cocoa powder gives red velvet brownies their subtle chocolate flavor without overpowering the tangy cheesecake topping.
Red Food Coloring
This ingredient creates the signature vibrant red velvet appearance that makes these brownies visually stunning.
All-Purpose Flour
Flour provides structure to the brownies while still keeping them soft and dense.
Salt
A small amount of salt balances the sweetness and brings out the richness of the chocolate and cream cheese.
Cream Cheese
Cream cheese creates the luscious cheesecake swirl layer that makes these brownies creamy and decadent.
Powdered Sugar
Powdered sugar sweetens the cheesecake mixture while keeping it silky smooth without graininess.
White Chocolate Chips (Optional)
White chocolate chips add creamy sweetness and pair beautifully with the slight cocoa flavor of red velvet.
Dark Chocolate Chunks (Optional)
Dark chocolate chunks make the brownies extra indulgent and provide pockets of melted chocolate throughout.
Step 1: Prepare the Baking Pan
Start by preheating your oven to 350°F. Line an 8×8-inch baking pan with parchment paper, leaving extra paper hanging over the sides for easy removal later.
Lightly grease the parchment paper with butter or nonstick spray to prevent sticking. Preparing the pan properly helps the brownies bake evenly and makes slicing much easier after cooling.
Step 2: Melt the Butter
Place the butter in a microwave-safe bowl or small saucepan and melt it until completely smooth. Allow it to cool slightly before mixing with the other ingredients.
Warm melted butter blends more evenly into the batter and creates that dense, fudgy brownie texture.
Step 3: Mix the Brownie Batter
In a large mixing bowl, whisk together the melted butter and granulated sugar until smooth and glossy. Add the eggs one at a time, mixing thoroughly after each addition.
Stir in the vanilla extract, cocoa powder, and red food coloring. The batter should become rich in color and smooth in texture.
Gradually fold in the flour and salt. Avoid overmixing because too much stirring can make the brownies tough instead of soft and fudgy.
If using white chocolate chips or dark chocolate chunks, gently fold them into the batter at this stage.
Step 4: Prepare the Cheesecake Mixture
In a separate bowl, beat the cream cheese until completely smooth and creamy. Add the powdered sugar, egg, and vanilla extract.
Continue mixing until the cheesecake filling becomes silky and lump-free. A smooth cheesecake layer creates the most beautiful swirls on top of the brownies.
Step 5: Layer the Batter
Pour most of the red velvet brownie batter into the prepared baking pan, reserving a few spoonfuls for the top.
Spread the batter evenly using a spatula to ensure the brownies bake uniformly.
Carefully spoon the cheesecake mixture over the brownie layer and smooth it gently across the surface.
Drop the remaining brownie batter in small spoonfuls over the cheesecake layer.
Step 6: Create the Swirl Effect
Use a butter knife or skewer to gently swirl the brownie batter and cheesecake mixture together.
Move the knife in circular or figure-eight motions to create a marbled pattern without overmixing the layers. The swirls will become even more striking after baking.
Step 7: Bake the Brownies
Place the pan into the preheated oven and bake for approximately 30 to 35 minutes.
The edges should look set while the center remains slightly soft. A toothpick inserted into the middle should come out with a few moist crumbs rather than wet batter.
Avoid overbaking because the brownies continue to firm up as they cool.
Step 8: Cool Completely
Remove the brownies from the oven and allow them to cool in the pan for at least 30 minutes.
Transfer the pan to the refrigerator for another hour if you want cleaner slices and a firmer cheesecake layer.
Cooling fully helps the flavors develop and improves the texture significantly.
Step 9: Slice and Serve
Lift the brownies out of the pan using the parchment paper overhang.
Use a sharp knife to cut them into squares or rectangles. Wipe the knife clean between slices for neat bakery-style edges.
Serve chilled for a dense cheesecake texture or slightly warm for gooey, melt-in-your-mouth brownies.
Step 10: Add Final Touches
For an extra special presentation, drizzle melted white chocolate over the brownies or dust them lightly with powdered sugar.
Fresh berries, whipped cream, or a scoop of vanilla ice cream can also elevate these brownies into an impressive dessert for gatherings or celebrations.
Easy Red Velvet Cheesecake Brownies
How Long to Prepare Easy Red Velvet Cheesecake Brownies
Making these Easy Red Velvet Cheesecake Brownies does not require hours in the kitchen, which is one reason I enjoy baking them so often. Most of the preparation involves mixing the brownie batter, preparing the cheesecake swirl, and layering everything into the pan. The process is simple enough for beginner bakers while still delivering bakery-style results.
The total preparation time is usually around 15 to 20 minutes. If your cream cheese is softened ahead of time, the cheesecake filling comes together even faster and creates a smoother texture.
Preparation Time
The prep time for this recipe is approximately 20 minutes. During this stage, you’ll prepare the brownie batter, mix the cheesecake filling, line the baking pan, and create the signature swirl effect.
Baking Time
The brownies generally bake for 30 to 35 minutes at 350°F. Ovens may vary slightly, so it’s important to check the brownies near the end of baking time to avoid overbaking.
Cooling Time
Cooling is a very important step for achieving the best texture. Allow the brownies to cool at room temperature for at least 30 minutes before chilling them in the refrigerator for another hour.
Total Time
Including preparation, baking, and cooling, the entire process takes approximately 2 hours from start to finish. Much of that time is hands-off cooling time.
Tips for Perfect Easy Red Velvet Cheesecake Brownies
Use Room Temperature Ingredients
Softened cream cheese and room-temperature eggs blend much more smoothly into the batter. This prevents lumps and creates a silky cheesecake layer.
Don’t Overmix the Batter
Overmixing develops too much gluten in the flour, which can make the brownies cakey instead of dense and fudgy.
Use Gel Food Coloring for Vibrant Color
Gel food coloring produces a richer red shade without adding extra liquid to the batter.
Line the Pan With Parchment Paper
Parchment paper makes removing the brownies effortless and helps keep the edges clean when slicing.
Chill Before Cutting
Cold brownies slice more neatly and hold their shape better, especially because of the creamy cheesecake layer.
Swirl Gently
Creating swirls with a light hand keeps the cheesecake and brownie layers distinct while producing a beautiful marbled pattern.
Measure Flour Correctly
Too much flour can dry out the brownies. Spoon the flour into the measuring cup and level it off rather than scooping directly from the bag.
Use Quality Cocoa Powder
Even though red velvet has a mild chocolate flavor, quality cocoa powder improves the overall richness and depth of the brownies.
Watch Out for These Mistakes While Cooking
Overbaking the Brownies
One of the most common mistakes is leaving the brownies in the oven too long. Overbaked brownies lose their fudgy texture and become dry.
Using Cold Cream Cheese
Cold cream cheese creates lumps in the cheesecake layer that are difficult to smooth out.
Skipping the Cooling Process
Cutting the brownies while they are still warm can cause messy slices and soft centers that fall apart.
Over-Swirling the Layers
Mixing the layers too aggressively blends the colors together instead of creating a marbled effect.
Incorrect Pan Size
Using a pan larger than recommended makes the brownies thinner and may cause them to overbake quickly.
Adding Too Much Food Coloring
Excess food coloring can affect the flavor and texture of the brownies. A moderate amount is enough to create the signature red velvet look.
Not Testing for Doneness
Every oven bakes differently. Check the brownies with a toothpick near the center to ensure they are baked properly.
What to Serve With Easy Red Velvet Cheesecake Brownies?
Vanilla Ice Cream
A scoop of vanilla ice cream pairs beautifully with the rich chocolate flavor and creamy cheesecake swirl.
Fresh Strawberries
Fresh strawberries add brightness and a juicy contrast that complements the sweetness of the brownies.
Hot Coffee
The slight bitterness of coffee balances the sweetness of the dessert and enhances the cocoa flavor.
Whipped Cream
Light and airy whipped cream creates a soft contrast against the dense brownie texture.
Chocolate Drizzle
Warm chocolate sauce or ganache makes these brownies even more decadent and dessert-worthy.
Storage Instructions
Storing in the Refrigerator
Because of the cheesecake layer, these brownies should be stored in an airtight container in the refrigerator. They stay fresh for up to 5 days while maintaining their fudgy texture.
Freezing Instructions
These brownies freeze surprisingly well. Wrap individual squares tightly in plastic wrap and place them in a freezer-safe container.
They can be frozen for up to 3 months. Thaw overnight in the refrigerator before serving.
Serving After Storage
You can enjoy the brownies cold directly from the refrigerator or allow them to sit at room temperature for 15 to 20 minutes for a softer texture.
Preventing Dryness
Always keep the brownies tightly covered to prevent them from drying out or absorbing odors from the refrigerator.
Estimated Nutrition
Calories
Approximately 320 calories per brownie square depending on portion size and optional add-ins.
Carbohydrates
Each serving contains around 35 grams of carbohydrates from sugar, flour, and chocolate ingredients.
Protein
The eggs and cream cheese provide approximately 5 grams of protein per serving.
Fat
These brownies contain approximately 18 grams of fat due to the butter and cream cheese.
Sugar
Each brownie has around 24 grams of sugar, giving the dessert its sweet and indulgent flavor.
Fiber
The cocoa powder contributes a small amount of dietary fiber.
Sodium
A moderate amount of sodium helps balance the sweetness and enhance the chocolate flavor.
Frequently Asked Questions
Can I Make Easy Red Velvet Cheesecake Brownies Ahead of Time?
Yes, these brownies are excellent for making ahead because the flavor and texture improve after chilling.
Can I Freeze Red Velvet Cheesecake Brownies?
Absolutely. Wrap them individually and freeze for up to 3 months for easy desserts anytime.
Why Did My Cheesecake Layer Crack?
Cracking usually happens from overbaking or rapid temperature changes. Removing the brownies while the center is slightly soft helps prevent cracks.
Can I Use Boxed Red Velvet Mix?
Yes, you can use a boxed red velvet brownie or cake mix as a shortcut while still preparing the cheesecake swirl from scratch.
How Do I Get Clean Brownie Slices?
Use a sharp knife and wipe it clean between cuts. Chilling the brownies beforehand also helps create cleaner edges.
Conclusion
Easy Red Velvet Cheesecake Brownies combine everything people love about rich brownies and creamy cheesecake into one unforgettable dessert. The vibrant color, fudgy texture, and beautiful swirls make them ideal for holidays, parties, romantic dinners, or everyday baking.
I love how impressive these brownies look despite being surprisingly simple to prepare. With just a few basic ingredients and easy steps, you can create a dessert that tastes bakery-quality right from your own kitchen.
Whether you serve them chilled, warm, plain, or topped with ice cream, these brownies always deliver a decadent bite packed with flavor and texture. Once you try them, they’ll quickly become one of your favorite homemade desserts.
Easy Red Velvet Cheesecake Brownies
- Total Time: 1 hour 55 minutes
- Yield: 9 brownies
- Diet: Vegetarian
Description
These Easy Red Velvet Cheesecake Brownies are rich, fudgy, creamy, and packed with beautiful swirls of tangy cheesecake in every bite. They combine the classic flavor of red velvet cake with the dense texture of brownies, making them perfect for holidays, Valentine’s Day desserts, party treats, easy dessert recipes, and sweet snack ideas. Whether you need a quick dessert, easy baking recipe, or impressive homemade brownies, this recipe delivers bakery-style results with simple ingredients and easy preparation.
Ingredients
1 cup unsalted butter, melted
1 1/4 cups granulated sugar
2 large eggs
1 tablespoon vanilla extract
2 tablespoons unsweetened cocoa powder
1 tablespoon red food coloring
1 cup all-purpose flour
1/4 teaspoon salt
8 ounces cream cheese, softened
1/3 cup powdered sugar
1 large egg
1 teaspoon vanilla extract
1/2 cup white chocolate chips
1/2 cup dark chocolate chunks
Instructions
1. Preheat the oven to 350°F and line an 8×8-inch baking pan with parchment paper. Lightly grease the parchment paper for easy removal.
2. Melt the butter in a microwave-safe bowl or saucepan and allow it to cool slightly.
3. In a large bowl, whisk together the melted butter and granulated sugar until smooth and glossy.
4. Add the eggs one at a time, mixing thoroughly after each addition.
5. Stir in the vanilla extract, cocoa powder, and red food coloring until fully combined.
6. Fold in the flour and salt gently until no dry streaks remain.
7. Stir in the white chocolate chips and dark chocolate chunks if using.
8. In a separate bowl, beat the cream cheese until smooth.
9. Add the powdered sugar, egg, and vanilla extract to the cream cheese and mix until creamy and lump-free.
10. Pour most of the brownie batter into the prepared pan, reserving a few spoonfuls for the top.
11. Spread the cheesecake mixture evenly over the brownie batter.
12. Drop the remaining brownie batter over the cheesecake layer in small spoonfuls.
13. Use a knife or skewer to gently swirl the layers together to create a marbled effect.
14. Bake for 30 to 35 minutes or until the edges are set and the center is slightly soft.
15. Allow the brownies to cool at room temperature for 30 minutes, then chill in the refrigerator for at least 1 hour before slicing.
16. Slice into squares and serve chilled or slightly warm.
Notes
Use room-temperature cream cheese for the smoothest cheesecake layer and easier mixing.
Do not overbake the brownies because they continue to set while cooling and chilling.
For clean slices, chill the brownies completely and wipe the knife between cuts.
- Prep Time: 20 minutes
- Cook Time: 35 minutes
- Category: Dessert
- Method: Baking
- Cuisine: American
Nutrition
- Serving Size: 1 brownie
- Calories: 320
- Sugar: 24g
- Sodium: 190mg
- Fat: 18g
- Saturated Fat: 10g
- Unsaturated Fat: 6g
- Trans Fat: 0g
- Carbohydrates: 35g
- Fiber: 1g
- Protein: 5g
- Cholesterol: 70mg